Summary: How do I Convert MKV on Mac OS X 10.10 ? This article shows you how to do it in 4 simple steps. Get in to read the detail now!
How incredible that Mac OS X 10.9 hasn't been with us for long, but its successor Mac OS X 10.10 is coming to us! Mac OS X Yosemite comes with new features like improved Today view in Notification Center, brighter spotlight, Safari with new streamlined toolbar and so on.  If you have downloaded some MKV movies, you may consider converting these MKV to on Mac OS X 10.10 Yosemite for watching on iOS/Android/Windows-based tablet/phone and media players. In this case, a powerful MKV video converter for Mac OS X Yosemite is needed. Here I recommend Pavtube HD Video Converter for Mac, which is compatible with all Mac OS, including Mac OS X Tiger/Leopard/Snow Leopard/Lion/Mountain Lion/Mavericks 10.8/ Mavericks (10.9), and it is all set for the coming Mac OS X 10.10 Yosemite.
 Other Download: - Pavtube old official address: http://www.pavtube.com/hd-video-converter-mac/ - Amazon Store Download: http://www.amazon.com/Pavtube-Video-Converter-Mac-Download/dp/B00QI9GNZS - AppStore Download: https://itunes.apple.com/de/app/pavtube-hd-video-converter/id502792488?mt=12 - Cnet Download: http://download.cnet.com/Pavtube-HD-Video-Converter/3000-2194_4-76177786.html It is the best choice to convert MKV videos on OS X 10.10 Yosemite with: - Fastest speed: the kernel perfectly compatible with Yosemite makes the mkv converting speed even faster. - Powerful video compatibility: It is capable of handling all SD, HD and 4K UHD videos including all kinds of MKV videos. - First-class output quality: With High Quality Engine, it keeps the original video audio effect to the utmost during converting mkv on Mac OS X Yosemite at one go. First, you need to download and install the app. Converting MKV video on Mac OS X (10.10) will be as easy as pie for such professional MKV Video Converter for Mac OS X 10.10 Yosemite. Follow the steps below. Step 1. Run Pavtube HD Video Converter for Mac on your computer, click “Add Video” button or just drag and drop to import MKV files.
 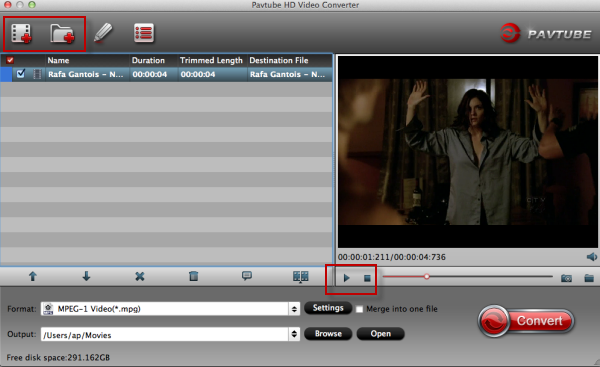 Step2. Edit (optional). You can edit the video if you want.(Include Trim, Effect, Crop, Add Watermark, Add Subtitle etc) Step3. Select an output format or device. You may convert MKV to MP4 on Mac OS X 10.10, MKV to MPEG, WMV, AVI, iPhone 5S/5C, iPad Air/iPad Mini 2, Samsung Galaxy S5, HTC, Google Nexus, Sony PS4, etc.
 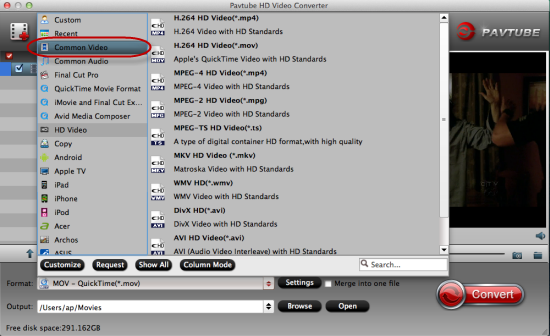 Step4. Click "Convert" button to start your MKV converting on Mac OS X 10.10 Yosemite. Knowledge: How to play MKV files on Mac freely? In fact, you can try this free VLC Media Player software which contains a decoder to decode the .MKV files. It also supports a lot of other video formats. More related tips:
Source: http://pc-mac-compatibility-issues.blogspot.com/2014/07/convert-mkv-on-mac-os-x-yosemite.html
Step4. Click "Convert" button to start your MKV converting on Mac OS X 10.10 Yosemite. Knowledge: How to play MKV files on Mac freely? In fact, you can try this free VLC Media Player software which contains a decoder to decode the .MKV files. It also supports a lot of other video formats. More related tips:
Source: http://pc-mac-compatibility-issues.blogspot.com/2014/07/convert-mkv-on-mac-os-x-yosemite.html
Summary: For advanced users, you must be have error while you wanna convert 4K videos to ProRes also with 4K resolution preserved. This topic teach you to Compress GoPro 4k in FCP smoothly with 4K resolution. Here we go! 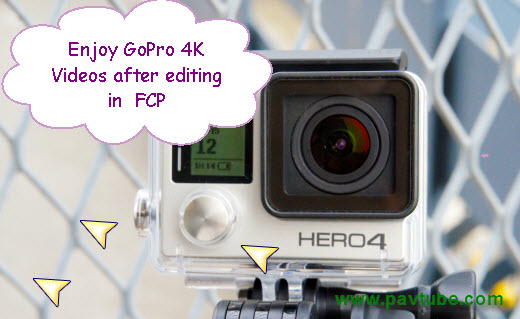 Any experience of using GoPro Hero4 4K camera? With the sharpest footage and the most user-friendly version, GoPro’s new Hero 4 black edition camera features a standard waterproof housing for recording in up to 131′ of water. And one of most stunning features is that it can capture stunning 4K footage in 30fps. But as we know, the majority of playback, editing work is not easy for NELs such as Adobe Premiere or FCP etc. So here someone may asked: Is there any GoPro Converting Alternatives? Pavtube HD Video Converter for Mac: Nicely transcode GoPro 4K to ProRes 4K for FCP. I heard that someone could be disappointed that when they are trying to convert GoPro 4K Videos to FCP for editing, the output video resolution 1920*1080 is the highest resolution so for those advanced users, they cannot enjoy the original 4K video definition quality, right? Fortunately, we have this Pavtube 4K to FCP converter for Mac, which has the strong ability of working GoPro Hero4 4k video with other popular NLEs, FCP is the typical one. What’s the most important, we can preserve the 4K resolution after conversion. Other Download: - Pavtube old official address: http://www.pavtube.com/hd-video-converter-mac/ - Amazon Store Download: http://www.amazon.com/Pavtube-Video-Converter-Mac-Download/dp/B00QI9GNZS - AppStore Download: https://itunes.apple.com/de/app/pavtube-hd-video-converter/id502792488?mt=12 - Cnet Download: http://download.cnet.com/Pavtube-HD-Video-Converter/3000-2194_4-76177786.html Lessons on how to convert GoPro Hero4 4K to ProRes 4K for nice editing in FCP. Step 1. Load GoPro 4K videos
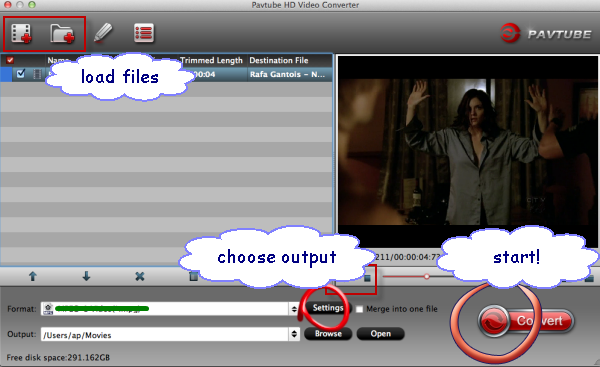
 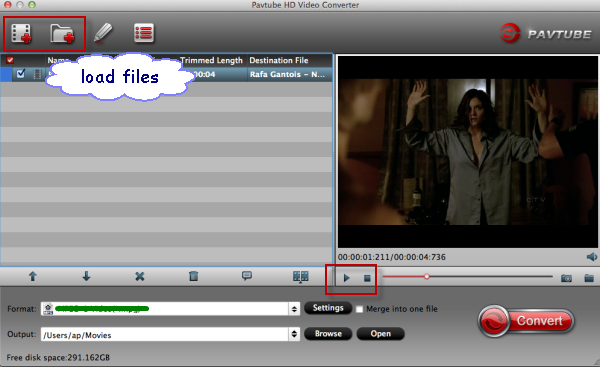 Launch the GoPro 4K to FCP converter on your computer and then the main interface will pop up in front of our eyesight. Two buttons called ‘Add Video’ or ‘Add from folder’ could be your best choice to add your original files. Step 2.Choose ProRes MOV for output as necessary.
 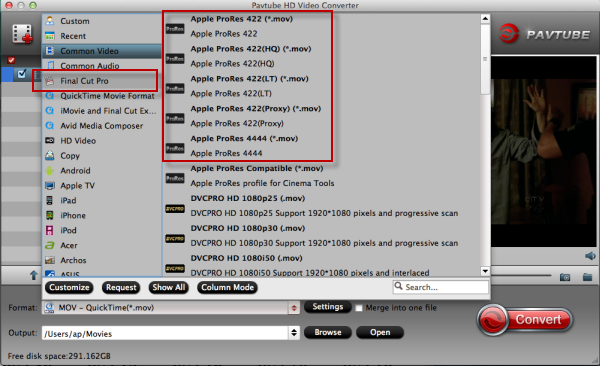 Next, open the output list with the ‘Format’ bar on the left of the preview window. There we can easily find the item we want. ‘Final Cut Pro’>>’Apple ProRes Codec 422(*.mov)’ is no doubt could be our best choice. Step 3( Necessary point) How to preserve 4K resolution with output videos?
 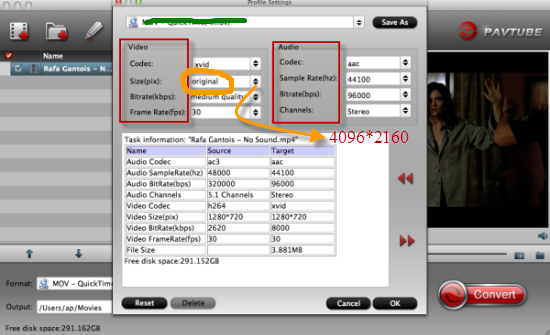 In order to get the output videos with 4K resolution, we should click the ‘Settings’ and get in to set the ‘Video size’ to ‘4K’. However, there are no ‘4K’ items we need to tap the ‘4096*2160’ in the blank. That’s the necessary step we need to do here. Finally, when you go back to the main interface, of course we can click the ‘Convert’ icon to make our work started. From GoPro Hero4 4K to FCP ProRes 4K, is that cool? Easily transfer your 4K files to FCP for professional workflow, we can enjoy ourselves then! More related tips:
Source: http://www.video-pedia.com/2015/01/22/convert-gopro-4k-to-prores-4k-in-fcp/
In order to get the output videos with 4K resolution, we should click the ‘Settings’ and get in to set the ‘Video size’ to ‘4K’. However, there are no ‘4K’ items we need to tap the ‘4096*2160’ in the blank. That’s the necessary step we need to do here. Finally, when you go back to the main interface, of course we can click the ‘Convert’ icon to make our work started. From GoPro Hero4 4K to FCP ProRes 4K, is that cool? Easily transfer your 4K files to FCP for professional workflow, we can enjoy ourselves then! More related tips:
Source: http://www.video-pedia.com/2015/01/22/convert-gopro-4k-to-prores-4k-in-fcp/
Summary:
Can't import your MP4 file to Adobe Premiere Pro CS4/CS5/CS3/CS6?Your MP4 file codec isn't compatible with Adobe Premiere. To easily solve your problem, you can convert this MP4 video to other Premiere friendly movie format like MOV, MPEG-2, FLV and more (Note: it applies to all kinds of Adobe Premiere including Adobe Premiere Pro, Adobe Premiere Pro CS3/ CS4/ CS5/ CS6).
Hot Search: embed subtitles to MP4DVD to H.264 MP4H.265 video to iPhone/iPad/Apple TV | H.265 Video to iMovie
Q1: Hi I'm Hayley, I was just wondering, I have footage in a strange format; .mp4, and it wont import into Premiere CS3. Someone asked me if I had all the updates, etc, I do, and still no luck with it...I was thinking of doing a reinstall of it, but if i do that, I will likely have to download all my updates and stuff all over again, and in the end, the mp4 thing still may not work. Before I try the reinstall, I was just wondering if anything else can be done about the format.
Any ideas, friends? Thanks in advance!
Q2: I recorded using camera app in Windows 8. It names the files as mp4 but Adobe Premier Pro CS4 wasn't able to import it. Try rename to mpg, m4v doesn't work, converting using Free Make Video Converter to WMV, MP4, MPG also doesn't work.
Q3: When I attempt to import XDCAM EX clips or MP4 files into Adobe Premiere Pro CS5, I receive the error message "Unsupported format or damaged file." Every time I try, all I get are codes/words and I'm having trouble. Please help?
 MP4 files are compressed using h.264 codec which is a final delivery codec not use for editing, while Adobe Premiere Pro CS3/CS4/CS5/CS6 lets you edit faster with true native format support. Therefore you may have problems when importing MP4 footage into Premiere Pro. For smoothly editing .MP4 files in Premiere Pro CS3/CS4/CS5/CS6, you first need to convert MP4 to a more editing-friendly format with Premiere Pro, such MPEG-2/WMV.
To get the work done, a third-party software is needed. Here HD Video Converter for Mac and Pavtube HD Video Converter is highly recommended. They are professional and powerful high-quality Windows/Mac video converter and editor. With it, you can effortlessly transcode 720p/1080p MP4 files to MPEG-2/WMV format for Premiere Pro CS3/CS4/CS5/CS6 editing. Just download it and follow the tutorials.
Guide: Transcoding MP4 to Premiere Pro CS3/CS4/CS5/CS6 for editing and importing
Step 1: Add mp4 footage from MP4 file folder to MP4 Converter for Premiere Pro. You can directly drag and drop .mp4 video files to this software.
MP4 files are compressed using h.264 codec which is a final delivery codec not use for editing, while Adobe Premiere Pro CS3/CS4/CS5/CS6 lets you edit faster with true native format support. Therefore you may have problems when importing MP4 footage into Premiere Pro. For smoothly editing .MP4 files in Premiere Pro CS3/CS4/CS5/CS6, you first need to convert MP4 to a more editing-friendly format with Premiere Pro, such MPEG-2/WMV.
To get the work done, a third-party software is needed. Here HD Video Converter for Mac and Pavtube HD Video Converter is highly recommended. They are professional and powerful high-quality Windows/Mac video converter and editor. With it, you can effortlessly transcode 720p/1080p MP4 files to MPEG-2/WMV format for Premiere Pro CS3/CS4/CS5/CS6 editing. Just download it and follow the tutorials.
Guide: Transcoding MP4 to Premiere Pro CS3/CS4/CS5/CS6 for editing and importing
Step 1: Add mp4 footage from MP4 file folder to MP4 Converter for Premiere Pro. You can directly drag and drop .mp4 video files to this software.
 Step 2: Choose Premiere Pro CS3/CS4/CS5/CS6 best editing codec.
Select to rewrap your mp4 files to" Adobe Premiere/Sony Vegas --> MPEG-2 (*.mpg) or WMV (VC-1) (*.wmv)." which work fine with Premiere Pro.
Step 2: Choose Premiere Pro CS3/CS4/CS5/CS6 best editing codec.
Select to rewrap your mp4 files to" Adobe Premiere/Sony Vegas --> MPEG-2 (*.mpg) or WMV (VC-1) (*.wmv)." which work fine with Premiere Pro.
 Step 3: Hit "Convert" button to carry out the MP4 to Premiere Conversion process.
When the conversion ends, you can run the Premiere Pro CS3/CS4/CS5/CS6 and click File --> Import --> Files to import the resulted files in Premiere Pro.
From the steps above, I think you got the point to convert MP4 files to MPEG-2/WMV for Premiere Pro editing, please have a try, this software will solve you MP4 files conversion and editing problems, and then you can easily import and use your MP4 files in Premiere Pro CS3/CS4/CS5/CS6 without any problems.
More related tips:
Step 3: Hit "Convert" button to carry out the MP4 to Premiere Conversion process.
When the conversion ends, you can run the Premiere Pro CS3/CS4/CS5/CS6 and click File --> Import --> Files to import the resulted files in Premiere Pro.
From the steps above, I think you got the point to convert MP4 files to MPEG-2/WMV for Premiere Pro editing, please have a try, this software will solve you MP4 files conversion and editing problems, and then you can easily import and use your MP4 files in Premiere Pro CS3/CS4/CS5/CS6 without any problems.
More related tips:
Src: Import MP4 Video into Adobe Premiere Pro CS3/CS4/CS5/CS6
Summary: This article offers a brief guide about how to transcode and transfer Sony XDCAM EX footages to Windows editing programs like Avid, Premiere, Sony Vegas, Pinnacle, CyberLink, Windows Movie Maker for editing. Sony XDCAM EX series camcorders, like like PMW-EX3, PMW-200, PMW-EX1, PMW 150, etc, are high-end professional camcorders which can capture high definition shootings, they can offer very high quality HD recording at a data rate of up to 50Mbps wrapped with MP4 format. While enjoying the stunning videos recorded of HD image quality, many users are having problems when trying to edit Sony XDCAM EX videos on Windows editing software, like Avid, Premiere, Sony Vegas, Pinnacle, CyberLink and Windows Movie Maker,etc. Hot search: Sony XDCAM to MPEG-2 for Sony Vegas Pro | Sony XDCAM HD IMX Files on Mac NLEs | Sony XDCAM HD422 to Final Cut Pro X | Sony XDCAM in MOV on Mac Yosemite | Sony XDCAM EX for Avid, FCP, DaVinci Resolve, etc  The reason that we can't successfully import Sony XDCAM EX MP4 recordings to Windows Platform for editing is because of the format compatibility. Since the XDCAM EX MP4 footage is a peripheral non-standard format which is not supported by editors on Windows PC. In order to import Sony XDCAM MP4 footage into Avid, Premiere, Sony Vegas, Pinnacle, CyberLink and Windows Movie Maker for smoothly editing, we can render to the third-party software to help convert XDCAM EX MP4 to AVI/MOV/WMV/MPG– native format for Avid, Premiere, Sony Vegas, Pinnacle, CyberLink and Windows Movie Maker. This is the best way to help XDCAM users to edit Sony XDCAM EX MP4 on Window PC smoothly..To achieve our goal, the quickest and easiest way is to use the easy-to-use yet professional software called Pavtube Video Converter , with which, we can effortlessly and flawlessly transcode Sony EX MP4 footage to AVI/MOV/WMV/MPG for Avid, Premiere, Sony Vegas, Pinnacle, CyberLink and Windows Movie Maker editing. It is safe to install and easy to use. And you can enjoy the powerful edit function, like trim, crop, watermark for text, image and video, 3D effect, subtitles and so on. Below will show you how to
 Other Download: - Pavtube old official address: http://www.pavtube.com/video_converter/ - Amazon Download: http://download.cnet.com/Pavtube-Video-Converter/3000-2194_4-75734821.html - Cnet Download: http://download.cnet.com/Pavtube-Video-Converter/3000-2194_4-75734821.html Free download and follow below step to convert Sony XDCAM EX MP4 for Windows . Step 1. Load Sony XDCAM EX MP4 files.You can choose "add video" directly to add the whole folder.
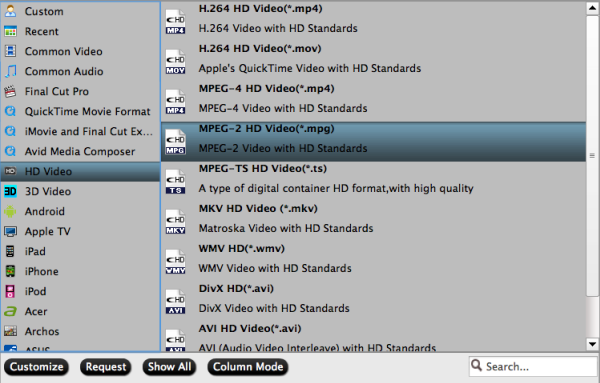
  Step 2. Select output format for video editing software. Click "Format" menu and choose "Adobe Premiere/Sony Vegas -> MPEG-2 HD Video (*.mpg)",or select WMV/MOV/MPEG-2, you can also choose "HD Video -> AVI HD Video (*.avi)". Finally, click the file icon beside output bar, and choose a destination folder for saving output files.
  Step 3. Edit loaded Sony XDCAM EX MP4 files. Click "Edit" button and you are allowed to trim, crop, add text/image/video watermark or some effect to your output video for making it perfect. Here the function of adding subtitles to output files will contribute to make your own videos. Tips: Click "Settings" on the interface and you can adjust the parameters including size, bitrate, frame rate, etc. to get a high quality of output files. And keep the settings the same as original video recordings will provide you the least loss of video quality. Step 4. Start conversion. Click the "Convert" button to start transcoding Sony XDCAM EX MP4 footage for editing in Avid, Premiere, Sony Vegas, Pinnacle, CyberLink and Windows Movie Maker. When it completed, click the "Open" button to get the generated videos for your editing software. More related tips:
Source: http://pc-mac-compatibility-issues.blogspot.cz/2013/08/transcode-sony-xdcam-ex-file-on-windows.html
Step 3. Edit loaded Sony XDCAM EX MP4 files. Click "Edit" button and you are allowed to trim, crop, add text/image/video watermark or some effect to your output video for making it perfect. Here the function of adding subtitles to output files will contribute to make your own videos. Tips: Click "Settings" on the interface and you can adjust the parameters including size, bitrate, frame rate, etc. to get a high quality of output files. And keep the settings the same as original video recordings will provide you the least loss of video quality. Step 4. Start conversion. Click the "Convert" button to start transcoding Sony XDCAM EX MP4 footage for editing in Avid, Premiere, Sony Vegas, Pinnacle, CyberLink and Windows Movie Maker. When it completed, click the "Open" button to get the generated videos for your editing software. More related tips:
Source: http://pc-mac-compatibility-issues.blogspot.cz/2013/08/transcode-sony-xdcam-ex-file-on-windows.html
Summary: What aspects do you use for your DJI Inspire 1 4K files? How do you usually play, edit or upload your Inspire 4K videos? Here is a tutorial on how to resize your DJI Inspire 4K files to 1080P for further working on Mac/PC.  Hot search: HD 4K video to iMovie | 4K videos on VLC | 4K Video to DropBox | 4K Videos To PS4 | 4K Video to Sony Movie Studio | 4K Video to Avid MC | 4K MXF to Premiere Pro "I am doing some inspire 1 4K video editing, I see my desktop is very powerful, however, when I playback the videos, it's very choppy, and not easy to do the editing. Does any pros have any idea on 4K workflow? Much appreciated!" DJI Inspire camera can shoot up to 4K video with MOV/MP4 format capture 12 megapixel photos. With this high definition image ability showed to us, DJI Inspire has attracted a lot of users. While on the hand, it has also confused most people in playback 4K files on such like tablets or edit in NLEs like Adobe or iMovie, etc. So for easily work the Inspire 4K files well on Mac and PC, we suggest you to resize the 4K to 1080P, which could be nicely accepted. Just find the Pavtube Video Converter for Windows/Mac, which w can choose to achieve the goal so easily. In general, you can effortlessly encode DJI Inspire 4K MP4/MOV footage for smoothly importing and editing in various non-linear editing systems (NLEs). Besides, DJI Inspire clips, it also can deal with other video formats such as MKV, MTS, MXF, FLV .etc. If you are a PC user and willing to transfer DJI Inspire 4K files to any other media players. Now, let's follow the guide to know how to resize Inspire 4K videos to 1080P below: Other Download: - Pavtube old official address: http://www.pavtube.com/video_converter/ - Amazon Download: http://download.cnet.com/Pavtube-Video-Converter/3000-2194_4-75734821.html - Cnet Download: http://download.cnet.com/Pavtube-Video-Converter/3000-2194_4-75734821.html Steps on downscaling DJI Inspire 4K videos to 1080p on Mac/PC: Step 1. Click "Add" button and load your DJI Inspire 4K files as soon as you get into the main interface. Or you can drag & drop the files into the App directly.
  Step 2. Then on the output list, we can surely choose some items for output like all NLEs and media devices. Or just go to the ‘HD Video' interface, we suggest you to select the ‘H.264 HD Video (*.mp4)' as the best example. Of course we can choose others as suitable ones.
  Step 3. Go to "Settings" button; you can adjust video and audio settings, including codec, aspect ratio, bit rate, frame rate, sample rate, and audio channel. To down-convert ultra HD 4K to 1080p, you can choose 1920*1080 as "Video Size".
  Finally, as you adjust all the video and audio parameters, we are going to go back to the main interface to hit the big icon ‘Convert' to start the work. We will not be disappointed with the DJI Inspire 4K footage and resize them to 1080P videos on Mac/PC for a further dispose. More related tips:
Hot News!!! Pavtube Summer Promotion has become something of a tradition, and it's back for 2015. Giveaway and Save up to 50% OFF for new Pavtube Software owners, this sale runs until Aug 7, 2015. Source: http://i-freepedia.com/convert-gji-4k-to-1080p-for-editing/
Finally, as you adjust all the video and audio parameters, we are going to go back to the main interface to hit the big icon ‘Convert' to start the work. We will not be disappointed with the DJI Inspire 4K footage and resize them to 1080P videos on Mac/PC for a further dispose. More related tips:
Hot News!!! Pavtube Summer Promotion has become something of a tradition, and it's back for 2015. Giveaway and Save up to 50% OFF for new Pavtube Software owners, this sale runs until Aug 7, 2015. Source: http://i-freepedia.com/convert-gji-4k-to-1080p-for-editing/
Summary: With the popularity of AVCHD MTS files, more and more camera manufacturers have released the MTS cameras on the digital market which features 1920 x 1080 60p MPEG-4 AVC/H.264 Full HD video.
If you are one of the user, you must be satisfied with the effect of the videos these camcorders captured. But you may found that it is difficult for TV, computers or some portable devices to play these AVCHD full HD videos while you are eager to share the amazing videos you shot with friends and family members. On the other hand, also include the editing tools such like FCP, iMovie, premiere, etc.Upload videos on YouTube or Vimeo?  Hot search: Sony TD20 3D MTS on Zeiss VR One | Sony HDR-TD10 3D MTS/M2TS on Zeiss VR One | C100 Mark II AVCHD MTS on Zeiss VR One | Sony HDR-PJ440/B MTS to iMovie Frankly speaking, Some people googled and found some professional converters to transcode AVCHD videos for watching and editing. However, they usually capture the recordings with splitted clips. Do you want to combine these video clips into one file while converting for smoothly playing and editing? Here Pavtube MTS/M2TS Converter for Mac/Windows is highly recommended tool for you. Let's learn how it works so smoothly. Note: This program can work well with latest operation Windows 10 and Mac OS X 10.10(Yosemite) after we tested, also the former operation is included. Download , install and run the trial version of MTS/M2TS Covnerter, 'Add video ' or 'Add from folder' can import your original MTS/M2TS files successfully. 'Merge AVCHD clips into one?' Choose several clips you want to merge and transcode together? On the left of the preview window, you can find the button here. Just tick on the clips you want on the imported list. Other Download: - Pavtube old official address: http://www.pavtube.com/mts-converter-mac/ - Amazon Download: http://www.amazon.com/Pavtube-MTS-M2TS-Converter-Download/dp/B00QIE3U0Y - Cnet Download: http://download.cnet.com/Pavtube-MTS-M2TS-Converter/3000-2194_4-76177029.html
  Change your MTS/M2TS into others to be suitable for editing tools or media devices? Click"Format" bar to choose video format for output. There are several output format for you to choose, such as Adobe Premiere/Sony Vegas/Avid Media Composer and so on. Of course, if you just want to merge and viewed your recordings from computer or on TV, just choose MP4 from "Common Video" as output format.
  Additionally, don't miss the 'Settings' button on the main interface, you can customize you output videos and audios. For example, video size, bitrates, frame rate or even the audio channel. You are deserved to have a try here.
  Finally, just go back to the mian interface to press on the 'Convert' button, you can get our conversion work started. No matter you shot the sMTS files from the camcorders, with this MTS transcoder, you can handle all your MTS footage nicely. More related tips:
Source: http://digisns.com/2014/11/convert-merge-avchd-mts-m2ts-files/
Finally, just go back to the mian interface to press on the 'Convert' button, you can get our conversion work started. No matter you shot the sMTS files from the camcorders, with this MTS transcoder, you can handle all your MTS footage nicely. More related tips:
Source: http://digisns.com/2014/11/convert-merge-avchd-mts-m2ts-files/
Summary: This article will teaches you how to Edit H.265(HEVC) video to Premiere Pro CC edit-friendly format for smooth workflow.
 Hot search: Samsung NX1 H.265 Files to YouTube/Vimeo | Samsung NX1 H.265 to H.264 | Samsung NX1 H.265 Videos to WMM | Samsung NX1 H.265 in Avid Media Composer Since H.265 footage like from Samsung NX1 can’t be recognized by Adobe Premiere Pro CC on Mac Yosemite due to its best supported video formats, some related questions are asked on some forums. For example: "I feel well because the new Samsung NX1 camcorder can shoot the H.265 recordings so nicely. But it seems wrong when I wanna edit them in Premiere Pro. Such as the ‘errors’ and ‘unsupported message’ always appear on the screen. Any good measures?" How to easily import Samsung NX1 H.265 videos to Premiere Pro CC on Yosemite? Method 1.: Cinemartin Cinec Plin---third-party tool to work H.265 well with Premiere Pro CC. It’s the new plugin from cinemartin for Premiere Pro that allows users to export Adobe Premiere Sequence Timeline to several output videos including the Apple Prores codecs, and the new HEVC H.265. Just look the following video display as good reference. Method 2.Professional H.265 decoder for Premiere Pro CC---Pavtube Video Converter for Mac. (Windows version)
Here we can also introduce you a professional H.265/HEVC videos converter to help you a lot. With the latest version upgraded, it can decode and encode the H.265/HEVC videos well, also, other common video formats are included. For editing NX1 H.265 movies nicely in Premiere Pro CC, it’s not a big deal to convert the H.265 to MPEG-2 mpg now. Let’s download this Samsung NX1 H.265 Video Converter and start transcoding. Other Download: - Pavtube old official address: http://www.pavtube.com/video-converter-mac/ - Amazon Store Download: http://www.amazon.com/Pavtube-Video-Converter-Mac-Download/dp/B00QIBK0TQ - Cnet Download: http://download.cnet.com/Pavtube-Video-Converter/3000-2194_4-76179460.html Learning course of converting Samsung NX1 H.265 to MPEG-2 MPG for Premiere Pro CC: Step 1.After you install the H.265/HEVC decoder correctly on your computer, drag you files in this program directly or with two adding buttons. ‘Add video’ and ‘Add from folder’. 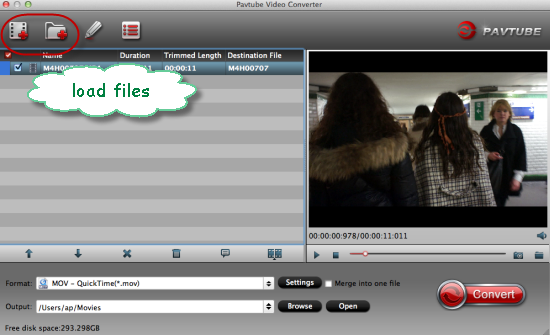 Step 2. Come to the output list and choose Adobe Premiere/Sony Vegas > MPEG-2 (*.mpg) as the best video format for editing Samsung NX1 H.265 files in Adobe Premiere as well as good video quality.
 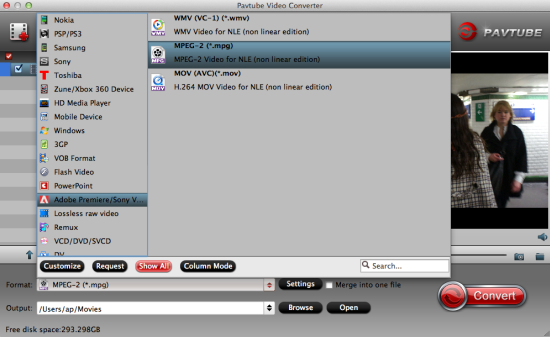 Notes: For other NLEs as output? Such as H.265 to FCP or media devices like H.265 to iPhone 6,etc. All these output items we can easily find on the output list. Step 3.Adjust the video and audio parameters, including the Bitrates of Video & Audio, Video Size, Sample Rate, Frame Rate, Audio Channels, etc., by clicking the Settings button on the main interface for getting the best quality.
 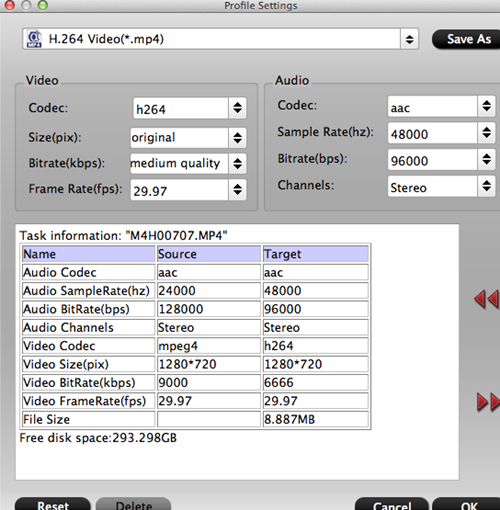 Finally, if you get back to the main interface, we are going to hit the big icon ‘Convert’ to get the work started. Aftertransferring the files to Adobe Premiere Pro CC as usual, we can enjoy editing the Samsung NX1 H.265 videos in Adobe Premiere Pro CC on Mac Yosemite so perfectly. More related tips:
If You Want to Get Our Weekend Pavtube Special offer,You can Click Here: http://bit.ly/1hmOn34 Source: http://mediaconverting.blogspot.com/2015/04/import-nx1-h.265-to-ppro-on-yosemite.html
Finally, if you get back to the main interface, we are going to hit the big icon ‘Convert’ to get the work started. Aftertransferring the files to Adobe Premiere Pro CC as usual, we can enjoy editing the Samsung NX1 H.265 videos in Adobe Premiere Pro CC on Mac Yosemite so perfectly. More related tips:
If You Want to Get Our Weekend Pavtube Special offer,You can Click Here: http://bit.ly/1hmOn34 Source: http://mediaconverting.blogspot.com/2015/04/import-nx1-h.265-to-ppro-on-yosemite.html