Summary:? DaVinci Resolve 11 won’t import Sony XAVC S videos correctly– read this article to find the best solution.
 The HXR-NX100 brings the very best in resolution, depth of field control and low light performance thanks to its big 1.0-type Exmor R CMOS sensor, allowing content creators to capture beautiful images in any environment. Its ergonomic design ensures comfortable handling and the ability to record in XAVC S 50Mbps means the camcorder delivers quality content across a range of shoots, such as events and corporate videos. We must admit that it’s disappointed DaVinci Resolve and many other programs can only handle PCM audio, like WAV files. Not LPCM audio. There are totally different format. Consequently, for native importation of Sony (4K) XAVC-S video within DaVinci Resolve, it is highly recommended to convert XAVC S video to DaVinci Resolve 11 with appropriate codec like QuickTime, DNxHD, ProRes for editing smoothly. How to solve the video format incompatibility problem? An XAVC S converter for Mac will handle the import issue and make it easy to edit XAVC S footages shot by a HXR-NX100. Pavtube HD Video Converter for Mac is just the reliable one to transcode and converts XAVC S footages to video formats compatible with DaVinci Resolve.
 Other Download: - Pavtube old official address: http://www.pavtube.com/hd-video-converter-mac/ - Amazon Store Download: http://www.amazon.com/Pavtube-Video-Converter-Mac-Download/dp/B00QI9GNZS - AppStore Download: https://itunes.apple.com/de/app/pavtube-hd-video-converter/id502792488?mt=12 - Cnet Download: http://download.cnet.com/Pavtube-HD-Video-Converter/3000-2194_4-76177786.html Step 1: Add source videos Install the program on Mac and run it. Drag the XAVC S files to the software. Or you can also click "Add" button on the top of the main interface to import video to the program.
  Step 2: Choose output format Hit Format bar to select output format. You can choose Avid Media Composer > Avid DNxHD(*.mov) as output format. It is an ideal editing format for Resolve. Of course, you can also click "Common Video" > "MOV - QuickTime (*.MOV)" as the target format.
  Step 3: Start XAVC S to Resolve 11 conversion Click "convert" to start converting XAVC S to DNxHD for DaVinci Resolve on Mac OS X. After conversion, you can play or edit XAVC(S) clips in QuickTime/FCP/FCE/iMovie/Avid without problem. Tips: 1. Click the "Settings" icon and you will go into a new interface named "Profile Settings". You can adjust codec, bit rate, frame rate, sample rate and audio channel in the interface according to your needs and optimize the output file quality. 2. Besides transcoding XAVC S to Resolve, this Mac XAVC S converter also supports converting XAVC S file to Final Cut Pro, Avid Media Composer, Adobe Premiere Pro, iMovie, After Effects and more editing programs with ProRes, DNxHD, MPEG-2, Apple InterMediate Codec, etc optimal codecs. Further reading: Encode Sony A7S II 4K XAVC S to Apple Prores for FCP 6/7 Editing Import Canon C100 AVCHD MP4 to Davinci Resolve Import Documentary Footage to Adobe Premiere Pro/ DaVinci Resolve Top 5 MTS/M2TS AVCHD Converter for Mac Reviewed Compress MTS/M2TS from Canon Cameras/Sony/Panasonic Easily import Sony XDCAM EX to Avid, Premiere, Sony Vegas, Pinnacle, CyberLink, Windows Movie Maker Source: http://handycameratips.jimdo.com/2015/09/22/how-to-import-sony-hxr-nx100-xavc-s-to-davinci-resolve/
Summary: This article will show you how to transfer Zenmuse X5/X5R 4K video to Premiere Elements 12/13 to create remarking editing work.
 DJI has announced X5 and X5R Micro-four-thirds 4K cameras for Inspire 1 Drone. Both the X5 and X5R support 4K video at 24 and 30 frames per second, but the X5R has the ability to shoot raw 4K footage to its included 512GB SSD as it simultaneously records compressed 4K video to a micro-SD card for a fast editing workflow. Each camera comes attached to DJI's Zenmuse gimbal. Adobe Premiere Elements is a scaled-down version of the Adobe Premiere Pro and is tailed to novice editors and consumers. Zenmuse X5 and X5R record MP4 and MOV format files compressed with H.264/MPEG-4 AVC codec, which is not a native editing format for Adobe Premiere 12/13. Therefore, people often encounter audio missing or file not importing problems when moving H.264 files to Premiere Elements for editing. Any ways to fix this issue? The most ideal solution is convert Zenmuse X5/X5R 4K Video to Adobe Premiere optimized MPEG-2 format and you can perform the conversion will a simple to use application calledPavtube Video Converter for Windows/Mac to directly encode Zenmuse X5/X5R 4K video to Premiere Elements 12/13 customized MPEG-2/WMV(VC-1)/MOV(AVC) format. What's more, the program also allows you to transcode Zenmuse X5/X5R 4K video to other professional video editing codec such as DNxHD for Avid Media Composer, Apple Prores for FCP 6/7/X, etc. Other Download: - Pavtube old official address: http://www.pavtube.com/video-converter-mac/ - Amazon Store Download: http://www.amazon.com/Pavtube-Video-Converter-Mac-Download/dp/B00QIBK0TQ - Cnet Download: http://download.cnet.com/Pavtube-Video-Converter/3000-2194_4-76179460.html How to transcode and import Zenmuse X5/X5R 4K Video to Premiere Elements 12/13? Step 1: Add Zenmuse X5/X5R 4K video files. Click the "Add Video" button or "Add from folder" button to import source Zenmuse X5/X5R 4K video files to the program. You can add multiple video clips at one time.
  Step 2: Choose output file format. Click the "Format" bar and select "Adobe Premiere/Sony V..." > "MPEG-2(*.mpg)" as output format.
  Step 3. Edit Zenmuse X5/X5R 4K video. Open "Video Editor" window, here you can trim video length, crop video file size, apply special effect, add image or transparent text watermark, add subtitles, replace or remove original audio, etc.
  Step 4. Transcode Zenmuse X5/X5R 4K to Premiere Elements. Click the "Convert" icon under the preview window, it will start to convert Zenmuse X5/X5R 4K video to Premiere Elements 12/13 supported MPEG-2 format. After the conversion, launch Premiere Elements 12/13, locate and find the folder where you save the converted video clips. Then start Zenmuse X5/X5R 4K video to Premiere Elements 12/13 professional post workflow with no difficulty. Further Reading:
Source: http://file-editing-tips.over-blog.com/zenmuse-x5-x5r-4k-to-premiere-elements-12-13
Step 4. Transcode Zenmuse X5/X5R 4K to Premiere Elements. Click the "Convert" icon under the preview window, it will start to convert Zenmuse X5/X5R 4K video to Premiere Elements 12/13 supported MPEG-2 format. After the conversion, launch Premiere Elements 12/13, locate and find the folder where you save the converted video clips. Then start Zenmuse X5/X5R 4K video to Premiere Elements 12/13 professional post workflow with no difficulty. Further Reading:
Source: http://file-editing-tips.over-blog.com/zenmuse-x5-x5r-4k-to-premiere-elements-12-13
Summary: If you are looking for a fast and fluid workflow of Zenmuse X5/X5R 4K video with Avid Media Composer, the following guide will. show you how to import Zenmuse X5/X5R 4K video to Avid Media Composer with DNxHD codec.  Drone maker DJI has announced a pair of Micro Four Thirds aerial cameras. One model is the Zenmuse X5, which is capable of capturing 4K video at 30fps or still 16MP photographers, the other is the Zenmuse X5R, which is able to capture the world around you in RAW with frame rates of up to 30fps and a 1.7Gbps average bitrate. As one of the most widely used NLE editing program, Avid Media Composer empowers its users with accelerated workflows, automated media management and extending real-time production. Wish to shine your Zenmuse X5/X5R 4K video with Avid Media Composer? However, like other NLE editing programs, Avid Media Composer has its own preferable editing codec – Avid DNxHD, which helps significantly reduce storage and bandwidth while providing mastering-quality HD media. To export DNxHD codec from Zenmuse X5/X5R, a third-party program called Pavtube Video Converter for Windows/Mac, it not only enables you to directly encode Zenmuse X5/X5R 4K video to Avid DNxHD codec, but also other professional editing codec like Apple Prores for FCP, Apple Intermediate Codec for iMovie/FCE and Adobe Premiere/Sony Vegas optimized editing format. Other Download: - Pavtube old official address: http://www.pavtube.com/video-converter-mac/ - Amazon Store Download: http://www.amazon.com/Pavtube-Video-Converter-Mac-Download/dp/B00QIBK0TQ - Cnet Download: http://download.cnet.com/Pavtube-Video-Converter/3000-2194_4-76179460.html How to transcode Zenmuse X5/X5R 4K video to Avid Media Composer? Step 1: Add Zenmuse X5/X5R 4K video files. Click the "Add Video" button or "Add from folder" button to import source Zenmuse X5/X5R 4K video files to the program. You can add multiple video clips at one time. Step 2: Choose output file format. Click the "Format" bar and select "Avid Media Composer" > "Avid DNxHD (*.mov)" as output format.
  Step 3. Edit Zenmuse X5/X5R 4K video. Open "Video Editor" window, here you can trim video length, crop video file size, apply special effect, add image or transparent text watermark, add subtitles, replace or remove original audio, etc. Step 4. Convert Zenmuse X5/X5R 4K to DNxHD codec. Click the "Convert" icon under the preview window, it will start to convert Zenmuse X5/X5R 4K video to Avid Media Composer supported DNxHD mov format. After the conversion, launch Final Avid Media Composer, locate and find the folder where you save the converted video clips. Then start Zenmuse X5/X5R 4K video to Avid Media Composer professional post workflow with no difficulty. Further Reading:
Source: http://camcordervideoshare.altervista.org/blog/import-zenmuse-x5-x5r-4k-to-avid/
Step 3. Edit Zenmuse X5/X5R 4K video. Open "Video Editor" window, here you can trim video length, crop video file size, apply special effect, add image or transparent text watermark, add subtitles, replace or remove original audio, etc. Step 4. Convert Zenmuse X5/X5R 4K to DNxHD codec. Click the "Convert" icon under the preview window, it will start to convert Zenmuse X5/X5R 4K video to Avid Media Composer supported DNxHD mov format. After the conversion, launch Final Avid Media Composer, locate and find the folder where you save the converted video clips. Then start Zenmuse X5/X5R 4K video to Avid Media Composer professional post workflow with no difficulty. Further Reading:
Source: http://camcordervideoshare.altervista.org/blog/import-zenmuse-x5-x5r-4k-to-avid/
Those FLAC OGG WMA DTS Audio problem on iPhone 6s/iPhones 6s Plus Though iPhone has updated to iPhone 6s and iPhone 6s Plus, it still can’t play all kinds of video and audio files. We still encounter "cannot be played on this iPhone" issue:
- Can’t play video file types like FLAC, OGG on iPhone;
- Failed to import and open Windows audio file like WMA on iPhone;
- Difficult to play Dolby Digital audio (DTS) on iPhone;
 How to Solve Audio cannot be Played on iPhone 6s? In order to solve "can’t play video on iPhone" issue, a recommended solution is to convert video to iPhone more compatible format. The following article just aims to introduce a professional iPhone Video Converter as well as a step by step guide on how to convert iPhone unsupported video to iPhone 6s, iPhone 6s Plus supported one. iPhone 6s/6sP Audio Converter To overcome the format issues, you just need an ideal iPhone Audio Converter as assistant. Pavtube Video Converter, the professional iPhone Audio Converter (and Mac version), can easily convert FLAC OGG WMA and DTS audio to play on iPhone 6s/iPhone 6s Plus with native player smoothly. More than an audio converter, this powerful app can also support most mainstream video formats to play on iPhone 6s and iPhone 6s Plus with advanced editing function.
 How to Convert FLAC OGG WMA DTS audio to iPhone 6s/6s Plus? Step 1. Import FLAC/OGG/WMA/DTS; choose format. Click the plus icon to import FLAC files into it, or you can drag-and-drop directly. Then you will find a horn icon on the left that indicates it’s an audio file.
  Move your cursor to Format and choose "Common Audio>MP3 – MPEG Layer-3 Audio(*.mp3)" or "M4A – MPEG-4 Audio(*.m4a)" as below:
 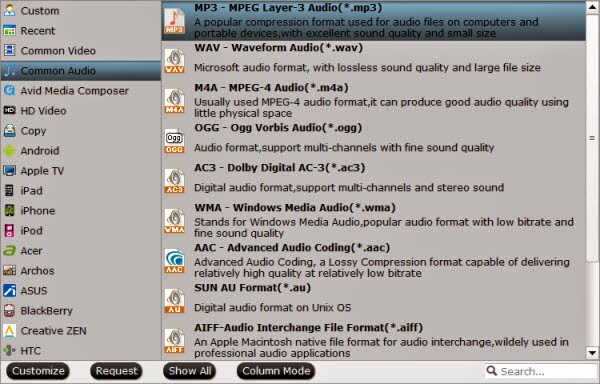 As listed above, there are several presets for other audio format; just choose one as your needs. Step 2. Adjust audio specs (optional). If you are not satisfied with the default audio quality, just click the "Settings" icon and choose wanted audio settings including sample rate, bitrate and audio channel. Step 3. Start converting FLAC OGG WMA DTS audio to MP3/M4A. Now back to the main interface and hit "Convert" to convert your audio files to MP3/M4A format. It will start batch conversion automatically one by one. Wait for a while during the progress; after it completed, click "Open output folder" to locate the converted audio file. Start iTunes, then drag and drop the converted audio file to your iTunes Music Library for syncing to iPod, iPad, iPhone for playing. Further reading: FLAC vs WAV vs WMA: Convert Audio Files on iOS Devices Top 5 Free Audio/Video Conversion Tools Best Video Formats for iPhone 6 (Plus) How To Convert MP4 Video into Adobe Premiere Pro Transcode GoPro Hero4 4K Videos to ProRes in FCP Best Mac OS X 10.10 Yosemite MKV Conversion Top 5 Video Editors Review- Edit MTS/M2TS Files Perfectly Source: http://i-freepedia.com/play-flac-ogg-wma-dts-on-iphone-6s6s-plus-ios-9/
XDCAM EX The Sony XDCAM EX is a high-quality video camcorder, capable of shooting in either standard definition or high definition. XDCAM EX video and audio content is stored on Sony SxS solid-state Express Card 3/4 media within MP4 container files. You can record video either 1920 x 1080 or 1280 x 720 modes. XDCAM EX HD MP4 video is recorded from Sony XDCAM EX. But after test, we find that this MP4 format by Sony can't even be played on Mac OS 10.8. Many fresh users don't know what to do. But don't worry. Just follow me to learn how to play and view .mp4 files from Sony XDCAM EX.  Soutions:
- With running XDCAM Browser you can preview the MP4 files or export as a mxf file, but can't transfer to a .mov file and this rewapped .mxf file may not be viewing.
- Of course You can play this video file on the camcorder and through the Sony software, but if you use QuickTime as your media player, you will have to convert Sony XDCAM HD file to a compatible format with QuickTime MOV for playback. So how to convert a XDCam EX MP4 file into a mac-compatible .mov file for enjoying which retain the same size and quality?
- Calibrated{Q} MP4-EX Import component ($149.95) supports tranferring MP4 to QuickTime MOV. (Not supported FCP X)
- Calibrated{Q} XD Decode codec ($89.95) to encode MP4 files for playback. (Not for use when any version of Final Cut Pro, Final Cut Studio or Final Cut Server is installed, and at least a Intel Core 2 Duo with two physical cores is highly recommended)
- As the solution above takes too much money, and you may may have reliability and incompatiblity issues. Here comes the third solution, using Pavtube HD Video Converter for mac can helps you to tranfer Sony XDCAM MP4 to QuickTime mov easily and fastly. (Easy and Helpful)
As you see, the last solution is the esaiest and effective way. Below are step to step guide for Converting and Transferring an XDCAM EX to QuickTime on Mac. Step 1. Download Sony XDCAM MP4 to MOV Converter for mac, and install it. Click the "Add Video" button to import Sony XDCAM EX seperate MP4 files or press on"Add from Folder" button to add MP4 folder.  Step 2. Select output format. Click on the dropdown menu of "Format" and select "Common Video -> MOV – QuickTime (*.mov)" as target format. This format is specially designed for QuickTime playback. You can also choose format as you need in the format column, such as AVI, MKV, MP4, etc.
  Step 3.Adjust video and audio parameters. Click "Settings" button to customize the output video and audio settings by yourself. You can also use the default parameters, they will ensure you a good balance between file size and image quality basically. You can change the resolution, bitrate, frame rate as you need.
  Step 4. Click "Convert" button and this Sony XDCAM EX MP4 Converter for Mac will start transcoding Sony XDCAM MP4 to QuickTime MOV. After you converting Sony XDCAM HD Video to MOV for QuickTime, you can play the converted footages smoothly on Mac. More related tips:
Source: http://pc-mac-compatibility-issues.blogspot.com/2013/05/Working-with-Sony-XDCAM-to-play-with-QuickTime-on-Mac.html
Step 4. Click "Convert" button and this Sony XDCAM EX MP4 Converter for Mac will start transcoding Sony XDCAM MP4 to QuickTime MOV. After you converting Sony XDCAM HD Video to MOV for QuickTime, you can play the converted footages smoothly on Mac. More related tips:
Source: http://pc-mac-compatibility-issues.blogspot.com/2013/05/Working-with-Sony-XDCAM-to-play-with-QuickTime-on-Mac.html
Summary: M3U8 format was added into this powerful Video Converter. Detailed review about this converter you can find in this article.  The M3U8 file extension is used for playlists that are stored in the M3U UTF-8 (Unicode) text playlist format. M3U and M3U8 playlists can be opened in a variety of media players, such as Winamp, KMPlayer, iTunes, VLC media player etc. Playlist doesn’t contain any multimedia content, it is only list of media files selected from a hard disk or other media. You may get many different files from Internet, camcorder shooting and etc. Take the newly H.265 as an example: The big trend of 4K put an eager need for higher shooting quality, fast playback , powerful stream function. H.265 just came as a best connection between the 4K generation and video making equipment. Many giant Digital Company like Sony, Canon, and Panasonic all pursuit this latest trend. They all launched their 4K camera in order to size the market. The H.265/HEVC used by those HD Camcorder or Camera would be the best solution to compress those high resolution video into small size while maintain the sharp quality. Got these fantastic videos at hand, how to play them smoothly without waiting for the buffering time? Here, you need to convert your files like H.265 to M3U8, the format we mentioned at the very beginning. The advantage is that dragging videos is fast because of no extra datas. You can drag the video to any point you want to enjoy smoothly and immediately. Besides, the original supporting effect is good. Using an M3U8 Converter thus offers a neat advantage for both video producers and video consumers who will certainly be wowed. This is great news for producers of video who want to maximize quality and minimize costs. Online commercial distribution of video will certainly be less expensive on the storage side and highly interesting in terms of video supply variety, especially for businesses offering video-on-demand services. Here strongly recommend this all-in-one brand new Pavtube Video Converter, which is top-ranked M3U8 Converter for Windows.
 Other Download: - Pavtube old official address: http://www.pavtube.com/video_converter/ - Amazon Download: http://download.cnet.com/Pavtube-Video-Converter/3000-2194_4-75734821.html - Cnet Download: http://download.cnet.com/Pavtube-Video-Converter/3000-2194_4-75734821.html How to convert video files to M3U8 format on Windows? Step 1: Download and install the program. Click "Add video" on the main interface to load your files to the program. You can also drag the files to the program’s window list directly. This program can also support the batch video clips.
  Step 2: Click the "Format" bar to get the drop-down menu and you can get "HLS Streaming (m3u8)". Choose "ipad m3u8 streaming" or "iphone m3u8 streaming" as best output format. Any media player supporting TS format are all available for playing M3U8 format files.
  Step 3: Click "Settings" button to customize the output video and audio settings by yourself. Video codec is the default H.264 and audio codec is the default AAC. You can change the resolution, bit rate, frame rate as you need. But if you are not good at it, you’d better use the default parameters, they will ensure you a good balance between file size and image quality basically. Step 4: When everything is done, you can take a preview by hitting "Play" button. If you are satisfied with the final result, you can click "Convert" button to finish the conversion work. Conclusion: The output files should be named without space and file path should be in plain English or pure digital, or you could play them successfully. After conversion, you can set up a server to enjoy M3U8! Hope this top-ranked M3U8 Converter can help you a lot! By the way, Pavtube Video Converter Ultimate is the best BD/DVD/Video solution for Windows users to backup BD/DVD, compress disc and transcode video clip to almost all popular video and audio formats. Source: http://digisns.com/2015/06/m3u8-windows-converter-review/ Further Reading: GoPro 4K to ProRes 4K Workflow: Edit GoPro Hero4 4K Videos in FCP How to Transcode FLV Files to M3U8 Format on Mac? Get Sony Camera Video to Play on Apple TV Why Doesn’t VLC Decode NX 4K H.265 Video from Samsung? Edit Canon T6i/750D MP4 in Final Cut Pro Convert Panasonic P2 MXF to QuickTime MOV for Playing on Mac Yosemite Edit Sony A5100 XAVC S Files in FCP X Source: http://m3u8mediacentral.jimdo.com/2015/08/25/m3u8-windows-converter-review/
Summary: How do I Convert MKV on Mac OS X 10.10 ? This article shows you how to do it in 4 simple steps. Get in to read the detail now!
How incredible that Mac OS X 10.9 hasn't been with us for long, but its successor Mac OS X 10.10 is coming to us! Mac OS X Yosemite comes with new features like improved Today view in Notification Center, brighter spotlight, Safari with new streamlined toolbar and so on.  If you have downloaded some MKV movies, you may consider converting these MKV to on Mac OS X 10.10 Yosemite for watching on iOS/Android/Windows-based tablet/phone and media players. In this case, a powerful MKV video converter for Mac OS X Yosemite is needed. Here I recommend Pavtube HD Video Converter for Mac, which is compatible with all Mac OS, including Mac OS X Tiger/Leopard/Snow Leopard/Lion/Mountain Lion/Mavericks 10.8/ Mavericks (10.9), and it is all set for the coming Mac OS X 10.10 Yosemite. Other Download: - Pavtube old official address: http://www.pavtube.com/hd-video-converter-mac/ - Amazon Store Download: http://www.amazon.com/Pavtube-Video-Converter-Mac-Download/dp/B00QI9GNZS - AppStore Download: https://itunes.apple.com/de/app/pavtube-hd-video-converter/id502792488?mt=12 - Cnet Download: http://download.cnet.com/Pavtube-HD-Video-Converter/3000-2194_4-76177786.html It is the best choice to convert MKV videos on OS X 10.10 Yosemite with: - Fastest speed: the kernel perfectly compatible with Yosemite makes the mkv converting speed even faster. - Powerful video compatibility: It is capable of handling all SD, HD and 4K UHD videos including all kinds of MKV videos. - First-class output quality: With High Quality Engine, it keeps the original video audio effect to the utmost during converting mkv on Mac OS X Yosemite at one go. First, you need to download and install the app. Converting MKV video on Mac OS X (10.10) will be as easy as pie for such professional MKV Video Converter for Mac OS X 10.10 Yosemite. Follow the steps below. Step 1. Run Pavtube HD Video Converter for Mac on your computer, click “Add Video” button or just drag and drop to import MKV files.
 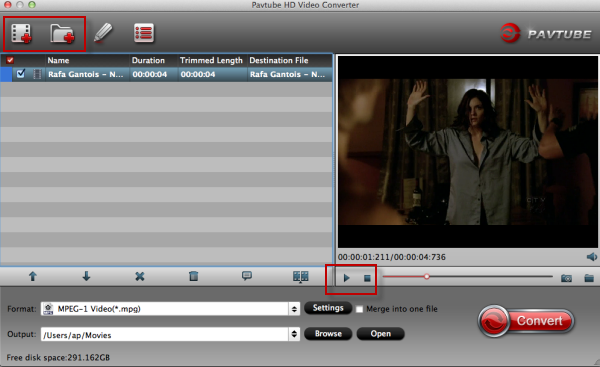 Step2. Edit (optional). You can edit the video if you want.(Include Trim, Effect, Crop, Add Watermark, Add Subtitle etc) Step3. Select an output format or device. You may convert MKV to MP4 on Mac OS X 10.10, MKV to MPEG, WMV, AVI, iPhone 5S/5C, iPad Air/iPad Mini 2, Samsung Galaxy S5, HTC, Google Nexus, Sony PS4, etc.
 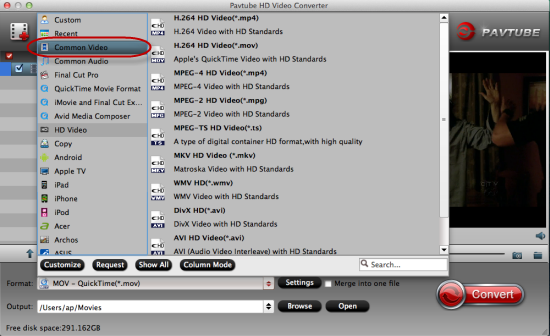 Step4. Click "Convert" button to start your MKV converting on Mac OS X 10.10 Yosemite. Knowledge: How to play MKV files on Mac freely? In fact, you can try this free VLC Media Player software which contains a decoder to decode the .MKV files. It also supports a lot of other video formats. More related tips:
Source: http://pc-mac-compatibility-issues.blogspot.com/2014/07/convert-mkv-on-mac-os-x-yosemite.html
Step4. Click "Convert" button to start your MKV converting on Mac OS X 10.10 Yosemite. Knowledge: How to play MKV files on Mac freely? In fact, you can try this free VLC Media Player software which contains a decoder to decode the .MKV files. It also supports a lot of other video formats. More related tips:
Source: http://pc-mac-compatibility-issues.blogspot.com/2014/07/convert-mkv-on-mac-os-x-yosemite.html


