Summary: What aspects do you use for your DJI Inspire 1 4K files? How do you usually play, edit or upload your Inspire 4K videos? Here is a tutorial on how to resize your DJI Inspire 4K files to 1080P for further working on Mac/PC.  Hot search: HD 4K video to iMovie | 4K videos on VLC | 4K Video to DropBox | 4K Videos To PS4 | 4K Video to Sony Movie Studio | 4K Video to Avid MC | 4K MXF to Premiere Pro "I am doing some inspire 1 4K video editing, I see my desktop is very powerful, however, when I playback the videos, it's very choppy, and not easy to do the editing. Does any pros have any idea on 4K workflow? Much appreciated!" DJI Inspire camera can shoot up to 4K video with MOV/MP4 format capture 12 megapixel photos. With this high definition image ability showed to us, DJI Inspire has attracted a lot of users. While on the hand, it has also confused most people in playback 4K files on such like tablets or edit in NLEs like Adobe or iMovie, etc. So for easily work the Inspire 4K files well on Mac and PC, we suggest you to resize the 4K to 1080P, which could be nicely accepted. Just find the Pavtube Video Converter for Windows/Mac, which w can choose to achieve the goal so easily. In general, you can effortlessly encode DJI Inspire 4K MP4/MOV footage for smoothly importing and editing in various non-linear editing systems (NLEs). Besides, DJI Inspire clips, it also can deal with other video formats such as MKV, MTS, MXF, FLV .etc. If you are a PC user and willing to transfer DJI Inspire 4K files to any other media players. Now, let's follow the guide to know how to resize Inspire 4K videos to 1080P below:
 Other Download: - Pavtube old official address: http://www.pavtube.com/video_converter/ - Amazon Download: http://download.cnet.com/Pavtube-Video-Converter/3000-2194_4-75734821.html - Cnet Download: http://download.cnet.com/Pavtube-Video-Converter/3000-2194_4-75734821.html Steps on downscaling DJI Inspire 4K videos to 1080p on Mac/PC: Step 1. Click "Add" button and load your DJI Inspire 4K files as soon as you get into the main interface. Or you can drag & drop the files into the App directly.
  Step 2. Then on the output list, we can surely choose some items for output like all NLEs and media devices. Or just go to the ‘HD Video' interface, we suggest you to select the ‘H.264 HD Video (*.mp4)' as the best example. Of course we can choose others as suitable ones.
  Step 3. Go to "Settings" button; you can adjust video and audio settings, including codec, aspect ratio, bit rate, frame rate, sample rate, and audio channel. To down-convert ultra HD 4K to 1080p, you can choose 1920*1080 as "Video Size".
  Finally, as you adjust all the video and audio parameters, we are going to go back to the main interface to hit the big icon ‘Convert' to start the work. We will not be disappointed with the DJI Inspire 4K footage and resize them to 1080P videos on Mac/PC for a further dispose. More related tips:
Hot News!!! Pavtube Summer Promotion has become something of a tradition, and it's back for 2015. Giveaway and Save up to 50% OFF for new Pavtube Software owners, this sale runs until Aug 7, 2015. Source: http://i-freepedia.com/convert-gji-4k-to-1080p-for-editing/
Finally, as you adjust all the video and audio parameters, we are going to go back to the main interface to hit the big icon ‘Convert' to start the work. We will not be disappointed with the DJI Inspire 4K footage and resize them to 1080P videos on Mac/PC for a further dispose. More related tips:
Hot News!!! Pavtube Summer Promotion has become something of a tradition, and it's back for 2015. Giveaway and Save up to 50% OFF for new Pavtube Software owners, this sale runs until Aug 7, 2015. Source: http://i-freepedia.com/convert-gji-4k-to-1080p-for-editing/
Summary: With the popularity of AVCHD MTS files, more and more camera manufacturers have released the MTS cameras on the digital market which features 1920 x 1080 60p MPEG-4 AVC/H.264 Full HD video.
If you are one of the user, you must be satisfied with the effect of the videos these camcorders captured. But you may found that it is difficult for TV, computers or some portable devices to play these AVCHD full HD videos while you are eager to share the amazing videos you shot with friends and family members. On the other hand, also include the editing tools such like FCP, iMovie, premiere, etc.Upload videos on YouTube or Vimeo?  Hot search: Sony TD20 3D MTS on Zeiss VR One | Sony HDR-TD10 3D MTS/M2TS on Zeiss VR One | C100 Mark II AVCHD MTS on Zeiss VR One | Sony HDR-PJ440/B MTS to iMovie Frankly speaking, Some people googled and found some professional converters to transcode AVCHD videos for watching and editing. However, they usually capture the recordings with splitted clips. Do you want to combine these video clips into one file while converting for smoothly playing and editing? Here Pavtube MTS/M2TS Converter for Mac/Windows is highly recommended tool for you. Let's learn how it works so smoothly. Note: This program can work well with latest operation Windows 10 and Mac OS X 10.10(Yosemite) after we tested, also the former operation is included. Download , install and run the trial version of MTS/M2TS Covnerter, 'Add video ' or 'Add from folder' can import your original MTS/M2TS files successfully. 'Merge AVCHD clips into one?' Choose several clips you want to merge and transcode together? On the left of the preview window, you can find the button here. Just tick on the clips you want on the imported list.
 Other Download: - Pavtube old official address: http://www.pavtube.com/mts-converter-mac/ - Amazon Download: http://www.amazon.com/Pavtube-MTS-M2TS-Converter-Download/dp/B00QIE3U0Y - Cnet Download: http://download.cnet.com/Pavtube-MTS-M2TS-Converter/3000-2194_4-76177029.html
  Change your MTS/M2TS into others to be suitable for editing tools or media devices? Click"Format" bar to choose video format for output. There are several output format for you to choose, such as Adobe Premiere/Sony Vegas/Avid Media Composer and so on. Of course, if you just want to merge and viewed your recordings from computer or on TV, just choose MP4 from "Common Video" as output format.
  Additionally, don't miss the 'Settings' button on the main interface, you can customize you output videos and audios. For example, video size, bitrates, frame rate or even the audio channel. You are deserved to have a try here.
  Finally, just go back to the mian interface to press on the 'Convert' button, you can get our conversion work started. No matter you shot the sMTS files from the camcorders, with this MTS transcoder, you can handle all your MTS footage nicely. More related tips:
Source: http://digisns.com/2014/11/convert-merge-avchd-mts-m2ts-files/
Finally, just go back to the mian interface to press on the 'Convert' button, you can get our conversion work started. No matter you shot the sMTS files from the camcorders, with this MTS transcoder, you can handle all your MTS footage nicely. More related tips:
Source: http://digisns.com/2014/11/convert-merge-avchd-mts-m2ts-files/
Summary: This article will teaches you how to Edit H.265(HEVC) video to Premiere Pro CC edit-friendly format for smooth workflow.
 Hot search: Samsung NX1 H.265 Files to YouTube/Vimeo | Samsung NX1 H.265 to H.264 | Samsung NX1 H.265 Videos to WMM | Samsung NX1 H.265 in Avid Media Composer Since H.265 footage like from Samsung NX1 can’t be recognized by Adobe Premiere Pro CC on Mac Yosemite due to its best supported video formats, some related questions are asked on some forums. For example: "I feel well because the new Samsung NX1 camcorder can shoot the H.265 recordings so nicely. But it seems wrong when I wanna edit them in Premiere Pro. Such as the ‘errors’ and ‘unsupported message’ always appear on the screen. Any good measures?" How to easily import Samsung NX1 H.265 videos to Premiere Pro CC on Yosemite? Method 1.: Cinemartin Cinec Plin---third-party tool to work H.265 well with Premiere Pro CC. It’s the new plugin from cinemartin for Premiere Pro that allows users to export Adobe Premiere Sequence Timeline to several output videos including the Apple Prores codecs, and the new HEVC H.265. Just look the following video display as good reference. Method 2.Professional H.265 decoder for Premiere Pro CC---Pavtube Video Converter for Mac. (Windows version)
Here we can also introduce you a professional H.265/HEVC videos converter to help you a lot. With the latest version upgraded, it can decode and encode the H.265/HEVC videos well, also, other common video formats are included. For editing NX1 H.265 movies nicely in Premiere Pro CC, it’s not a big deal to convert the H.265 to MPEG-2 mpg now. Let’s download this Samsung NX1 H.265 Video Converter and start transcoding. Other Download: - Pavtube old official address: http://www.pavtube.com/video-converter-mac/ - Amazon Store Download: http://www.amazon.com/Pavtube-Video-Converter-Mac-Download/dp/B00QIBK0TQ - Cnet Download: http://download.cnet.com/Pavtube-Video-Converter/3000-2194_4-76179460.html Learning course of converting Samsung NX1 H.265 to MPEG-2 MPG for Premiere Pro CC: Step 1.After you install the H.265/HEVC decoder correctly on your computer, drag you files in this program directly or with two adding buttons. ‘Add video’ and ‘Add from folder’. 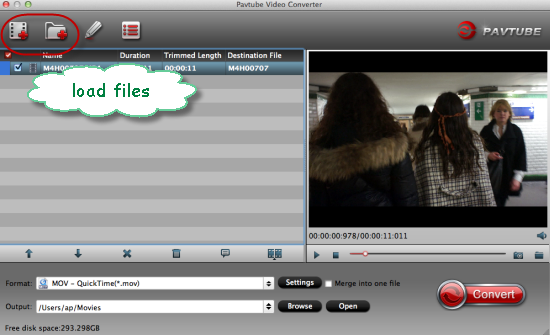 Step 2. Come to the output list and choose Adobe Premiere/Sony Vegas > MPEG-2 (*.mpg) as the best video format for editing Samsung NX1 H.265 files in Adobe Premiere as well as good video quality.
 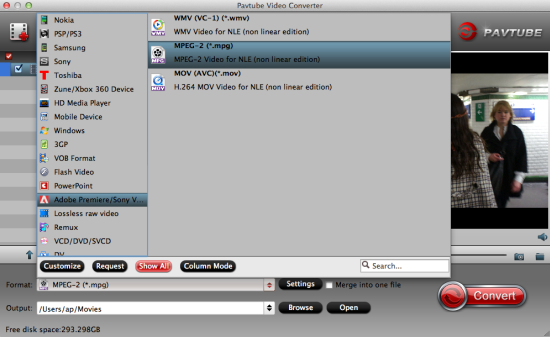 Notes: For other NLEs as output? Such as H.265 to FCP or media devices like H.265 to iPhone 6,etc. All these output items we can easily find on the output list. Step 3.Adjust the video and audio parameters, including the Bitrates of Video & Audio, Video Size, Sample Rate, Frame Rate, Audio Channels, etc., by clicking the Settings button on the main interface for getting the best quality.
 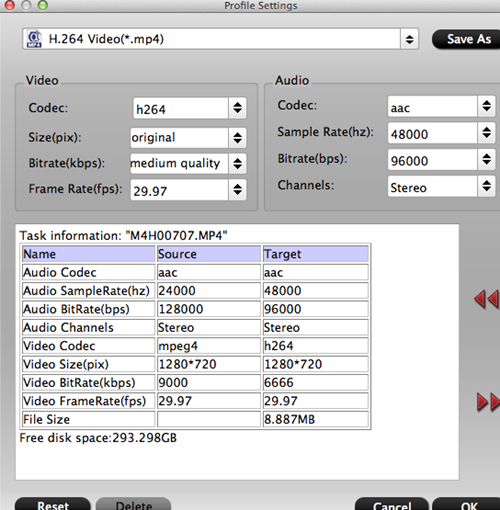 Finally, if you get back to the main interface, we are going to hit the big icon ‘Convert’ to get the work started. Aftertransferring the files to Adobe Premiere Pro CC as usual, we can enjoy editing the Samsung NX1 H.265 videos in Adobe Premiere Pro CC on Mac Yosemite so perfectly. More related tips:
If You Want to Get Our Weekend Pavtube Special offer,You can Click Here: http://bit.ly/1hmOn34 Source: http://mediaconverting.blogspot.com/2015/04/import-nx1-h.265-to-ppro-on-yosemite.html
Finally, if you get back to the main interface, we are going to hit the big icon ‘Convert’ to get the work started. Aftertransferring the files to Adobe Premiere Pro CC as usual, we can enjoy editing the Samsung NX1 H.265 videos in Adobe Premiere Pro CC on Mac Yosemite so perfectly. More related tips:
If You Want to Get Our Weekend Pavtube Special offer,You can Click Here: http://bit.ly/1hmOn34 Source: http://mediaconverting.blogspot.com/2015/04/import-nx1-h.265-to-ppro-on-yosemite.html
Summary: If you have a HD camera or camcorder device, you have great chance to deal with AVCHD .mts Video. After you shot many enough videos, then you definitely want to edit these AVCHD file. And here are Top 5 MTS Video Editing Software recommended to you.  1. AvideMux
  Avidemux is a free video editor designed for simple cutting, filtering and encoding tasks. It supports many file types, including AVI, DVD compatible MPEG files, MP4 and ASF, using a variety of codecs. Tasks can be automated using projects, job queue and powerful scripting capabilities. Video and audio encoding can also be done with this software.2. iMovie
  iMovie is Apple’s newly designed entry-level video editor makes creating gorgeous digital movies a breeze. Beautifully simple interface. Color matching for consistent movie looks. Classy themes. Great chroma-keying tool. Lots of audio tools. Theater feature shares movies to all your Apple gear. Although it is free, you will only avail the free version when a new Mac OS releases.3. HyperEngine AV
  HyperEngine-AV (formerly known as “Montage”) is a true multimedia editor that lets you combine seamlessly video, photos, sounds and text to create slide shows, family movies, business presentations, even your own feature films quickly and easily, with full DV quality. HyperEngine-AV lets you retain different edited files and processing settings for the same piece of audio and is a complete video editing package that allows you to produce work of a high standard.4. Blender
  Blender is a professional free and open-source 3D computer graphics software product used for creating animated films, visual effects, art, 3D printed models, interactive 3D applications and video games. The popularity this software has can only be rivaled by very few in the market. The interface of Blender is very unique. Someone with no experience with Video Editing tool can have a hard time mastering it though.5. Pavtube Media Magician (Win/Mac)
  Pavtube Media Magician is a nice camcorder assistant manager, lossless camcorder video joiner, MTS/ M2TS/ MXF/ MOV/ MKV/ TiVo/ WMV/ AVI/ MPG converter and editor, and efficient camcorder video uploader for YouTube. It’s a useful and easy tool helping you make better use of either camcorder videos, but also common videos. It is also can be used as a wonderful MTS/M2TS/MOD/TOD lossless trimming software which can help you trim off unwanted parts of one click and output original format or MKV without quality loss. Really an useful Mac camcorder software that helps you save a lot of money on purchasing storage memories!
(Here is how to Use Media Magician for Mac to Edit your AVCHD Video)Additional Tip: If you want to get your recoreded MTS/M2TS/M2T/TS/MXF/MP4/MOV/XAVC and more files for editing, try Pavtube HD Video Converter(Win/Mac), which works pefectly in HD Video conversion with fast speed and high video quality. Also it provides some editing functions and help you joins videos without breaks (lag) besides converting. Other Download: - Pavtube old official address: http://www.pavtube.com/hd-video-converter-mac/ - Amazon Store Download: http://www.amazon.com/Pavtube-Video-Converter-Mac-Download/dp/B00QI9GNZS - AppStore Download: https://itunes.apple.com/de/app/pavtube-hd-video-converter/id502792488?mt=12 - Cnet Download: http://download.cnet.com/Pavtube-HD-Video-Converter/3000-2194_4-76177786.html  Useful guides:
After seeing the above comparison, it is worth to take a try of Blender, HyperEngine AV and Pavtube. But here Pavtube can be taken as a smart editor which supports many powerful editing functions as well as works as a video uploader too. Again, the compatibility is perfect for Pavtube, and both windows and mac version are available. No matter which one you choose, hope you enjoy mts editing workflow. And if you have issues when editing your mts or m2ts video files, turn to this Top 5 Best MTS/M2TS Converter for Mac Review. More related tips:
Source: http://digisns.com/2014/09/top-5-video-editors-review/
Useful guides:
After seeing the above comparison, it is worth to take a try of Blender, HyperEngine AV and Pavtube. But here Pavtube can be taken as a smart editor which supports many powerful editing functions as well as works as a video uploader too. Again, the compatibility is perfect for Pavtube, and both windows and mac version are available. No matter which one you choose, hope you enjoy mts editing workflow. And if you have issues when editing your mts or m2ts video files, turn to this Top 5 Best MTS/M2TS Converter for Mac Review. More related tips:
Source: http://digisns.com/2014/09/top-5-video-editors-review/
Summary: MTS/M2TS format is a high-definition MPEG, AVC, H.264 transport stream video file format which is commonly used by HD camcorders such as Sony, Canon, Panasonic. These files are also present on Blu-ray disc compilations, therefore they are capable of storing quite a large amount of information and data. As a video shooting enthusiast, you probably have lots of MTS files on your Mac. Due to the limited support for MTS file format on Mac, you may be facing these problems: cannot play MTS/M2TS on Mac, or on iPhone; have trouble uploading MTS files to video sharing sites like YouTube.  To resolve all MTS file problems, you can try converting MTS/M2TS to other formats on Mac and playing them directly on Mac. In this case, a top-reviewed MTS/M2TS file Converter Mac is needed. There are so many Mac AVCHD Converters available now. According to the demonds of our clients, the best MTS/M2TS Converter for Mac should be a powerful, easy-to-use, user-friendly and with reasonalle price. For the function of providing the best solution to convert AVCHD mts/m2ts video to Mac editor friendly formats easily and rapidly. After the wide investment, for you to manage your MTS/M2TS files efficiently, we made this MTS/M2TS Converter for Mac Review for all the AVCHD camera or camcorder users.Top 5 MTS/M2TS Converter for Mac Review |2014-2015Top 1. Pavtube MTS/M2TS Converter for Mac – Excellent Price: $29
  It is the best Mac AVCHD Converter to process MTS, M2TS files from Canon, Sony, Panasonic and JVC cameras on Mac, and convert them to various video formats with preferred video codec for NLE programs on Mac, such as Final Cut Pro, iMovie, Final Cut Express, Avid Media Composer, Adobe Premiere Pro, Apple Aperture 3, etc. and get MTS/M2TS video compatible with current fashionable portable devices, such as iPhone 5S/5C, iPhone 6, iPad Air, Galaxy Tab S, Galaxy Tab 4, Galaxy Note 4, Surface Pro 3. What’s more, it can convert 2D AVCHD to 3D MKV/MP4/MOV/WMV/AVI with Side-by-Side, Top-Bottom, or Anaglyph (Red-Blue) and supports adding *.srt and *.ass subtitle. System Requirements:
- Supported Mac OS X 10.5 above (including Mac OS X 10.5 Leopard,Mac OS X 10.6 Snow Leopard,Mac OS X 10.7 Lion, OS X 10.8 Mountain Lion, OS X 10.9 Mavericks) on iMac, MacBook, Mac Pro, MacBook Air, MacBook Pro, etc.
- Processor: 1G Hz or above PowerPC G4/G5 or Intel processor.
- Hardware Requirements: 1024*768 or higher resolution display.
As the most popular and one of the best sellers, Pavtube MTS/M2TS Converter for Mac has the reasonable price and high quality. The bad: Haven’t find any. Windows Version: MTS/M2TS ConverterTop 2. Aiseesoft MTS Converter for Mac – Good Price: $35  Aiseesoft MTS Converter for Mac can convert MTS file to other popular video format like MP4, MPG, 3GP, MKV, AVI, WMV, FLV, VOB, SWF, DV, M4V, and MOV, etc. on Mac. Also this application supports converting MTS to 3D videos on Mac. You are allowed to convert MTS recordings to other video format that can play well on any portable devices like iPad/iPhone/iPod/Apple TV/PS3/most popular mobile phones. It also has multiple editing functions to help you edit different MTS recordings instead of professional video editing software such as Final Cut Pro, iMovie, etc. most popular video editors on Mac. What’s more, it is convenient to convert any part of your MTS file, crop the video play region to suit for your players, even input watermark, merge, settings and more. System Requirements:
- Processor: Intel® processorOS
- Supported: Mac OS X 10.4 or above
- Hardware Requirements: 512MB RAM, Super VGA (800×600) resolution, 16-bit graphics card or higher
The bad:
- A little Expensive
- Can’t create Side-by-Side, Top-Bottom 3D video.
Top 3. Tipard MTS Converter for Mac – Good Price: $40  Tipard MTS Converter for Mac can not only converts MTS to AVI, WMV, MP4, 3GP, FLV, MKV, VOB, DV, etc. but also converts M2TS, TS and HD MPG, HD MPEG, HD MP4, etc to what you need video or audio formats, like AAC, AC3, AIFF, AMR, AU, FLAC, MP3, M4V, MP2, OGG, WAV, WMA. Besides, it provides many optimized settings and features as well. So that you can customize the advanced output settings, make your own special editing by set video brightness, contrast, saturation, crop video, trim video/audio and even merge multiple files into one file. System Requirements:
- Processor: Intel® processorOS
- Supported: Mac OS X 10.5 or above (highly supports 10.7.3)
- Hardware Requirements: 512MB RAM, Super VGA (800×600) resolution, 16-bit graphics card or higher
The bad:
- PowerPC Processor is not supported.
- Not supporting Mac OS X 10.8 and Mavericks 10.9
- Expensive
- 3D video output not supported
Top 4. AnyMP4 MTS Converter for Mac – Fair Price: $35  AnyMP4 MTS Converter for Mac, the outstanding and great Mac MTS Converting software, has powerful converting function to convert MTS to other popular video/audio formats on Mac with unparalleled speed and excellent quality. This Mac MTS Converter can also convert M2TS, TS to common video formats for editing on Final Cut Pro, iMovie and playback on iPad, iPhone, iPod for better entertainment. System Requirements:
- OS Supported: Mac OS X 10.5, 10.6, 10.7, 10.8 Mountain Lion
- Processor: Intel ® processorHardware
- Requirements: 512MB RAM, Super VGA (800×600) resolution, 16-bit graphics card or higher
The bad:
- Expensive
- 3D video output not supported
Top 5. Alternative MTS/M2TS Converter for Mac – Pavtube Video Converter for Mac – Perfect Price: $35  Pavtube Video Converter for Mac is a useful timeline-oriented video editor and converter. It helps transcode not only camcorder videos, but also MTS, M2TS, M2T, TS, MXF, MKV, MOV, Tivo, AVI, VOB, WMV, MPG, FLV, F4V, 3GP, EVO, VRO, WebM and so on for further editing in non-linear editing software (FCP, FCE, iMovie, Avid Media Composer, Xpress Pro, Adobe Premiere Pro, After Effect C6S, iPhoto, etc.), watching on iOS/Android/Windows tablets and phones, or direct uploading to YouTube. What’s more, with it, you can edit videos through trimming, cropping, adding watermarks, insert subtitles, etc.
- OS Supported: Mac OS X 10.5 above (including Mac OS X 10.5 Leopard,Mac OS X 10.6 Snow Leopard,Mac OS X 10.7 Lion, OS X 10.8 Mountain Lion, OS X 10.9 Mavericks) on iMac, MacBook, Mac Pro, MacBook Air, MacBook Pro, etc.
- Processor: 1G Hz or above PowerPC G4/G5 or Intel processor.
- Requirements: 1024*768 or higher resolution display.
The bad: Not supporting output 3D video. Windows Version: Video Converter Hope the top 5 MTS/M2TS Converter for Mac review would help you, which it the best MTS/M2TS Converter for Mac to meet your needs? Just get the best AVCHD Converting software to convert your MTS/M2TS files on Mac for watching on iPad, iPhone, iPod, smartphone, MP3/MP4 player or editing in FCP, iMovie, FCE, Adobe Premiere, Avid Media Coposer, etc. without any hassle. Now do you best to make your digital media life colorful! Read more comparison reviews:
Source: http://digisns.com/2014/08/top-5-mts-m2ts-converter-for-mac-review/
Summary: Have any Problem? Today here we would like to introduce you the best method of convert/transcode Sony PMW-200 XDCAM MXF file to Final Cut Pro/Aperture 3. Join us now?  Hot search: MXF to Sony Movie Studio|H.264 to FCP X|MXF to iMovie | MXF to Premiere Pro CC | MXF to Avid MC | MXF to PowerDirector | MXF to MPEG-2 Sony PMW-200 camcorder features a broadcast-friendly 50Mbps data rate drawing from three half-inch CMOS sensors -- bigger than any other broadcast handheld cam, according to Sony -- though that size is still a far cry from its own super-35 filmmaking cams and others on the market. 50Mbps HD422 Recording In the UDF/MXF recording mode, you can record Full HD video (1920x1080) at up to 50Mbps using MPEG HD422 compression technology and enjoy the benefits of proven, high-speed and intuitive XDCAM HD422 workflow. With the PMW-200, you can also record video in MPEG HD (420) or DVCAM? format. (Note: Proxy video is not available with the PMW-200). Import XDCAM MXF recordings to FCP 6/7 or Aperture 3. Q: Hi! I was wondering if the FCP 6/7 works with mxf footages natively. Aperture 3 seems not work with these mxf recordings. I have some .mxf video from Sony PMW-200 to edit for group work, and it would be great if anyone could help me with the importing workflow. Thanks! A: If you want to edit Sony PMW-200 XDCAM MXF in Final Cut Pro 6/7 or Apple Aperture 3, you first need to convert the XDCAM MXF video to compatible format like ProRes 422 codec. This is a common format developed by Apple. Below are some useful tips. Solution: Transcode Sony PMW-200 XDCAM MXF to FCP 6/7 or Aperture 3 with Apple ProRes 422 codec. Step 1: Download Pavtube MXF Converter for Mac. This is excellent software which can help you convert Sony PMW-200 XDCAM MXF video to ProRes for FCP 6/7 or Aperture 3. Besides, it supports many other formats for output.Install and launch the Sony Mac XDCAM MXF Converter, import the MXF video from Sony PMW-200 by clicking "Add video" button.
 Other Download: - Pavtube old official address: http://www.pavtube.com/mxf-converter-mac/ - AppStore Download: https://itunes.apple.com/us/app/pavtube-mxf-converter/id502807634?mt=12 - Amazon Download: http://www.amazon.com/Pavtube-MXF-Converter-Mac-Download/dp/B00QID8K28 - Cnet Download: http://download.cnet.com/Pavtube-MXF-Converter/3000-2194_4-76177789.html
 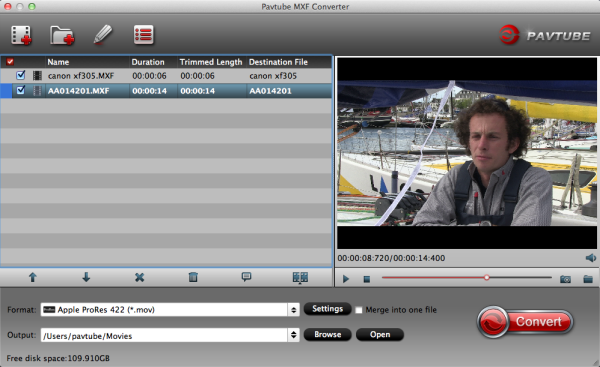 Step 2: Choose the best output format for Final Cut Pro 6/7 or Aperture 3. Click on "Format" and choose "Final Cut Pro >>Apple ProRes 422 (*.mov)" as output format.
 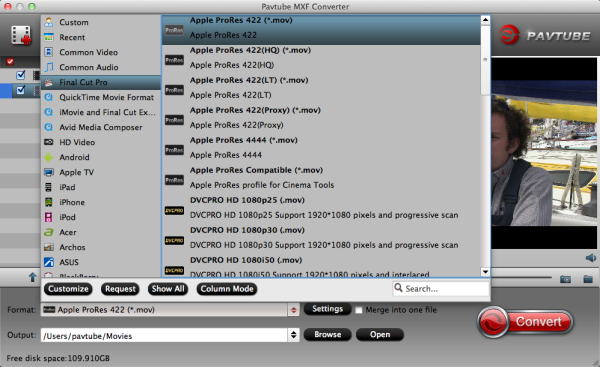 Step 3: You can click "Settings" to adjust the output parameters, such as resolution, bitrate and frame rate. Step 4: You can click "Edit" button to edit MXF video, such as deinterlace, denoise, mute, volume up and crop. Step 5: Click "Convert" button to start Sony MXF to ProRes conversion. It will transcode Sony PMW-200 MXF to Apple ProRes codec MOV format flawlessly. After converting, you can import converted video files to FCP 6/7 or Aperture 3 instantly without rendering. More output formats are supported. More related tips:
If You Want to Get Our Weekend Pavtube Special offer,You can Click Here: http://bit.ly/1hmOn34 Source: http://pc-mac-compatibility-issues.blogspot.com/2013/08/sony-pmw-200-importing-workflow-in-fcp-6-7-aperture-3.html
Step 3: You can click "Settings" to adjust the output parameters, such as resolution, bitrate and frame rate. Step 4: You can click "Edit" button to edit MXF video, such as deinterlace, denoise, mute, volume up and crop. Step 5: Click "Convert" button to start Sony MXF to ProRes conversion. It will transcode Sony PMW-200 MXF to Apple ProRes codec MOV format flawlessly. After converting, you can import converted video files to FCP 6/7 or Aperture 3 instantly without rendering. More output formats are supported. More related tips:
If You Want to Get Our Weekend Pavtube Special offer,You can Click Here: http://bit.ly/1hmOn34 Source: http://pc-mac-compatibility-issues.blogspot.com/2013/08/sony-pmw-200-importing-workflow-in-fcp-6-7-aperture-3.html
Summary: Are you all still confused about how to transcode and transfer GH4 4K videos to iMovies shot by Panasonic? Let me introduce you the easiest way. Here is How. Sony XDCAM EX series camcorders, like like PMW-EX3, PMW-200, PMW-EX1, PMW 150, etc, are high-end professional camcorders which can capture high definition shootings, they can offer very high quality HD recording at a data rate of up to 50Mbps wrapped with MP4 format. While enjoying the stunning videos recorded of HD image quality, many users are having problems when trying to edit Sony XDCAM EX videos on Windows editing software, like Avid, Premiere, Sony Vegas, Pinnacle, CyberLink and Windows Movie Maker,etc. Hot search: Sony XDCAM to MPEG-2 for Sony Vegas Pro | Sony XDCAM HD IMX Files on Mac NLEs | Sony XDCAM HD422 to Final Cut Pro X | Sony XDCAM in MOV on Mac Yosemite | Sony XDCAM EX for Avid, FCP, DaVinci Resolve, etc  The reason that we can't successfully import Sony XDCAM EX MP4 recordings to Windows Platform for editing is because of the format compatibility. Since the XDCAM EX MP4 footage is a peripheral non-standard format which is not supported by editors on Windows PC. In order to import Sony XDCAM MP4 footage into Avid, Premiere, Sony Vegas, Pinnacle, CyberLink and Windows Movie Maker for smoothly editing, we can render to the third-party software to help convert XDCAM EX MP4 to AVI/MOV/WMV/MPG– native format for Avid, Premiere, Sony Vegas, Pinnacle, CyberLink and Windows Movie Maker. This is the best way to help XDCAM users to edit Sony XDCAM EX MP4 on Window PC smoothly..To achieve our goal, the quickest and easiest way is to use the easy-to-use yet professional software called Pavtube Video Converter , with which, we can effortlessly and flawlessly transcode Sony EX MP4 footage to AVI/MOV/WMV/MPG for Avid, Premiere, Sony Vegas, Pinnacle, CyberLink and Windows Movie Maker editing. It is safe to install and easy to use. And you can enjoy the powerful edit function, like trim, crop, watermark for text, image and video, 3D effect, subtitles and so on. Below will show you how to Other Download: - Pavtube old official address: http://www.pavtube.com/video_converter/ - Amazon Download: http://download.cnet.com/Pavtube-Video-Converter/3000-2194_4-75734821.html - Cnet Download: http://download.cnet.com/Pavtube-Video-Converter/3000-2194_4-75734821.html Free download and follow below step to convert Sony XDCAM EX MP4 for Windows . Step 1. Load Sony XDCAM EX MP4 files.You can choose "add video" directly to add the whole folder.
  Step 2. Select output format for video editing software. Click "Format" menu and choose "Adobe Premiere/Sony Vegas -> MPEG-2 HD Video (*.mpg)",or select WMV/MOV/MPEG-2, you can also choose "HD Video -> AVI HD Video (*.avi)". Finally, click the file icon beside output bar, and choose a destination folder for saving output files.
  Step 3. Edit loaded Sony XDCAM EX MP4 files. Click "Edit" button and you are allowed to trim, crop, add text/image/video watermark or some effect to your output video for making it perfect. Here the function of adding subtitles to output files will contribute to make your own videos. Tips: Click "Settings" on the interface and you can adjust the parameters including size, bitrate, frame rate, etc. to get a high quality of output files. And keep the settings the same as original video recordings will provide you the least loss of video quality. Step 4. Start conversion. Click the "Convert" button to start transcoding Sony XDCAM EX MP4 footage for editing in Avid, Premiere, Sony Vegas, Pinnacle, CyberLink and Windows Movie Maker. When it completed, click the "Open" button to get the generated videos for your editing software. More related tips:
Source: http://pc-mac-compatibility-issues.blogspot.com/2013/08/transcode-sony-xdcam-ex-file-on-windows.html
Step 3. Edit loaded Sony XDCAM EX MP4 files. Click "Edit" button and you are allowed to trim, crop, add text/image/video watermark or some effect to your output video for making it perfect. Here the function of adding subtitles to output files will contribute to make your own videos. Tips: Click "Settings" on the interface and you can adjust the parameters including size, bitrate, frame rate, etc. to get a high quality of output files. And keep the settings the same as original video recordings will provide you the least loss of video quality. Step 4. Start conversion. Click the "Convert" button to start transcoding Sony XDCAM EX MP4 footage for editing in Avid, Premiere, Sony Vegas, Pinnacle, CyberLink and Windows Movie Maker. When it completed, click the "Open" button to get the generated videos for your editing software. More related tips:
Source: http://pc-mac-compatibility-issues.blogspot.com/2013/08/transcode-sony-xdcam-ex-file-on-windows.html