Summary: As a professional video format, MXF allows us to shoot video with multiple audio tracks. There is an easy way to solve MXF audio problems. Pavtube iMixMXF can remove all your worries about sound problems when convert multi-track MXF on Mac.
Hot Search: Multi-track P2 MXF to FCP X | MXF to FCP X | MXF to Avid | Multi-track MXF to SBS 3D video | MXF to Aperture 3 | MXF to Premiere Pro CC  Multi-track MXF footage becomes more and more common with camcorders from Canon, Sony, Panasonic and so on. Usually these mxf contains two or more audio tracks for better presenting, you may like to record one audio track in mics which will get better audio effect especially shooting in a noisy environment. But it may troubles you when converting the multi-track MXF footage to other formats for editing/playback in NLE or other programs on Mac; for instance, you may like to convert multi-track MXF to MOV, ProRes, AIC, DNxHD, H.264/AVC, QuickTime MOV. However, due to the multi-track audios, you may not able to get the right track or get all the tracks converted. Here by this article will show you how to convert your multi-track MXF files on Mac without audio problems. To achieve this goal, Pavtube iMixMXF(Review) can exactly do it for you which are professional multi-track MXF Converter and Mixer tools for helping to convert MXF to any other video and audio formats for playback or further editing on Mac with preserving all the multiple audio tracks of original MXF videos. Other than multi-track preserving features, it is also capable of mixing several audio tracks into one track. Let's go to try efficient conversion workflow with an easy-to-use interface and these wonderful functions now. The following instruction will tell you how to transcode multi audio channels MXF on Mac Mavericks. Now download and install the best Multitracks MXF Converter and Mixer, and then follow the instruction. (Note: And its windows version is available here.) Before converting, connect your MXF Camcorder to Mavericks with USB 2.0 cable or use card reader to transfer the.mxf files to Apple hard drive disk.
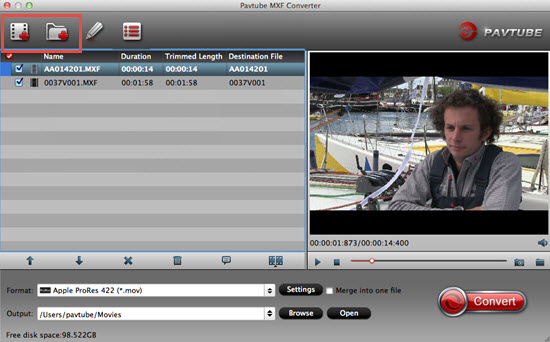
 Other Download: - Pavtube old official address: http://www.pavtube.com/imixmxf-mac/ - Amazon Download: http://www.amazon.com/Pavtube-Studio-iMixMXF-Download/dp/B00QI7MY4Y - Cnet Download: http://download.cnet.com/Pavtube-iMixMXF/3000-2194_4-76171460.html Step 1. Launch Pavtube iMixMXF and click the top left two icons to load individual mxf clips or the entire folder.
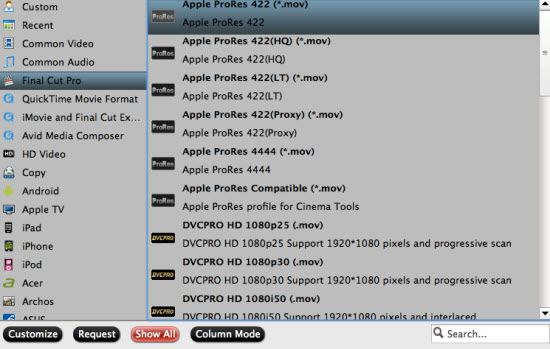
 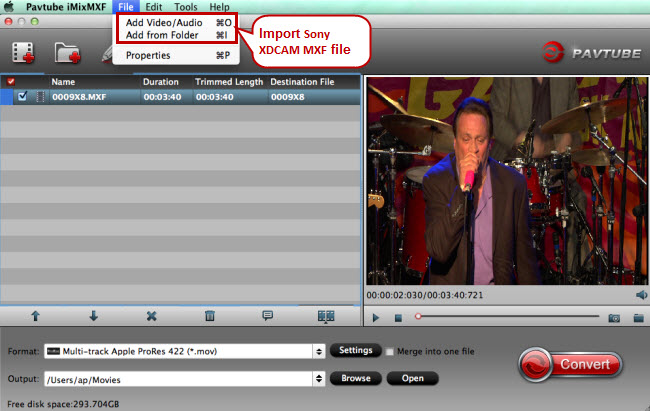 Step 2. Choose best video codec according to your needs. Different from other MXF converters, Pavtube iMixMXF is able to output multi-track Apple RreRes formats for FCP X, multi-track MOV for various editor tools, making it stand out from the rest. To preserve and produce multi-track video, click the "Format" bar to follow "Multi-track Video" > "Multi-track Apple ProRes 422 (*.mov)", "Multi-track MOV", Multi-track MP4" for broadcasting, further editing, delivering and playing.
 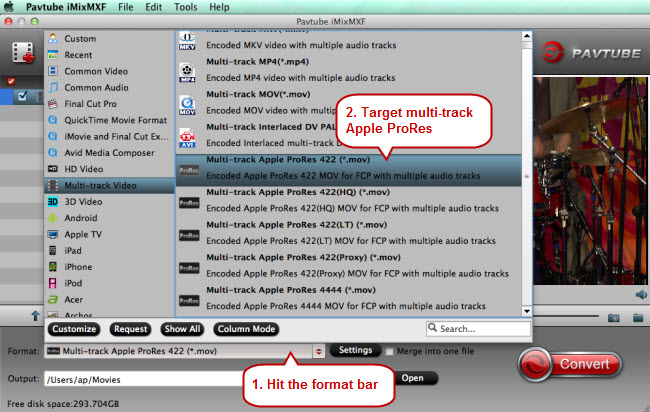 Step 3. Check "Mix into one track" In the main interface, press "Settings" button, and then "Multi-task Settings" panel pops up. Switch to "Audio" section, check the audio tracks that you want to mix down, and tick off the checkbox before "Mix into one track". After that, click "OK"
  If you don't change it, Mac MXF Converter will take the first audio track be default; but if this track has no audio, you will only get video no audio after conversion. Step 4. Click "Start" to start multi-track MXF conversion. Click the "Convert" button to start converting MXF to compatible video format on Mac. After conversion, you can click "open output folder" to locate the converted files and then you can edit, deliver and play them. Of course, there is no sound problem any more. That's great! Never miss to get Saving up to $44.1, MXF/MTS/M2TS/MKV/FLV/MOV Converter.etc at Pavtube Bundles Deals!
  More Guides: Canon XF plug-in for FCP or Use iMixMXF to Convert MXF for FCP Import Sony PXW-X70 Video Files into FCPX or iMovie Mix and Convert Avid Multi-track MXF Files to MP4 Audio Issues When Editing Sony PMW 150 MXF in FCP? Convert Panasonic HPX250 P2 MXF files for playback on TV How to Edit 4K Footage in Adobe Premiere Import Canon multi-track MXF to Davinci Resolve Canon XF300 MXF Read Errors in Premiere Pro CC Edit Panasonic AJ-HPX2700 P2 MXF in Avid/Premiere/Sony Vegas Pro Encode Sony XDCAM MXF to Multi-track Apple ProRes for FCP Transcode MXF to MP4 with multiple audio tracks for playing and editing Import Canon C300 Mark II 4K MXF to Premiere Pro CS6/5/4/3 Method of Importing JVC GY-HM650U MXF Files to iMovie Source: http://digitalmediasolution.altervista.org/blog/solve-no-audio-issue-convert-multi-track-mxf-files-on-mac/
Summary: These days I’ve been trying to figure out how to get VLC to recognize MXF recordings, how to play MXF with VLC on Mac and Windows, but there is no-go. Can anyone kindly shed some light on this issue?
 Hot search: MXF to MOV | MXF to iMovie | MXF to QuickTime | MXF to Avid Media Composer | MXF to FCP 7 | MXF to Aperture 3 | MXF to DaVinci Resolve
Material Exchange Format (MXF) is an open-standard container or a wrapper format for digital audio and video media. There are many camcorders use MXF format, like Sony XDCAM series, Panasonic P2 series and Canon XF series. Unfortunately MXF is not an easy format to handle both on Windows and Mac. In this article, we aim to offer you an easy way to help you play MXF with VLC media player freely.
VLC media player is the most successful free open source cross-platform multimedia player in Windows, Linux, Mac OS X and framework that plays most multimedia files as well as DVD, Audio CD, VCD, and various streaming protocols. There are still many people encountered problems when playing MXF with VLC on Mac and Windows.
"I am using VLC to play some MXF files. The files play fine but it seems I cannot seek. Whenever I try to click to a position on the scrollbar the video will freeze and jump to the beginning. I am wondering is this a known issue?"
If you tried to play MXF with VLC on Mac and Windows, you may probably run into the same situations as mentioned above. To be able to make MXF files viewable on a Mac or a Windows PC through VLC, you are suggested to transcode MXF to a format that is suitable for your media player. This requires third party software like Pavtube MXF Converter for Mac. (Windows version)
Hot search: MXF to MOV | MXF to iMovie | MXF to QuickTime | MXF to Avid Media Composer | MXF to FCP 7 | MXF to Aperture 3 | MXF to DaVinci Resolve
Material Exchange Format (MXF) is an open-standard container or a wrapper format for digital audio and video media. There are many camcorders use MXF format, like Sony XDCAM series, Panasonic P2 series and Canon XF series. Unfortunately MXF is not an easy format to handle both on Windows and Mac. In this article, we aim to offer you an easy way to help you play MXF with VLC media player freely.
VLC media player is the most successful free open source cross-platform multimedia player in Windows, Linux, Mac OS X and framework that plays most multimedia files as well as DVD, Audio CD, VCD, and various streaming protocols. There are still many people encountered problems when playing MXF with VLC on Mac and Windows.
"I am using VLC to play some MXF files. The files play fine but it seems I cannot seek. Whenever I try to click to a position on the scrollbar the video will freeze and jump to the beginning. I am wondering is this a known issue?"
If you tried to play MXF with VLC on Mac and Windows, you may probably run into the same situations as mentioned above. To be able to make MXF files viewable on a Mac or a Windows PC through VLC, you are suggested to transcode MXF to a format that is suitable for your media player. This requires third party software like Pavtube MXF Converter for Mac. (Windows version)

 Other Download:
- Pavtube old official address: http://www.pavtube.com/mxf-converter-mac/
- AppStore Download: https://itunes.apple.com/us/app/pavtube-mxf-converter/id502807634?mt=12
- Amazon Download: http://www.amazon.com/Pavtube-MXF-Converter-Mac-Download/dp/B00QID8K28
- Cnet Download: http://download.cnet.com/Pavtube-MXF-Converter/3000-2194_4-76177789.html
Other Download:
- Pavtube old official address: http://www.pavtube.com/mxf-converter-mac/
- AppStore Download: https://itunes.apple.com/us/app/pavtube-mxf-converter/id502807634?mt=12
- Amazon Download: http://www.amazon.com/Pavtube-MXF-Converter-Mac-Download/dp/B00QID8K28
- Cnet Download: http://download.cnet.com/Pavtube-MXF-Converter/3000-2194_4-76177789.html
Below is the simple guide about how to play MXF with VLC on Mac and Windows.
Step 1: Backup your MXF files to hard drive. Install and launch MXF Video Converter for Mac. Drag and drop MXF files to the software. You can import multiple files at once thanks to "Add from folder" button.
 Step 2: Click the drop-down list in the format line to get the format box. Then choose "HD Video>>H.264 HD Video (*.mp4)" as output format.
 Step 3: You can adjust the parameters by clicking "Settings" button, choose the resolution, bitrate, frame rate and etc. as you want.
Step 4: You can preview to check the final result. Once you are satisfied with it, click the "Convert" button to start converting MXF files to H.264 HD Video MP4 for playing with VLC flawlessly. It will take you a little while.
Conclusion: Once the conversion process shows in 100%, click "Open" to get the output videos. Now, you can play MXF with VLC on Mac and Windows without any issues.
Further Reading:
Source: http://bestvideoking.blogspot.com/2015/03/play-mxf-with-vlc.html
Step 3: You can adjust the parameters by clicking "Settings" button, choose the resolution, bitrate, frame rate and etc. as you want.
Step 4: You can preview to check the final result. Once you are satisfied with it, click the "Convert" button to start converting MXF files to H.264 HD Video MP4 for playing with VLC flawlessly. It will take you a little while.
Conclusion: Once the conversion process shows in 100%, click "Open" to get the output videos. Now, you can play MXF with VLC on Mac and Windows without any issues.
Further Reading:
Source: http://bestvideoking.blogspot.com/2015/03/play-mxf-with-vlc.html
Summary: Are you looking for an easy, quick and affordable way to seamlessly convert AVI file to MPEG-2 so that you can edit them in EDIUS 7/7.01? Consider it done.
 Hot search: MKV to EDIUS Pro 8 | GoPro MP4 File with EDIUS Pro 7 | AVI to Windows Movie Maker | AVI to Sony Movie Studio | XAVC MXF to AVI AVI, Audio Video Interleave video file format is developed by Microsoft mainly for Windows operating systems. Audio and video can be played in synchronous format without any halt in the video. AVI file format can be played with various media players like AVI media player, Media player classic, Plex and many others. People who have tons of AVI files at hand usually ask the same or similar questions when they try to edit AVI file in EDIUS 7/7.01. "After my negative testing experience with EDIUS 7 on a Windows 8 Machine, the AVI file is stuttering/shaking during playback and after exporting to an .m2ts file. There is no buffering issue. When I load the same video file to my EDIUS 6.08 system all looks smooth and normal the output file is perfect!" EDIUS 7 is a new engine under the hood and 64-bit, it can affect various subsystems differently than previous versions. Is there any way to solve AVI file stuttering/shaking problems with EDIUS 7/7.01? Searching the web, I got some hints. What I can do with the current project is take the AVI I have and convert it for use with EDIUS 7/7.01. And what I need is a great AVI converter. After multiple testing, I found Pavtube Video Converter is the best option for me. It is able to convert AVI to EDIUS 7/7.01 friendly format MPEG-2 easily with the best video quality. Besides AVI, this video convert program can also help to convert between any popular video and audio formats as you need. Plus, with the built-in video editing feature of the program, you can trim, crop, add watermark and more to your video files.
 Other Download: - Pavtube old official address: http://www.pavtube.com/video_converter/ - Amazon Download: http://download.cnet.com/Pavtube-Video-Converter/3000-2194_4-75734821.html - Cnet Download: http://download.cnet.com/Pavtube-Video-Converter/3000-2194_4-75734821.html How to solve AVI file stuttering/shaking problems with EDIUS 7/7.01? Step 1: As soon as you download and install the program, launch it and when the main interface pops up in front of us, just click the "Add Video" or "Add from Folder" to let in.
 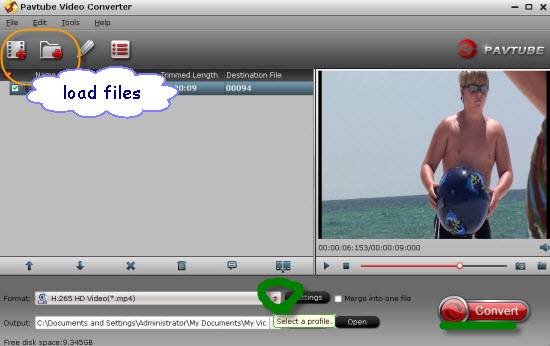 Step 2: Click the drop-down list in the format line to get the format box. Then choose "Adobe Premiere/Sony Vegas>>MPEG-2 (*.mpg)" as output format.
  Step 3: Click "Settings" button to customize the output video and audio settings by yourself. But if you are not good at it, you’d better use the default parameters, they will ensure you a good balance between file size and image quality basically. You can change the resolution, bit rate, frame rate as you need. Step 4: After that, click "Convert" to start AVI to EDIUS 7/7.01 MPEG-2 conversion. Conclusion: After conversion, you can get the generated files by clicking "Open" button. Now, you’ll get no troubles in editing AVI file in EDIUS 7/7.01. AVI file stuttering/shaking problems with EDIUS 7/7.01 have been solved! Further Reading: Downsize Sony 4K XAVC to 1080p for Playing Smoothly How Can I Edit 3D MTS from Sony HDR-TD20V in FCP X? Smoothly Edit Sony F55/F5 4K XAVC in Final Cut Pro 6/7 How to Play MOV on iPhone? Work with Canon C100 Mark II AVCHD in iMovie Upload Canon C300 MXF to YouTube/Vimeo for Sharing Import Canon EOS 5DS R MOV to Final Cut Studio Source: http://pc-mac-compatibility-issues.blogspot.com/2015/08/import-avi-file-to-edius-7-7.01.html
Summary: This article will tell you how to convert MKV to Final Cut Pro supported ProRes MOV format so that you can import MKV to Final Cut Pro (X) for editing. Final Cut Pro
As a major breakthrough in video editing, Final Cut Pro may be the first choice for Mac users. It makes video editing faster and better with motion graphics and file-based workflow, offers a new way to organize. As we know, Final Cut Pro(FCP) allows users to edit any QuickTime compatible video format including DV, HDV, P2 MXF (DVCProHD), XDCAM, and 2K film formats without any quality loss. But for Mac users, what confused them most now is the importing problems with the 1080p/720p MKV video. For example, how to play MKV on Xbox? Hot search: XAVC to FCP 7 | MXF to FCP | 4K Video to FCP | MKV to FCP | MP4 to FCP | XAVC to FCP 7 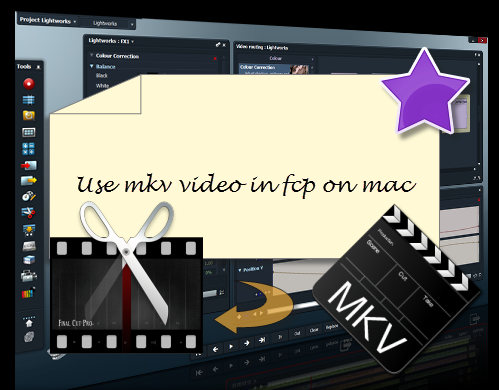 In fact, FCP still can't support MKV format, which is similar in concept to other containers like AVI, MP4 or Advanced Systems Format (ASF), but is entirely open in specification, with implementations consisting mostly of open source software. If you want to import 1080p/720p MKV files into FCP and edit 1080p/720p MKV files with FCP, you must get the Mac MKV to FCP Converter first. To do MKV video to Final Cut Pro mac task, you're highly recommended to get PavtubeVideo Converter for Mac which can convert 1080p/720p MKV to Apple Prores 422 which is the most most compatible codec with Final Cut Pro on Mac with fast speed by keeping the original quality. Then you can easily import the 1080p/720p MKV to Final Cut Pro X, Final Cut Pro 6, Final Cut Pro 7 for editing on Mac. This will help you import the file correctly, saving the rendering time and keep the HD quality. Why not to download this easy-to-use and useful software for you and transcode MKV to Apple ProRes codec. What to do in detail? The Steps for Converting MKV to FCP Apple ProRes 422 1.Load MKV files After install and launch the Pavtube MKV to FCP Converter, drag and drop MKV file. You can drag several files to the program directly.
  2.Choose output format Apple ProRes MOV is the best format for Final Cut Pro (X), here you just need to choose the target application as output format, for example, “Final Cut Pro”->”Apple ProRes 422(*.mov)”.
  3. Do some settings as you want. 4.Transcode MKV to FCP (X) At last, hit the “Convert” button to transcode MKV to FCP (X). With this MKV to Apple ProRes 422 converter, you can easily change MKV files to FCP (X) for editing, this software runs fast, so you can convert your 1080p /720p MKV footages to FCP (X) in less time, video and audio synchronization are perfectly guaranteed, after converting you can follow this guide to import videos to FCP (X) for editing. As Apple ProRes codecs are natively supported by FCP, the rendering time is saved as well. And you can not only edit footage captured in such popular video formats, but also edit video clips such as downloaded web content or even archived video from the hard drive by converting and importing MTS to Final Cut Pro, M2TS to Final Cut Pro, MOV to Final Cut Pro, MXF to Final Cut Pro, etc. Good luck to you! More related tips:
Source: http://1080p-video-tool.blogspot.com/2013/11/convert-mkv-to-prores-for-fcp.html
3. Do some settings as you want. 4.Transcode MKV to FCP (X) At last, hit the “Convert” button to transcode MKV to FCP (X). With this MKV to Apple ProRes 422 converter, you can easily change MKV files to FCP (X) for editing, this software runs fast, so you can convert your 1080p /720p MKV footages to FCP (X) in less time, video and audio synchronization are perfectly guaranteed, after converting you can follow this guide to import videos to FCP (X) for editing. As Apple ProRes codecs are natively supported by FCP, the rendering time is saved as well. And you can not only edit footage captured in such popular video formats, but also edit video clips such as downloaded web content or even archived video from the hard drive by converting and importing MTS to Final Cut Pro, M2TS to Final Cut Pro, MOV to Final Cut Pro, MXF to Final Cut Pro, etc. Good luck to you! More related tips:
Source: http://1080p-video-tool.blogspot.com/2013/11/convert-mkv-to-prores-for-fcp.html
Summary: Have interests in uploading Canon XC10 XF-AVC 4K MXF to YouTube, Vimeo or Facebook for sharing? That’s exactly an awesome idea! But do you know the best video codec for uploading? If not, you may get some troubles there. Fortunately, best solutions are offered here to upload the Canon XC10 XF-AVC 4K MXF to YouTube, Vimeo and Facebook.
 Introduction:
Canon has recently announced the development of XF-AVC, a new proprietary video format for the efficient recording of high-image-quality 4K, 2K and HD video footage. XF-AVC is mainly targeting professional-use 4K video camcorders, such as the most recent Canon XC10 4K Camcorder, which delivers enhanced workflows across various stages of the production process, from shooting to editing.
Introduction:
Canon has recently announced the development of XF-AVC, a new proprietary video format for the efficient recording of high-image-quality 4K, 2K and HD video footage. XF-AVC is mainly targeting professional-use 4K video camcorders, such as the most recent Canon XC10 4K Camcorder, which delivers enhanced workflows across various stages of the production process, from shooting to editing.
Hot Search: MXF to VLC/WMP | MXF to iMovie | MXF to FCP | MXF to Avid MC | MXF to Premiere Pro | MXF to multi-track MOV
How to upload Canon XC10 XF-AVC 4K MXF to YouTube, Vimeo and Facebook? If you are looking for an easy and direct way, you may wish to read this post. Canon has recently announced the development of XF-AVC, a new proprietary video format for the efficient recording of high-image-quality 4K, 2K and HD video footage. XF-AVC is mainly targeting professional-use 4K video camcorders, such as the most recent Canon XC10 4K Camcorder, which delivers enhanced workflows across various stages of the production process, from shooting to editing.
Canon XC10 uses XF-AVC movie recording format, employs the MPEG-4 AVC/H.264 video compression format, and stores shootings in an MXF wrapper. MXF is a "container" or "wrapper" format which supports a number of different streams of coded "essence", encoded with any of a variety of codecs, together with a metadata wrapper which describes the material contained within the MXF file. MXF has been designed to address a number of problems with non-professional formats.
Since YouTube/Vimeo/Facebook has their best supported video formats, why can't we convert all the video formats to those suitable ones for YouTube/Vimeo/Facebook. Powerful converting assistant PavtubeMXF Converter for Mac is highly recommended here. If you are running on Windows, you can refer to the equivalent version MXF Converter. As well as encoding the edited video back to normal files for sharing with friends, it can adjust our output videos with our own favorite settings.
Other Download Sources:
Apple Store: https://itunes.apple.com/us/app/pavtube-mxf-converter/id502807634?mt=12
Amazon Store: http://www.amazon.com/Pavtube-MXF-Converter-Mac-Download/dp/B00QID8K28
Cnet: http://download.cnet.com/Pavtube-MXF-Converter/3000-2194_4-76177789.html
How to convert and upload Canon XC10 XF-AVC 4K MXF to YouTube/Vimeo/Facebook?
Step 1: Backup your MXF files from Canon XC10 to hard drive. Install and launch MXF Converter for Mac. Drag and drop MXF files to the software. You can import multiple files at once thanks to "Add from folder" button.
 Step 2: Click the "Format" bar and come to the output list, here we should select the different output items there. For example, choose the "Flash Video -> FLV H.264 (*.flv)" for YouTube. Or "HD Video" -> "H.264 HD Video (*.mp4)" or "AVI HD Video(*.avi)" individually for Vimeo and Facebook.
 Step 3: Click "Settings" button to customize the output video and audio settings by yourself. But if you are not good at it, you'd better use the default parameters, they will ensure you a good balance between file size and image quality basically. You can change the resolution, bit rate, frame rate as you need.
 Step 4: You can preview to check the final result. Once you are satisfied with it, click the "Convert" button to start converting Canon XC10 XF-AVC 4K MXF to YouTube/Vimeo/Facebook supported formats for uploading. It will take you a little while.
Conclusion: From Canon XC10 XF-AVC 4K MXF to supported videos for YouTube/Vimeo/Facebook, such the easy operation job you can do well. Just have fun for sharing wonderful XF-AVC 4K MXF videos captured by Canon XC10 on YouTube, Vimeo and Facebook with your family and friends!
Learn more about Pavtube MXF Converter for Mac articles:
Never miss to get Saving up to $44.1, MXF/MTS/M2TS/MKV/FLV/MOV Converter.etc at Pavtube Bundles Deals!
Source: http://bestvideoking.blogspot.com/2015/04/upload-4k-mxf-to-youtube-vimeo-facebook.html
Step 4: You can preview to check the final result. Once you are satisfied with it, click the "Convert" button to start converting Canon XC10 XF-AVC 4K MXF to YouTube/Vimeo/Facebook supported formats for uploading. It will take you a little while.
Conclusion: From Canon XC10 XF-AVC 4K MXF to supported videos for YouTube/Vimeo/Facebook, such the easy operation job you can do well. Just have fun for sharing wonderful XF-AVC 4K MXF videos captured by Canon XC10 on YouTube, Vimeo and Facebook with your family and friends!
Learn more about Pavtube MXF Converter for Mac articles:
Never miss to get Saving up to $44.1, MXF/MTS/M2TS/MKV/FLV/MOV Converter.etc at Pavtube Bundles Deals!
Source: http://bestvideoking.blogspot.com/2015/04/upload-4k-mxf-to-youtube-vimeo-facebook.html
Summary: How to import your M2T files into FCP (X) if you've already copied the individual files to your Mac. Also a how to use M2T to FCP Converter to rewrap M2T files into FCP X friendly ProRes 422 mov files smoothly. The article is showing you.
 Hot Search: MTS to Smart TV | 3D MTS Movies | MTS to MP4 | MTS to iMovie | MTS TO MP4 | MTS to Sony Movie Studio
What is M2T files?
M2T is High-definition video recording format used by many HD camcorders; commonly referred to as "HDV"; uses MPEG-2 compression to store HD video data on DV or MiniDV tapes; supports resolutions of 720p and 1080i.
There are many different digital video file types available out there, which can make file conversion difficult for the inexperienced. M2T files and MPG files are actually not completely dissimilar, as both are different types of MPEG2 video files. As a result, this is a much less complicated conversion than many other possible video conversions. If a quick file renaming trick doesn't work, there are many conversion programs available on the Internet. I'd like Pavtube Mac M2T to ProRes Converter.
Other Download:
- Pavtube old official address: http://www.pavtube.com/mts-converter-mac/
- Amazon Download: http://www.amazon.com/Pavtube-MTS-M2TS-Converter-Download/dp/B00QIE3U0Y
- Cnet Download: http://download.cnet.com/Pavtube-MTS-M2TS-Converter/3000-2194_4-76177029.html
The native format of HDV isn't QuickTime, its .M2T.
Anyway, while working on my latest book, I needed to batch convert .M2T files to FCP (X) compatible Formats. Apple Final Cut likes lots and lots of different files – but not .M2T.
This means that if someone captures an HDV file in another application, such as Adobe OnLocation or HDVSplit , then sends it to you, you'll need to batch transcode M2T to ProRes MOV before importing M2T to Final Cut Pro (X) for editing.
Note: You can not use QuickTime Player to preview an M2T file. The Finder displays it as a generic document icon.
Step 1. Load M2T files to Mac M2T to ProRes Converter.
Install and run Pavtube Mac M2T to ProRes Converter. Copy your M2T footages to Mac, Click "+" button to load your M2T file.
Tip: If you merge or combine various .m2t files into one file, click "Merge into one file".
Step 2: Choose Apple ProRes 422 MOV as output format for FCP.
When you'd like to specify an output format, you can choose "Format > Final Cut Pro > Apple ProRes 422 (*.mov)" as the best video format for FCP 6/7 and FCP X on Mac 10.8.
Hot Search: MTS to Smart TV | 3D MTS Movies | MTS to MP4 | MTS to iMovie | MTS TO MP4 | MTS to Sony Movie Studio
What is M2T files?
M2T is High-definition video recording format used by many HD camcorders; commonly referred to as "HDV"; uses MPEG-2 compression to store HD video data on DV or MiniDV tapes; supports resolutions of 720p and 1080i.
There are many different digital video file types available out there, which can make file conversion difficult for the inexperienced. M2T files and MPG files are actually not completely dissimilar, as both are different types of MPEG2 video files. As a result, this is a much less complicated conversion than many other possible video conversions. If a quick file renaming trick doesn't work, there are many conversion programs available on the Internet. I'd like Pavtube Mac M2T to ProRes Converter.
Other Download:
- Pavtube old official address: http://www.pavtube.com/mts-converter-mac/
- Amazon Download: http://www.amazon.com/Pavtube-MTS-M2TS-Converter-Download/dp/B00QIE3U0Y
- Cnet Download: http://download.cnet.com/Pavtube-MTS-M2TS-Converter/3000-2194_4-76177029.html
The native format of HDV isn't QuickTime, its .M2T.
Anyway, while working on my latest book, I needed to batch convert .M2T files to FCP (X) compatible Formats. Apple Final Cut likes lots and lots of different files – but not .M2T.
This means that if someone captures an HDV file in another application, such as Adobe OnLocation or HDVSplit , then sends it to you, you'll need to batch transcode M2T to ProRes MOV before importing M2T to Final Cut Pro (X) for editing.
Note: You can not use QuickTime Player to preview an M2T file. The Finder displays it as a generic document icon.
Step 1. Load M2T files to Mac M2T to ProRes Converter.
Install and run Pavtube Mac M2T to ProRes Converter. Copy your M2T footages to Mac, Click "+" button to load your M2T file.
Tip: If you merge or combine various .m2t files into one file, click "Merge into one file".
Step 2: Choose Apple ProRes 422 MOV as output format for FCP.
When you'd like to specify an output format, you can choose "Format > Final Cut Pro > Apple ProRes 422 (*.mov)" as the best video format for FCP 6/7 and FCP X on Mac 10.8.
 Step 3. Set best video and audio for FCP.
Click "Settings" if you want to further customize video and audio parameters such as video codec, audio codec, frame rate, bit rate, video size, audio channels etc. Do not forget to click on "OK" to confirm your settings. In Export to box you could specify destination for the converted file.
Tips: You can click "Edit" button to perform edit functions such as crop, trim, flip, effect, watermark and audio replace. To eliminate interlacing effect, simply check Deinterlacing box under Effect tab.
If you don't want "3D effect", please click on the pull down menu, choose "none".
Step 4: Start converting M2T to ProRes 422 MOV.
Click on "Convert" button to start Conversion. The converter will generate MOV file with admirable video quality. The M2T files are HD video with huge file size, so the conversion of M2T to ProRes MOVmay cost lots of time. You can set auto shutdown before conversion starts.
After conversion you can click the "Open" button to locate converted files and load the ProRes MOV files to FCP (X), then you are able to edit M2T footage in FCP 6/7 or FCP X freely.
More related tips:
Hot News!!! Pavtube Summer Promotion has become something of a tradition, and it's back for 2015. Giveaway and Save up to 50% OFF for new Pavtube Software owners, this sale runs until Aug 7, 2015.
Source: http://mediaconverting.blogspot.com/2013/09/batch-convert-m2t-files-to-fcp.html
Step 3. Set best video and audio for FCP.
Click "Settings" if you want to further customize video and audio parameters such as video codec, audio codec, frame rate, bit rate, video size, audio channels etc. Do not forget to click on "OK" to confirm your settings. In Export to box you could specify destination for the converted file.
Tips: You can click "Edit" button to perform edit functions such as crop, trim, flip, effect, watermark and audio replace. To eliminate interlacing effect, simply check Deinterlacing box under Effect tab.
If you don't want "3D effect", please click on the pull down menu, choose "none".
Step 4: Start converting M2T to ProRes 422 MOV.
Click on "Convert" button to start Conversion. The converter will generate MOV file with admirable video quality. The M2T files are HD video with huge file size, so the conversion of M2T to ProRes MOVmay cost lots of time. You can set auto shutdown before conversion starts.
After conversion you can click the "Open" button to locate converted files and load the ProRes MOV files to FCP (X), then you are able to edit M2T footage in FCP 6/7 or FCP X freely.
More related tips:
Hot News!!! Pavtube Summer Promotion has become something of a tradition, and it's back for 2015. Giveaway and Save up to 50% OFF for new Pavtube Software owners, this sale runs until Aug 7, 2015.
Source: http://mediaconverting.blogspot.com/2013/09/batch-convert-m2t-files-to-fcp.html


