VLC media player (commonly known as VLC) is a portable, free and open-source, cross-platform media player andstreaming media server written by the VideoLAN project.
When you got some MKV videos, and want to play them in VLC media player. You would meet some issues, such as: MKV audio can not be identified by VLC Media Player, subtitles load error, play slowly and so on. The reason for these problems is that MKV is more complex encoding.
To solve the problem, there is an universal solution: Install appropriate codec pack. There are various free codec packs online which will allow us to decode and play MKV files. The disadvantage of this approach is that you have to download a lot of codecs but if you are only trying to play one type of video file. Another shortcoming is these codecs not always work well.
Here, I recommend this simple and easy way: Using Pavtube Video Converter which is a perfect converter for converting 720p, 1080p MKV and MKV with dts/ac3 5.1 channel audio into VLC without any problems.
Other tools: MKV Players
Related conversion: Blu-ray to M3U8 in VLC, H.265 to VLC, M4V to VLC,
With Pavtube Video Converter, you’ll have free access to watching SD videos (e.g. YouTube FLV/F4V, MP4, AVI, etc), digital camcorder recordings (e.g. MXF, MTS AVCHD, MOV, MP4, etc), Tivo, audio files (e.g. MP3, MP2, WMA, FLAC) on devices such as Apple/Android/Windows series, media players, game consoles, etc.In addition to various common audio/video files, Pavtube Video Converter is also able to output compatible video formats for editing programs (e.g. Final Cut Pro, Final Cut Express, iMovie, Avid, Adobe Premiere, etc).
Notes: If you are Mac user, you can use the Mac version.
Then, follow the steps to convert MKV for playing in VLC Media Player.

 Other Download:
- Pavtube old official address: http://www.pavtube.com/video_converter/
- Amazon Download: http://download.cnet.com/Pavtube-Video-Converter/3000-2194_4-75734821.html
- Cnet Download: http://download.cnet.com/Pavtube-Video-Converter/3000-2194_4-75734821.html
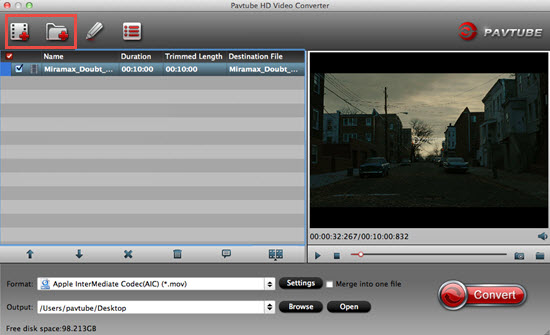
Step 1: Once run the program, click "Add video" button to load the MKV files. The program supports batch conversion, so you are allowed to add multiple files to convert at a time. Meanwhile, if you wanna combine several files into a single file, you can tick off the checkbox "Merge into one file".
Other Download:
- Pavtube old official address: http://www.pavtube.com/video_converter/
- Amazon Download: http://download.cnet.com/Pavtube-Video-Converter/3000-2194_4-75734821.html
- Cnet Download: http://download.cnet.com/Pavtube-Video-Converter/3000-2194_4-75734821.html
Step 1: Once run the program, click "Add video" button to load the MKV files. The program supports batch conversion, so you are allowed to add multiple files to convert at a time. Meanwhile, if you wanna combine several files into a single file, you can tick off the checkbox "Merge into one file".
 Step 2: Just click the "Format">"HD Video", then click the “H.264 HD Video(*.mp4)”
 Step 3: After selecting the format easily, you can click "Settings" to adjust Bitrates (kbps) and Size (pix). Don't forget the balance between video quality and size.
Moreover, Pavtube Video Converter also allows you to customize profile settings to get a desired and better output. Movie creation with this program is no big deal. You can edit your video files by trimming, cropping, attaching external subtitles, adding watermarks, change video effect, etc
Step 4: Click the red "Convert" button, start the conversion. And find the destination file by clicking "Open". After you get the transferred MKV file, you can play the video in VLC player without any sound issues and problems subtitles. Have a try and have fun!
Further reading:
Step 3: After selecting the format easily, you can click "Settings" to adjust Bitrates (kbps) and Size (pix). Don't forget the balance between video quality and size.
Moreover, Pavtube Video Converter also allows you to customize profile settings to get a desired and better output. Movie creation with this program is no big deal. You can edit your video files by trimming, cropping, attaching external subtitles, adding watermarks, change video effect, etc
Step 4: Click the red "Convert" button, start the conversion. And find the destination file by clicking "Open". After you get the transferred MKV file, you can play the video in VLC player without any sound issues and problems subtitles. Have a try and have fun!
Further reading:
As YouTube/Vimeo/Facebook have become more and more popular and widely over the world. Working at YouTube/Vimeo/Facebook, we love seeing inspiring videos shared around the world everyday. They display a wide variety of user-generated video content, including movie clips, TV clips, and music videos.
But, if you want to upload XAVC videos to YouTube/Vimeo/Facebook to share with your family and friends, you always face to some error message, such as very slow uploading speed, jerky playback performance, progress bar not moving, not compatible formats, etc.
Why do these problems appear?XAVC is acomplex code, sometimes it will be incompatible with YouTube/Vimeo/Facebook. What’s more, if the XAVC files has been damaged, you will fail to upload XAVC to YouTube/Vimeo/Facebook as well. The format is also the problem for YouTube/Vimeo/Facebook. By searching from Internet, we can learn that MP4 is the best format for YouTube/Vimeo/Facebook. So, we can solve the problem by converting XAVC to the format that supported by YouTube/Vimeo/Facebook best.
To complete the conversion, wo need to use this Pavtube XAVC to MP4 Converter(Windows Version and Review), then you can upload XAVC videos to YouTube/Vimeo/Facebook quickly. In addition to various common audio/video files, Pavtube Video Converter for Mac is also able to output compatible video formats for editing programs (e.g. Final Cut Pro, Final Cut Express, iMovie, Avid, Adobe Premiere, etc).
Then, follow the steps, you will upload XAVC to YouTube/Vimeo/Facebook successfully.
Download the XAVC to MP4 Converter:

 Other Download:
- Pavtube old official address: http://www.pavtube.com/video-converter-mac/
- Amazon Store Download: http://www.amazon.com/Pavtube-Video-Converter-Mac-Download/dp/B00QIBK0TQ
- Cnet Download: http://download.cnet.com/Pavtube-Video-Converter/3000-2194_4-76179460.html
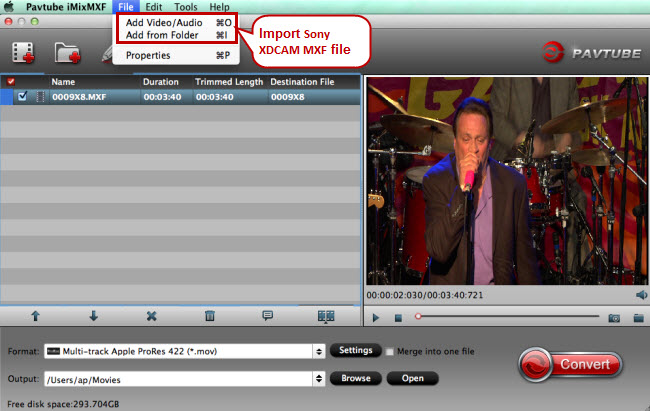
Step 1: Free download this converter on your Mac without any problem, the latest Yosemite can also be supported by this converter. Click "File">"Add Video/Audio" to load your files, if your files are on the desktop, you can directly drag them into the main UI.
Other Download:
- Pavtube old official address: http://www.pavtube.com/video-converter-mac/
- Amazon Store Download: http://www.amazon.com/Pavtube-Video-Converter-Mac-Download/dp/B00QIBK0TQ
- Cnet Download: http://download.cnet.com/Pavtube-Video-Converter/3000-2194_4-76179460.html
Step 1: Free download this converter on your Mac without any problem, the latest Yosemite can also be supported by this converter. Click "File">"Add Video/Audio" to load your files, if your files are on the desktop, you can directly drag them into the main UI.
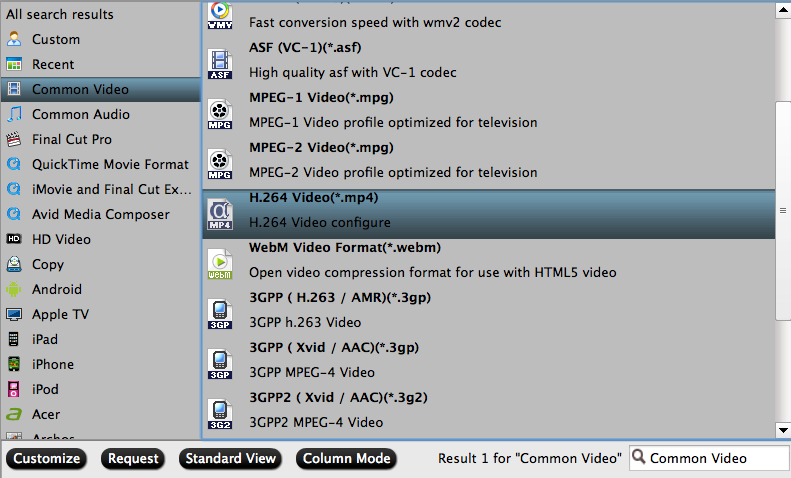
 Step 2: Click "Format" bar, from its drop-down options, choose "Common Video > H.264 Video (.mp4)" as the output file format for uploading to YouTube/Vimeo/Facebook.
 Step 3: Adjust parameters to speed up the progress of uploading XAVC to YouTube, Vimeo, Facebook
Tips: Why the uploading speed is very slow? This depends on many factors.
1. The length of your files are too long that over 15min
2. The file quality is too high, such as 1080p, 2K
3. The codec doesn't friendly to video sharing websites
4. Your Internet speed
In order to solve them all, you can click “Edit > Trim” to cut down your files length by removing some unnecessary parts. (Learn details. Click this "Settings", lower your bit rate and frame rate, which will shrink your file size. If you have no clue about the generated files, just check the table below in this UI.
You may worry about the file quality after lowering the bit rate and frame rate. Thanks to the calculator in this program, it will help you keep the balance between the quality and the file size.
Step 3: Adjust parameters to speed up the progress of uploading XAVC to YouTube, Vimeo, Facebook
Tips: Why the uploading speed is very slow? This depends on many factors.
1. The length of your files are too long that over 15min
2. The file quality is too high, such as 1080p, 2K
3. The codec doesn't friendly to video sharing websites
4. Your Internet speed
In order to solve them all, you can click “Edit > Trim” to cut down your files length by removing some unnecessary parts. (Learn details. Click this "Settings", lower your bit rate and frame rate, which will shrink your file size. If you have no clue about the generated files, just check the table below in this UI.
You may worry about the file quality after lowering the bit rate and frame rate. Thanks to the calculator in this program, it will help you keep the balance between the quality and the file size.
 Step 4: Check the “Convert” button to start convertingXAVC projects to YouTube, Vimeo, Facebook as H.264(.mp4). After that, you will get the compatible and in proper file size videos for uploading.
When the conversion is done, follow the 4 simple steps below to upload XAVC files to YouTube, Vimeo, Facebook.
For example, here shows you how to upload converted video to YouTube:
• Go to youtube.com and sign in your account.
• Click “Upload” in the top-right and select files from computer.
• Enter the title, descriptions, tags and category for the video.
• Click “Upload a Video” and the process will take a few minutes.
Now start sharing your XAVC files on YouTube, Vimeo, Facebook with family members and friends.
Further reading:
Step 4: Check the “Convert” button to start convertingXAVC projects to YouTube, Vimeo, Facebook as H.264(.mp4). After that, you will get the compatible and in proper file size videos for uploading.
When the conversion is done, follow the 4 simple steps below to upload XAVC files to YouTube, Vimeo, Facebook.
For example, here shows you how to upload converted video to YouTube:
• Go to youtube.com and sign in your account.
• Click “Upload” in the top-right and select files from computer.
• Enter the title, descriptions, tags and category for the video.
• Click “Upload a Video” and the process will take a few minutes.
Now start sharing your XAVC files on YouTube, Vimeo, Facebook with family members and friends.
Further reading:
The MPEG Transport Stream (MTS) video format is a type of HD camcorder file format, commonly used by both Sony and Panasonic. If you try to open up these MTS files into Avid Media Composer, especially old version of Avid MC, you will get an error message, or the MTS video needs a long rendering time for importing. Well, although Avid claimed it supports AVCHD, the highly compressed AVCHD format is not ideal for editing yet.
So, you are now faced with a question: how to successfully import MTS files into Avid Media Composer without error message. A best way is to convert MTS to DNxHD MOV, something that Avid Media Composer supports. (To learn what format Avid Media Composer support)
Hot Tips: MTS Column | Free MTS to Youtube | Free MTS to iPad Air
What you just need is this Pavtube MTS to Media Composer Converter. This converter is designed to process AVCHD videos from Canon/Sony/Panasonic/JVC cameras. It can also handle AVCHD/MTS/M2TS source and convert them to various video formats for popular devices (iDevices, Android devices, Windows 7/8/8.1/10 and later devices, etc) and NLE programs (e.g. Final Cut Pro, iMovie, Adobe Premiere Pro, Avid Media Composer, Apple Aperture 3, etc.) on Mac.
See also: Top 5 Best MTS/M2TS Converter for Mac Review
So, how to ingest MTS files to Avid Media Composer on Mac? Please follow the steps. Fortunately, if you are a Windows user, there is also a guide for you.
Download the MTS to Avid Media Composer Converter
Other Download:
- Pavtube old official address: http://www.pavtube.com/mts-converter-mac/
- Amazon Download: http://www.amazon.com/Pavtube-MTS-M2TS-Converter-Download/dp/B00QIE3U0Y
- Cnet Download: http://download.cnet.com/Pavtube-MTS-M2TS-Converter/3000-2194_4-76177029.html
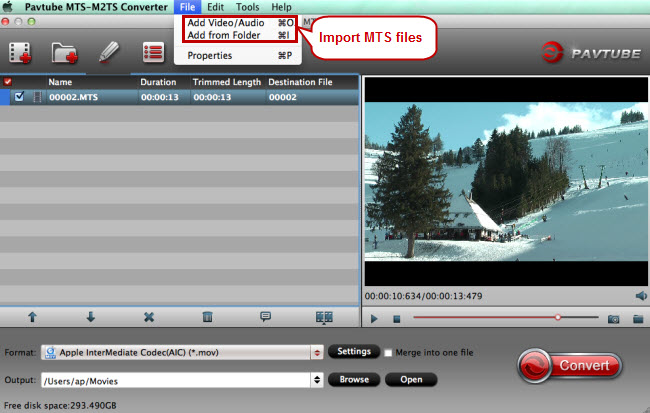
Step 1: When you run it, click "Add Video" button to load your source MTS files. When the MTS files are loaded to the MTS to Avid Media Composer Converter, you can view the videos from the Preview window. You are allowed to take snapshoot by clicking this "Camera" icon under the Preview window.
 Step 2: Select a proper format from the drop-down list of “Format” bar. To make MTS be compatible with Avid Media Composer, you’re advised to select “Avid Media Composer > Avid DNxHD (*.mov)” format.
 Step 3: Check “Settings” to adjust Size(pix) and Bitrate(kbps).
Tip: This MTS converter performs both conversion and editing work. To get your AVCHD MTS files edited with it, just click “Edit” to try editing functions (e.g. get wanted clips, cut off unwanted areas, add additional remarks, adjust effects) which are of great help in “Video Editor” screen.
Step 4: Click "Convert" button and the selected MTS files will be converted to DNxHD 1080P MOV. You may check the converting progress and set auto shutdown in the conversion window. After conversion, click "Open output folder" find converted footage in case you forget to set the file location before the conversion.
Finally, you can import and open up MTS files into Avid Media Composer for editing without any error messages.
Further reading:
Step 3: Check “Settings” to adjust Size(pix) and Bitrate(kbps).
Tip: This MTS converter performs both conversion and editing work. To get your AVCHD MTS files edited with it, just click “Edit” to try editing functions (e.g. get wanted clips, cut off unwanted areas, add additional remarks, adjust effects) which are of great help in “Video Editor” screen.
Step 4: Click "Convert" button and the selected MTS files will be converted to DNxHD 1080P MOV. You may check the converting progress and set auto shutdown in the conversion window. After conversion, click "Open output folder" find converted footage in case you forget to set the file location before the conversion.
Finally, you can import and open up MTS files into Avid Media Composer for editing without any error messages.
Further reading:
What is MXF?
MXF (Material eXchange Format) is a video container format targeted at professional video and broadcast applications established by Pro-MPEG Forum and SMPTE. It may contain compressed or uncompressed audio and video, and frame-based metadata, include timecode. Videos in MXF may be compressed in MPEG-2, DNxHD or any other formats.
Why Convert MXF to AVI, MOV, MP4, etc?
For most camcorder owners, they usually have a headache of the video format from their camcorders produce. For MXF camcorders like Panasonic AG-HVX200, Sony PMW-350kit, Canon XF300, etc which produces MXF or P2 MXF files that can’t be compatible for most players or editing software. In other words, it is so necessary for us to encode MXF/P2MXF to those common video formats on Mac/PC, for example: MOV, MPG, MP4, AVI or FLV.
Then, how to convert MXF to MOV, AVI, MP4, etc?
iMixMXF/Pavtube MXF MultiMixer is just the best conversion for converting MXF to MOV for editing in Premiere Pro CC and FCP, MXF to MP4 for playing on various players and devices like iPhone, iPod, iPad and iTunes, MXF to AVI for storage on hard drive, MXF to WMV, MXF to FLV, etc.
The recently upgraded MXF Converter can encode MXF to H.265, m3u8, etc. Besides, it has unique multi-track preserving feature or can get your MXF footage deinterlaced by default if you didn’t choose multi-track format.
Step-by-step guide on how to convert MXF to MOV, MP4, AVI, WMV, FLV, etc on Mac/Windows (Here are the details for Mac user):
Other Download:
- Pavtube old official address: http://www.pavtube.com/imixmxf-mac/
- Amazon Download: http://www.amazon.com/Pavtube-Studio-iMixMXF-Download/dp/B00QI7MY4Y
- Cnet Download: http://download.cnet.com/Pavtube-iMixMXF/3000-2194_4-76171460.html
Step 1: Download Download and install the corresponding version. Click “Add video” on the main interface to load MXF files to the program. You can also drag the files to the program’s window list directly. This program can also support the batch video clips.
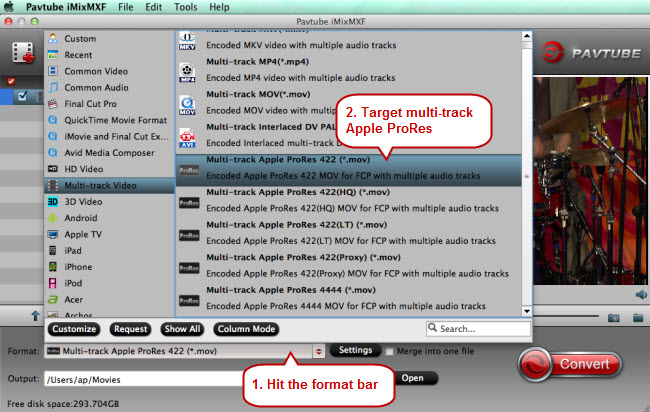
 Step 2. Select suitable MOV, MP4, AVI, WMV, FLV, etcas you need for Mac/Windows. If you are seeking the common ones, just go to the ‘HD Video’ to find the formats you need. While for those advanced users who wanna trancode the MXF files with multi-tracks preserved, we suggest you to choose MP4/Prores/AVI/MOV from‘Multi-track Video’.
Tips: AVI Players for Mac | MP4 Players for Mac/Windows
Step 2. Select suitable MOV, MP4, AVI, WMV, FLV, etcas you need for Mac/Windows. If you are seeking the common ones, just go to the ‘HD Video’ to find the formats you need. While for those advanced users who wanna trancode the MXF files with multi-tracks preserved, we suggest you to choose MP4/Prores/AVI/MOV from‘Multi-track Video’.
Tips: AVI Players for Mac | MP4 Players for Mac/Windows
 Step 3: If necessary, you can click ‘Settings’ button and go to ‘Profiles Settings’ panel to modify video and audio settings like video encoder, resolution, video bit rate, frame rate, aspect ratio, audio encoder, sample rate, audio bit rate, and audio channels.
Step 4:When you get ready for all preparation work, click ‘Convert’ to start format conversion. As soon as the conversion is complete, you can click ‘Open Folder’ button to get the exported files for Window/Mac.
If you still have problems in this process, welcome to leave us comments here.
Tips: If you want to burn various MXF videos to DVD on Mac or Windows, just need pay $34.9(Saving $29.1) to get DVD Creator for Mac or Windows.
Further reading:
Step 3: If necessary, you can click ‘Settings’ button and go to ‘Profiles Settings’ panel to modify video and audio settings like video encoder, resolution, video bit rate, frame rate, aspect ratio, audio encoder, sample rate, audio bit rate, and audio channels.
Step 4:When you get ready for all preparation work, click ‘Convert’ to start format conversion. As soon as the conversion is complete, you can click ‘Open Folder’ button to get the exported files for Window/Mac.
If you still have problems in this process, welcome to leave us comments here.
Tips: If you want to burn various MXF videos to DVD on Mac or Windows, just need pay $34.9(Saving $29.1) to get DVD Creator for Mac or Windows.
Further reading:
You will find it a painful experience to import and edit H.265 in FCP X. There’re some frequently asked questions quoted as below.
Q1: “Does anyone have a recommendation of the best program to convert H.265 for editing in FCP X?”
Q2: “Has Apple issued a new update support for H.265 for Final Cut Pro X?”
Recently on the forums there are many users have encountered the HEVC/H.265 to FCP X importing and editing issues, most of them can’t load recorded HEVC/H.265 videos to Final Cut Pro X. In fact, FCP or other editing systems currently have no full support for the new H.265 codec.
From FCP official product page you will know that the native supported format of FCP is Apple ProRes codec MOV format, the other formats will not be natively supported by FCP, in this case, the best way to import H.265 files to FCP for editing is to convert HEVC/H.265 to FCP Apple ProRes codec, and then you can edit the videos with FCP smoothly. Thus here we should learn about Final Cut Pro Supported Video Formats.
To realize this goal, you can get help from the best H.265 to Apple ProRes converter: Pavtube HD Video Converter for Mac. Pavtube HD Video Converter for Mac is an all-in-one program integrating conversion and editing. It can convert 1080p/720p MKV, MOV, MXF, MTS, M2TS, M2T, TS, M4V, MP4, AVI, MPG, VOB, WMV, 3GP, FLV videos to any video format for multiple purposes (e.g. free playback, editing, uploading, burning). HD footages generated by Sony, Canon, Nikon, Panasonic, and JVC can also be handled easily by Pavtube HD Video Converter for Mac.
Other Download:
- Pavtube old official address: http://www.pavtube.com/hd-video-converter-mac/
- Amazon Store Download: http://www.amazon.com/Pavtube-Video-Converter-Mac-Download/dp/B00QI9GNZS
- AppStore Download: https://itunes.apple.com/de/app/pavtube-hd-video-converter/id502792488?mt=12
- Cnet Download: http://download.cnet.com/Pavtube-HD-Video-Converter/3000-2194_4-76177786.html
Then, follow the steps to Transcode H.265 video to ProRes MOV for FCP.
Step 1: Download and install the corresponding version and open it. Click “Add video” to load H.265 files to the program.
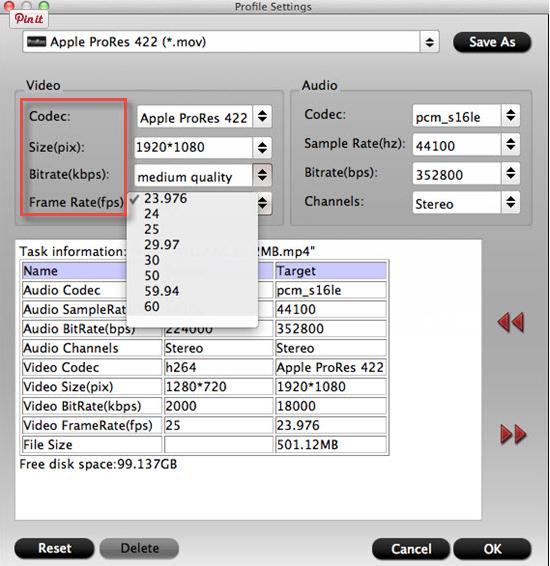
 Step 2: Choose output format, to edit videos on Final Cut Pro X native codec, you are recommended to choose Final Cut Pro -> Apple ProRes 422 (*.mov), it’s best for Final Cut Pro X editing. Read the difference of ProRes
 Step 3: You can check “Settings” to adjust Bitrates (kbps) and Size (pix). Choosing a little lower Bitrates and Size will help you to get a smaller target file, but it also leads to a lower video quality in saved file. Don't forget the balance between video quality and size.
 Step 4: Click the “Convert” button to start converting H.265 to Apple ProRes 422. After that, click the “Open” button to locate the output files and transfer the files to FCP X as usual.
Finally, you can edit H.265 video in Final Cut Pro X without any problems.
Further reading:
Step 4: Click the “Convert” button to start converting H.265 to Apple ProRes 422. After that, click the “Open” button to locate the output files and transfer the files to FCP X as usual.
Finally, you can edit H.265 video in Final Cut Pro X without any problems.
Further reading: