I know that Sony Cyber-shot DSC-HX80 can record in 1080 60p. For whatever reason it won't upload the videos into iMovie when you connect Sony Cyber-shot DSC-HX80 with your mac, the pictures are there but not the videos. Even if connected with the USB card reader and it still the pictures.
If recorded in 50i or 60i then iMovie can handle this directly, but for Sony Cyber-shot DSC-HX80 1080/60p video, it requires some sort of conversion.
The iMovie software does not support AVCHD 60p video. How to solve it?
To be able to edit Sony Cyber-shot DSC-HX80 1080/60p AVCHD in iMovie, we can set the camcorder to record in AVCHD 60i or AVCHD 24i. If you’ve already recorded videos in 60p, you can transfer the video directly to the hard drive of your Mac, and then burn it to a disc to be viewed on a different computer or television. Also, you can convert AVCHD 60p video to iMovie most compatible format AIC .mov with a piece of software.
Here you need a professional AVCHD converting tool, Pavtube HD Video Converter for Mac (Review) - it help you to enable iMovie to work with Sony Cyber-shot DSC-HX80 1080/60p AVCHD video files smoothly with the preset Apple Intermediate Codec (AIC)(*.mov) format.
With this best Mac HD Video Converter, you can import Sony Cyber-shot DSC-HX80 1080/60p AVCHD footage to iMovie without losing quality smoothly. What's more, this Mac HD Video Converter also provides the optimal presets like H.265, M3U8, MPEG-2, DNxHD, Apple ProRes Codec for Premiere, Avid MC, FCE, iMovie, FCP.
The trail-before-purchase is supported, just feel free to try it:


Below we will show the full step-by-step conversion guide for you no matter you are an expert or novice, you could easily use it for its intuitive interface.
Step 1: Add 1080/60p AVCHD files to the program
If you want import the video into iMovie, You must import from a connected camera and not a file created with one.
Click the “Add File” button to select the Sony Cyber-shot DSC-HX80 1080/60p AVCHD footage from connected Cyber-shot DSC-HX80 camera to this program.
To save your time, this program supports batch conversion so you can add multiple files at a time.
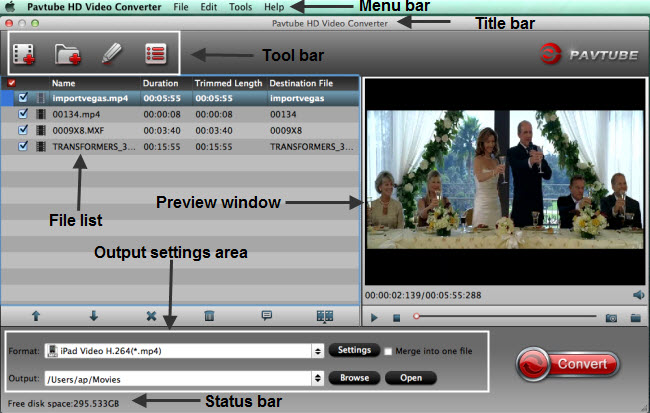
Step 2: Choose output format and specify output folder
Choose output format for your specific usage. For example in this case, from "Format" drop-down option, choose iMovie best editing codec by selecting "iMovie and Final Cut Ex..." > "Apple Intermediate Codec (AIC)(*.mov).
If you select all files and click Merge, you can join all imported mts files to one output video.

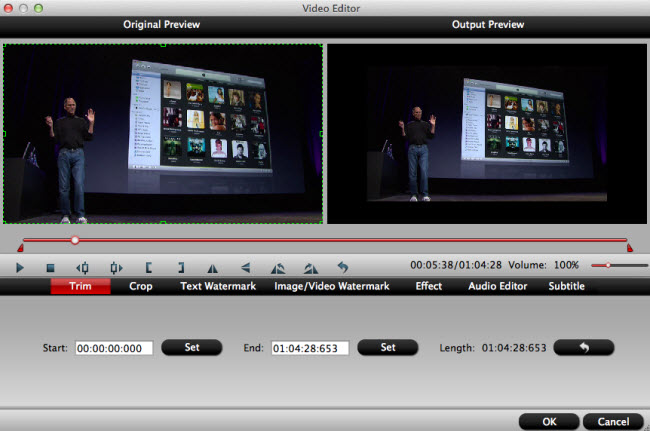
Step 3: Edit 1080/60p AVCHD files (Optional)
The “Video Editor” can be reached by clicking the “Edit” button. You can edit your Sony Cyber-shot DSC-HX80 1080/60p AVCHD files by using editing functions like trimming, cropping, adding watermark to video file, change video effects, etc.
Step 4: Start the Conversion.
Click “Convert” button to start conversion immediately. Few minutes later, you will get output video in your destination folder.
After converting Sony Cyber-shot DSC-HX80 1080/60p AVCHD to iMovie. workable formats you can easily import them to iMovie for editing. Hope you have a good editing experience.
If you are looking for Sony Cyber-shot DSC-HX80 1080/60p AVCHD Converter for Windows, please click HERE.
Direct Import Standard AVCHD to iMovie
But, for other camcorder uses the standard AVCHD format, it is able to edit these videos on Mac, luckily I find this "Step by Step Help" shown as below:
1. Turn on the camera.
2. Connect the camera to the computer using the supplied USB cable.
3. Set the camera to Mass Storage or USB Mode.(Note: If the “Photos” software automatically starts, close it.)
4. Open the iMovie software from the Dock or on the Finder Bar, choose Go and then Applications. iMovie will be listed as an icon in the Applications window.
5. In the iMovie window, click File and then Import from Camera.
6. Choose the method you want to use for importing.
7. Select the location to save the videos.
8. In the Create New Event section, type a name for the videos.
9. Click the OK button.(Note: The videos are copied to the computer. An Import complete dialog box is displayed when the import is finished.)
10. In the Import complete dialog box, click the Import button.
Read More: