Wednesday, October 28, 2015

Best H.264 to Apple Prores 422 Converter with timecode


Q:
 I sought so much advice beforehand, and decided to convert my 80+ hours of H.264 documentary footage to ProRes to make the edit easier. I am using Tipard HD Video Converter for Mac, but it doesn't keep my timecode for FCP ? So I'm asking is it possible to get the best h.264 to apple prores 422 converter with timecode preserving? 


Nowadays more and more popular DSLR cameras and AVCHD camcorders has come out the record footage is often in H.264 codec. And a common sense is that the H.264 is not really an editing-friendly codec and that is the reason why we go from H.264 to Apple ProRes 422 and other less-compressive codecs. 


Apple ProRes is a line of intermediate codecs, which means they are intended for use during video editing, and not for practical end-user viewing. ProRes is a lossy video compression format developed by Apple Inc. for use in post production in Final Cut Pro 6 and later on versions (FCP 7 & FCP X). ProRes 422 is a DCT based intra-frame-only codec and is therefore simpler to decode than distribution oriented formats like H.264. 


To get H.264 video files work perfectly with Final Cut Pro, all you need to do is to convert the native footage from the H.264 to ProRes which is in higher quality and is less compressed. How do you convert H.264 to ProRes codec


Well, there are MANY ways to do this. You can use Final Cut Studio's Compressor software – I create droplets and drop my files onto them. It's good. But some of you may not own Final Cut Studio… Well I recommend you look into the utility that has quickly become my absolute favorite way of converting my footage: 

Pavtube HD Video Converter for Mac ($35) - an easy to use and user-friendly tool. 


It's also often faster than Compressor and is much cheaper. With it, you can transcode H.264 to a FCP compatible Prores .mov format on mac quickly and easily with retaining the timecode for FCP . Before converting, pls download and install the first-class HD Video Converter for Mac from Pavtube. 


Step-by-step guide to learn how to convert H.264 to Prores 422 for FCP with keeping timecode. 

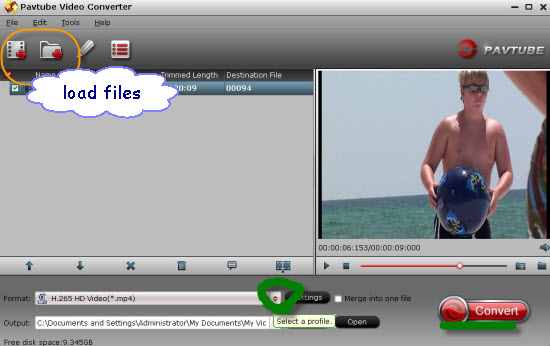
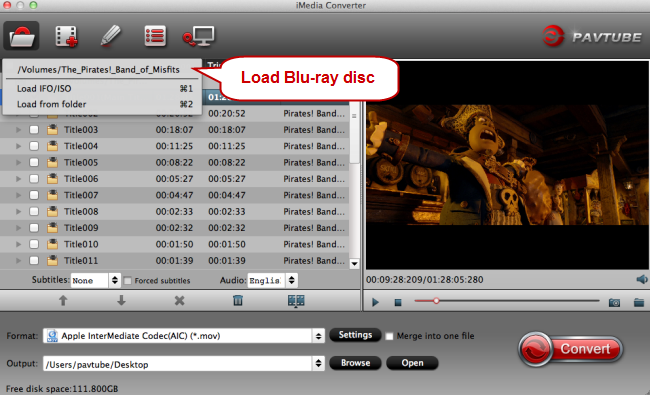
Step 1. Download and install the H.264 to Prores 422 Converter with timecode on your Mac. Launch it and import your h.264 .mov/.mts/.mp4 clips into it. 


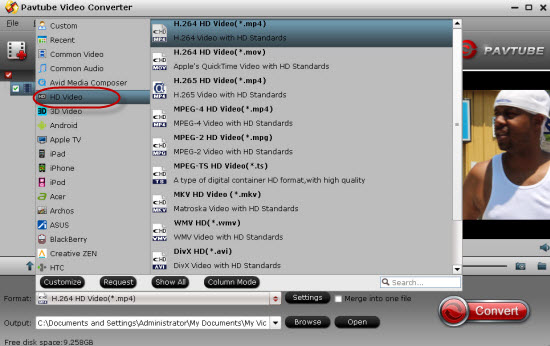
Step 2. Choose Apple Prores as output for FCP. 


Click on "Format", follow "Final Cut Pro > Apple ProRes 422 (*.mov)" format for native importing and editing in FCP. 


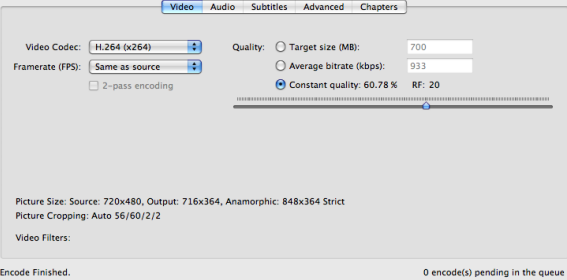
Step 3. Click on Settings to adjust audio and video parameters including video size, video frame rate, bitrate, sample rate, audio channel. 

Step 4. Start transcoding h.264 to Prores 422 by clicking on "Convert" button. 

After the conversion is done, you can easily import h.264 footage into FCP X with retaining timecode. 

Refer to the picture below to see how this cool mac H.264 converting tool keep the timecode for FCP. It is not difficult to find that the timecode is kept. 


More 
Can I play Sony XDCAM EX MP4 video with QuickTime 
Watch ISO Movies in 3D With Nvidia 3D Vision? 
Get TiVo shows onto your Android for viewing 
Merge/Join hard drive camera recored MTS videos into one 
Edit Samsung NX1 H.265 in Premiere Pro CC on Mac 
Best Canon MXF Converter : Ingest Canon MXF into FCE 
Convert DJI Inspire 1 4K Files to 1080p for Editing on Mac/PC 
Transfer Sony XDCAM footage to QuickTime MOV on Mac 
Src 
Best H.264 to Apple Prores 422 Converter with timecode 

Monday, October 26, 2015

Pavtube 40% Off Spirit Halloween Coupons & Discount


Pavtube launched 40% OFF Halloween Promotion from October 21 to November 6, 2015 when users can get top Video/DVD/BD Converter for Win/Mac with the least money. 
pavtube halloween promotion,halloween special offer, halloween sale 2015 

Halloween is coming. To give you a better Halloween celebration, Pavtube holds 40% off Halloween promotion from October 21 to November 6, 2015. During the period, you can get the professional Blu-ray/DVD Ripper and Video Converter for Win/Mac with less money than any other campaign. 

During Halloween, many people will not just watch Halloween movies but make Halloween videos by themselves. No matter Halloween movies enjoyment or Halloween video production, you probably need a video converter. For example, when you want to play your Blu-ray/DVD Halloween disc on your iPad Pro, Surface Pro 3, you can rip the disc to the device supported format with Pavtube BDMagic or Pavtube DVAid. Another case, you record the Halloween party scene and you are about to upload the camcorder video to Facebook to show your cool dressup, you’d better choose to transcode the camera video to Facebook or Vimeo accepted video with Pavtube Video Converter Ultimate. No matter what situations about video editing and producing, you can find the software you want at Pavtube Studio

Pavtube product is closed-source, not like Handbrake. But it deserves to pay for its life-long technical support and update in time to compatible with any Win/Mac system upgrade. Catch this opportunity and enjoy the best video production experience with the least money. 

The price comparison of Pavtube featured products between Halloween price and original price is as below: 
  • Pavtube Video Converter Ultimate: Original price $65, Now $52 
  • Pavtube BDMagic: Original price $49, Now $34.3 
  • Pavtube DVDAid: Original price $35, Now $21 
  • Pavtube ByteCopy: Original price $42, Now $33.6


Note: This attractive price will only be get until November 6, 2015. Please bear in mind all software programs will go back to original prices once the Halloween special offer 2015 ends. 

Time-limited. What are you waiting for? Action now!

Sunday, October 25, 2015

Pavtube 2015 Halloween Special Offer - Up to 40% Discount


Summary: Pavtube Studio presents big surprice for Halloween celebration with up to 40% discount on Blu-ray & DVD softwares. 

Festivals are always the best opportunities to purchase the goods you were not willing to buy or had no ability to afford in the past days. 2015 Halloween is coming. Are you ready to open your wallet? To make your Halloween celebration even greater, Pavtube Studio has prepared a great Halloween Promotion – we are offering you a generous 40% Discount on our Blu-ray & DVD Softwares (Windows 10 and El Capitan supported). 


Since Pavtube Studio offers many kinds of Blu-ray/DVD/Video softwares that you possibly don't know which one to choose, I can make a brief introduction and a recommendation to you. 

Recommendation 1: If you often do video conversion process, you can take Pavtube Video Converter Ultimate and Pavtube iMedia Converter for Mac into consideration. It can accept any Halloween movie source, like Blu-ray/DVD disc and 4K/SD/HD online/local video in any format and transform them to nearly any popular video format you have ever seen. 


Recommendation 2: For those who have plenty of Blu-ray discs, Pavtube BDMagic and Pavtube BDMagic for Mac will be the best choice. They are cheaper than the recommendation one but supply the same effect on Blu-ray/DVD Halloween movies. 


Recommendation 3: DVD owners who just need to rip and backup DVD disc or copy DVD folder, DVD ISO/IFO can focus on Pavtube DVDAid and Pavtube DVDAid for Mac. It only can deal with DVD movies but it is the cheapest item. 


Recommendation 4: Pavtube ByteCopy and Pavtube ByteCopy for Mac are for situation that your Halloween Blu-ray/DVD movies have several subtitles and audio tracks and you want to keep all the tracks and chapter markers while ripping and copying the discs. What's more, it enables you to extract FLAC/WAV audio from Blu-ray audio disc and extract SRT subtitle from Blu-ray movies. 


Think about which one is the best choice for you so that you can solve your video conversion problem with the least money. Don't waste the money-saving chance on Halloween. Just do it!

Wednesday, October 21, 2015

Tips on Importing H.265 (HEVC) Videos to Premiere Elements


You said you have shot some H.265/HEVC footage? You must be Samsung lover I guess, right? According to the output footage H.265 you owned, Samsung NX1 4K camcorder could be your favorite ones. So the issues are coming: Editing our H.265/HEVC in some NELs such as Premiere Elements must not be easy. To tell you’re the truth, that’s the purpose we write this article. 


You may be wrong if you think H.265/HEVC videos only refused by Premiere Elements. As the new codec, H.265 is not friendly with Adobe Premiere ProAvid MC etc. Also, some changes you may need to do if you wanna enjoy H.265 movies on handle devices such as iPhone 6. What a pity is until now, these popular NELs still have no capacity of editing the H.265/HEVC codec. However, we also have the good news, some H.265 encoder/decoders can also make the job smoothly work well in Premiere Elements. 

Expand knowledge: Higher quality Smaller Size—-That’s the most important point that H.265/HEVC brings to us. 

In order to fulfill the task of importing H.265/HEVC recordings to Premiere Elements, here you are fortunately to have the Pavtube Video Converter, which is upgraded to the newest version to supportencoding/decoding the H.265/HEVC videos nicely. Naturally speaking, this H.265 encoder can easily convert our H.265 to the Premiere Elements most suitable formats, MPG, MOV or WMV. What’s more, even on the latest Mac OS X Yosemite operation, we can work it well. 

Guide: Let me show you how to convert H.265/HEVC to MPG, MOV or WMV for Premiere Elements. 
Step 1. Add your original files 
As soon as you launch the H.265 encoder/decoder, we suggest you to add your files for the first step, ‘Add video’ and ‘Add from folder’ can be your good choices. 


Step 2. Select the right output for Premiere Elements 
Open the output list through the ‘Format’ bar, then drop down the list. Nearly on the bottom of the list, choose the ‘Adobe Premier Pro/Sony Vegas’ item. Here, we can choose the ‘MOV’, ‘WMV’ or ‘MPG’ as our best. 


Step 3. Optional function: Adjust the video and audio parameters, including the Bitrate of Video & Audio, Video Size, Sample Rate, Frame Rate, Audio Channels, etc., by clicking the Settings button on the main interface for getting the best quality. 


At the end, just press on the ‘Convert’ icon on the main interface, we can smoothly get our conversion work started. If you have already owned the Pavtube Video Converter, just open the main interface and select the “Help” >>”Update” to upgrade/download to the latest version 4.8.2.0 for free. Freely import your H.265/HEVC videos to Premiere Elements, are you still worrying about that? 

More 
Convert DJI Inspire 1 4K Files to 1080p for Editing on Mac 
Transfer Sony XDCAM footage to QuickTime MOV on Mac 
Can I play Sony XDCAM EX MP4 video with QuickTime 
Watch ISO Movies in 3D With Nvidia 3D Vision 
Edit Samsung NX1 H.265 in Premiere Pro CC on Mac 
Best Canon MXF Converter : Ingest Canon MXF into FCE 
Get TiVo shows onto your Android for viewing 
Merge/Join hard drive camera recored MTS videos into one 


Src 
Tips on Importing H.265 (HEVC) Videos to Premiere Elements

Monday, October 19, 2015

Comparison of Mac OS X 10.11 El Capitan and 10.10 Yosemite


Compare to the previous generations of Mac OS X 10.10 Yosemite, there are many new welcome features in 10.11 El Capitan. Fortunately, Mac users are able to upgrade to the new El Capitan for free or easily partition Mac to install both El Capitan and Yosemite for conveniently switching one to another. Following article will make a detailed comparison of El Capitan and Yostemite in many mayor aspects. 

Pavtube has upgraded with El Captian support for all its Mac Blu-ray/DVD/Video products. 


Performance in El Capitan VS Yosemite 

Apps in El Capitan will load apps up to 1.4 times faster and switching between apps will be twice as fast. Compare that to Yosemite: since its introduction many Mac users have been painfully aware of lags and slowdowns, such as stuttering animations and network connectivity issues. We experienced nothing like this in El Capitan. 

Look and feel in El Capitan vs Yosemite 

OS X El Capitan's user interface use a variation of the San Francisco font that was introduced with the Apple Watch and also features the iOS 9. San Franciso is much more Retina-friendly compared to Yosemite's use of Helvetica Neue. 

Force Touch trackpad support was introduced with Yosemite and in El Capitan there's additional setting within the Trackpad pane of System Preferences to deactivate the click noise. Referred to as Slient Clicking, this somehow doesn't compromise the degree of feedback, which is still handled via the Click slider. 

The El Capitan bar can now autohide via a setting in the General pane of System Preferences, in the same way that the Dock can dive out of the bottom of the screen in Yostemite and earlier releases of OS X. If you've used Full Screen mode in Yosemite then you'll already have experienced this feature but now it can be used all the time to gain a precious few centimeters of desktop space. 

Core tools in El Capitan vs Yosemite 

Safari: The new Safari on Mac OS X El Capitan is the perfect browser tool for your Mac device. The New Safari allows you to Pin your favorite websites, thus you can keep them opened, likewise you can mute audios without checking the tab from which the sound is coming from. The Develop menu of Safari, accessible via the Advanced pane within Safari's Preferences, now features a cool Responsive Design mode that lets you switch the web page to dimensions used on various Apple devices. 

Mail: As with Safari, feature additions in Mail within El Capitan are subtle compared to Yosemite. With the new Swipe gesture and improved full screen support, you can now optimize the way you read or manage your mails better on Mac OS X El Capitan - you can use this feature as a quick correspondence handler, and also manage your contacts and calendar much better from your inbox. With one swipe, you can mark an email as read or unread. 

Notes: Notes in El Capitan is essentially a whole new app compared to Yosemite, featuring more control over text formatting. The app is also now a share destination from within other apps, so you can send a map location straight to a new note, for example, or even a file from Finder/the desktop. The Reminders app can also receive items in this way via its own new entry on the share menu. To gain access to the new notes features, make sure upgrade your Notes iCloud database when you first run Notes on El Capitan, but doing so also makes your existing notes instantly incompatible with earlier versions of Apple's operating system. 

Maps: The enhanced Maps available on Mac OS X El Capitan provides maximum public transit information you can ever ask for, thus you will never miss your way even in a big city. You will have access to in-built public transport maps, directions and schedules. With El Capitan, you can easily plan your route with just few clicks. 

System tools in El Capitan vs Yosemite 

Spotlight: The new Spotlight window introduced in Yosemite can be moved around in El Capitan by clicking and dragging. It can also be resized to show more than a handful of results. Spotlight in El Capitan can also respond to Siri-like queries, such as "photo from last November in Germany". 

Mission control: El Capitan also comes with a full screen tweaks and mission control features. The mission control displays the names of existing apps at the top of the screen page, and this has replaced the thumbnail feature on the Yosemite. 

Disk Utility: Disk Utility has been given a visual overhaul compared to Yosemite and now features a bar graph showing how full a partition is, and what kind of files are taking up the space. 

Disk Ultility: The Disk Utility has been given a visual overhaul compared to Yosemite and now features a bar graph showing how full a partition is and what kind of files are taking up the space. Disk repartitioning within Disk Utility is now handled via a more common sense pie chart representing the entire disk, with a handle on its border that can be dragged to resize individual partitions. 

Mac users who have upgraded to the new Mac OS X 10.11 El Capitan may encounter with some video playing and editing issues since many video players or editing applications have not updated themselves with perfect support for this new OS. With Pavtube recently upgraded Mac products, you will get no problems to copy/backup 2D/3D Blu-ray/DVDdisc, convert and edit virtually any SD/HD/2K/4K video and audio formats on Mac OS X El Capitan. More Mac OS X El Capitan related articles are as below: 

More

How to Play Videos on Lenovo Yoga Tablet 2 (Pro)


You are out if you still do not heard of the latest portable device—Lenovo Yoga Tablet 2(Pro)! That’s indeed the big news which can bring us the nice enjoyment for favorite movies, right? To enjoy any videos on this new Lenovo Yoga Tablet 2, we are offering the best way to play videos smoothly on Lenovo Yoga Tablet2 without any troubles. 


Hot Search: 1080p Videos on Android | AVI to Galaxy Tab | VOB to New iPadPart 1.Lenovo Yoga Tablet2—Bigger screen tablet is coming! 

As phones keep getting bigger, 8-inch tablets are quickly becoming the sweet spot for shoppers. And Lenovo’s Yoga Tablet 2 is one of the best slates you can buy. This device boasts an improved kickstand design and houses a long-lasting battery in its cylindrical side. For seeking the better enjoyment of watching movies on Lenovo Yoga Tablet 2, how to make all video formats friendly with Yoga Tablet2 has become the top issues online. Any good suggestions there to play videos nicely on Lenovo Yoga?Supported video and audio files for Lenovo Yoga Tablet 2: 

Supported Videos: H.263 MPEG-4/3GPP, H.264 AVC MPEG-4(MP4), MPEG-TS, 3GPP, MPEG-4 SP 3GPP, VP8 WebM, MKV, etc. 

Supported Audio formats: MP3, 3GP, MP4, M4A, AAC, WAV, TS, FLAC, OGG, MID, XMF, MXMF, RTTTL, RTX, OTA, IMY. 

Supported Image formats: JPG, GIF, PNG, BMP, WEBP.Part 2.How to add supported videos to Lenovo Yoga Tablet 2?—USB date line 

As usual, it would be much easier to add our suitable videos to Yoga tablet on computer. Just connect the tablet to PC with USB cable, when the main interface pops up there, we are going to click the ‘Add media’ or ‘Add files’ to load them in freely. Due to the supported video information we mentioned above, we just need to wait for a moment through the third-party assistant tools. 

Part 3.How to add those unsupported videos to Lenovo yoga Tablet 2?—PavtubeVideo Converter for Windows. (Mac version) 

How could we import those incompatible video files to Lenovo Yoga Tablet 2 for playback? That may be the top point as soon as we wanna watch the recordings which took by ourselves. The easiest way to transfer them freely to Yoga tablet is transcoding the formats there. Fortunately, Pavtube studio has the professional Lenovo Yoga Tablet 2 converter for us to enjoy any movies without any troubles. Specific steps are allowed here which are deserved for us to have a try.


Step 1. Open the main interface and with the ‘Add files’ we can easily load the original files in. Or directly drag the files in is also a good idea!


Step 2. Choose the best output for Yoga tablet. Come to the output list by clicking the ‘Format’ bar there. Drop the list down, here we suggest you to select the ‘HD Video’>>’H.264 HD Video(*.mp4)’ as the suitable one for Yoga tablet as the supported information mentioned above.


Optional functions for advanced users:

Click the “Effect” button to open the Video Edit window to achieve editing MP4 like trim, crop, image, watermark, effect, subtitles and rotate and etc in the corresponding editing pane.

Click the “Setting…” button to open the Advanced Settings window to adjust the output video codec, resolution, bitrates, frame rate, aspect ratio, audio codec, channel, volume and etc in the advanced tab.

Go back to the main interface if you have done all the preparation work there. Hit the ‘Convert’ button, we can make this conversion job started! In a word, with this guide on how to add any videos to Lenovo Yoga Tablet 2, we are so glad to enjoy movies on this 8-inch screen tablet! Do you wanna join us for more?


More 

Can I play Sony XDCAM EX MP4 video with QuickTime 
Watch ISO Movies in 3D With Nvidia 3D Vision? 
Get TiVo shows onto your Android for viewing 
Merge/Join hard drive camera recored MTS videos into one 
Edit Samsung NX1 H.265 in Premiere Pro CC on Mac 
Best Canon MXF Converter : Ingest Canon MXF into FCE 
Convert DJI Inspire 1 4K Files to 1080p for Editing on Mac/PC 
Transfer Sony XDCAM footage to QuickTime MOV on Mac 


Src 
Play Videos on Lenovo Yoga Tablet 2

Thursday, October 15, 2015

Video Tips for Handbrake on Mac OS X 10.11 El Capitan


At Times you need HandBrake Alternative software to achieve better SD/HD video and DVD/Blu-ray conversion on Mac OS X 10.11 El Capitan, and iMedia Converter for Mac is best recommended HandBrake Alternative for on Mac OS X 10.11 El Capitan. 

Read the Software review>> Pavtube Softwares Comparison | Pavtube DVDAid vs AnyDVD | ByteCopy & MakeMKV | Best Video Converter Ultimate Reviews... 

Handbrake is a open source video transcoder, which is wildly used by Mac OS users. It supports to transcode video and audio from nearly any format to MP4, MKV, AVI on iMac abd MacBook. With Handbrake, you can convert Videos, DVD, Blu-ray on Mac OS X for viewing on your iPad, iPhone, iPod touch easily. 

Following with this detailed HandBrake Mac Tutorial, you will learn how to rip DVD, Blu-ray and transcode videos on Mac OS X with Handbrake. 

Step 1: Download and Install Handbrake 

Firstly, you should download and install Handbrake for Mac on your Mac OS X. 


Note: Here, we can see that HandBrake for Mac OS X 10.6-10.10 is for 64 bit Intel. 

Step 2: Load source video to HandBrake and set Destination and Output 

Click the “Source” button on the main interface to add video, DVD or decrypted Blu-ray to the program. In the Destination section you can set the output folder by clicking Browse button. One thing you need to decide is what format (MP4, MKV, AVI, OGM) Output setting section also has 3 options you can choose: Large File Size, Web optimized and iPod 5G support. 


Note: Handbrake supports to input multiple file formats, but it can only convert them one by one, if you want to transcode many videos, please make sure you have enough time to do it. 

Step 3: Adjust video and audio settings 

You can adjust video filter, video, audio subtitles, chapters, etc to make the output videos more suitable. You should pay attention that when you select the birate, the higher bitrate you choose, the bigger size the output file will be, and the better quality you will get. 


Step 4: Start to convert video with Handbrake on Mac OS X 

Click on the Start button on the left top of Mac version HandBrake. The encoding time will depend on several variables including: the duration of the video file, the speed of your Mac computer and which Mac OS, Mac OS X Tiger, Leopard, or Mac OS X Snow Leopard. What other activity your computer is currently doing, the codec you selected (H264 or MP4). 

Conclusion of this Handbrake Tutorial for Mac: 

This is basic HandBrake Tutorial for Mac OS X users, for details explanation, you need to cast an eye on HandBrake official site. And as a free transcoding software, you may come across with unexpected issues when using HandBrake on your Mac from time to time. Handbrake has some limitations. For instance, it can load multiple video and copy protected DVD, but it does not support the encrypted Blu-ray disc. It only can be used to transcode a Blu-ray disc that the protection is first removed using a third party application. It does not support batch conversion and shut-down automatically after conversion. And the most severe problem is HandBrake just supports Mac OS X 10.6 - 10.10. The newest Mac OS X 10.11 El Capitan system is not supported by HandBrake. 

Therefore, it is better to find some HandBrake Mac version Alternative software to fill all the limitations that Handbrake lacks, such as backing up encryption Blu-rayripping DVD to iTunes, copying Blu-ray andDVD on Mac OS X El Capitan. Pavtube iMedia Converter for Mac is the recommended HandBrake Alternative. It is all in one solution for you to convert SD/HD videoS, rip DVD/Blu-ray to various formats on Mac OS X from 10.6 to 10.11 El Capitan. You can use the batch conversion functions to transcoding multiple files at a time. The versatile and distinctive editing functions can help you create elegant videos. 

Free download and install 


Other Download: 
- Pavtube old official address: http://www.pavtube.cn/imedia-converter-mac/ 
- Cnet Download: http://download.cnet.com/Pavtube-iMedia-Converter/3000-2194_4-76177788.html 

How to use HandBrake Mac Alternative on Mac OS X El Capitan? 

Step 1. Load your Blu-ray 

Run Pavtube iMedia Converter for Mac on Mac OS X El Capitan, load your Blu-ray disc, folder, ISO image files by clicking the "File" icon. 


Step 2. Choose target format 

Click the format bar to choose "HD Video" and "H.264 HD Video (*.mp4)". 


Step 3. Start conversion 

After everything is OK, click the big button "Convert" to start conversion on Mac OS X El Capitan. After conversion, you'll get your desired MP4 movie in output folder. 

That is easy to use HandBrake Mac Alternative to convert videos on Mac OS X El Capitan. Just try. 

If want more detailed video conversion steps, read this article: How to Convert Videos on Mac OS X El Capitan with Pavtube iMedia Converter for Mac? 

Read More: 

Good News! To thanks for your continuous support, Pavtube Official Website and Pavtube Facebook are now holding the biggest sale for this summer with fantastic 50% off discounts and giveaway. Pay less to get powerful Blu-ray/DVD/Video Converter to build your own home media center on this summer! 

Giveaway: First Five customers can share this post, email us your order numer and the snapshot to win one more FREE license, no product limit! 

Related Article: 


Src 
HandBrake Mac Tutorial on Mac OS X 10.11 El Capitan