Summary: How to make Canon C100 Mark II AVCHD files work well with Sony Vegas Pro 13/12? Can you successfully import AVCHD to Sony Vegas Pro? Have you known some tips for converting AVCHD to Sony Vegas Pro? Simply follow this post, you’ll be clear.
 Hot search: C100 Mark II AVCHD to FCP X | C100 Mark II AVCHD to Premiere Pro | C100 Mark II AVCHD to Avid | C100 Mark II AVCHD to iMovie
Canon C100 Mark II offers more recording options than ever before so that you can get the look you need. The widely used AVCHD codec allows recording to SD card at up to 28Mbps, whilst a new MP4 mode offers data rates of up to 35Mbps for outstanding quality. Both codecs can be used at up to 1080/60p and the MP4 mode offers extended slow and fast motion options. It’s even possible to record the two formats simultaneously to separate SD cards, creating either two HD copies or separate HD and SD copies–ideal for quick sharing or turnaround.
As one AVCHD full HD camcorder user, you may meet some incompatibility issues of AVCHD .mts files when working with them in Sony Vegas Pro 13/12, a popular video editing program on Windows. In usual, the MTS footage from Sony, Panasonic, Canon AVCHD camcorders is encoded with H.264/AVC codec. The advanced compression method of H.264 results in much less storage and the same picture quality comparing with MPEG-4. However, the highly-compressed content is not so friendly for editing software. Then how to get Sony Vegas Pro 13/12 working perfectly with Canon C100 Mark II AVCHD files? A best way is to convert AVCHD MTS to MPEG-2, which is best supported by Sony Vegas.
Sony Vegas Pro 13 Supported file formats:
Opens: MOV, WMV, H.264, AA3, AAF, AIF, ASF, AU, AVC, AVI, BMP, BWF, CDA, DIG, DLX, DPX, DV, EXR, FLAC, GIF, HDP, IVC, JPEG, AVCHD, M2T, M2TS, MVC, Sony MXF (XDCAM and HDCAM SR), MP3, MP4, M4A, MPEG-1 and MPEG-2 video, OGG, MPO, OMA, Panasonic MXF (DVCPRO, AVC-Intra) PCA, PSD, QT, R3D, PNG, SFA, SND, TIFF, TGA, W64, WAV, VOX, WDP, WMA, XAVC Intra MXF, XAVC S
Saves: H.264, AA3, FLAC, AC3, AIF, ATRAC, AVC, AVCHD, AVI, DPX, EXR, HDP, MOV, MP4, WMV, MP3, MPEG-1 and MPEG-2 video, M2T, Sony MXF (XDCAM and HDCAM SR), MVC, OGG, Panasonic MXF (AVC-Intra), PCA, W64, WAV, WMA, XAVC S, XAVC Intra MXF
Sony Vegas Pro 12 Supported file formats:
Opens: AA3, AAF, AIF, ASF, AU, AVI, BMP, BWF, CDA, DIG, DLX, DPX, DV, EXR, FLAC, GIF, HDP, IVC, JPG, M2T, M2TS, MOV, Sony MXF (XDCAM and HDCAM SR), MP3, MP4, M4A, MPEG-1 and MPEG-2 video, OGG, OMA, Panasonic MXF (DVCPRO 25, 50, 100, AVC-Intra 50, 100), PCA, PNG, PSD, QT, R3D, SFA, SND, TIFF, TGA, VOX, W64, WAV, WDP, WMA, WMV
Saves: AA3, AC3, AIF, ATRAC, AVC, AVI, DPX, EXR, FLAC, HDP, MOV, MP3, MPEG-1 and MPEG-2 video, MP4, M2T, Sony MXF (XDCAM and HDCAM SR), OGG, PCA, W64, WAV, WMA, WMV
To get the work done easily, here Pavtube Video Converter, as the best video converter for Canon C100 Mark II is highly recommended. With it, you can convert AVCHD MTS to MPEG-2 for Sony Vegas Pro 13/12, which will save you both time and trouble. And all you need is to drag the result videos for playing and editing.
Hot search: C100 Mark II AVCHD to FCP X | C100 Mark II AVCHD to Premiere Pro | C100 Mark II AVCHD to Avid | C100 Mark II AVCHD to iMovie
Canon C100 Mark II offers more recording options than ever before so that you can get the look you need. The widely used AVCHD codec allows recording to SD card at up to 28Mbps, whilst a new MP4 mode offers data rates of up to 35Mbps for outstanding quality. Both codecs can be used at up to 1080/60p and the MP4 mode offers extended slow and fast motion options. It’s even possible to record the two formats simultaneously to separate SD cards, creating either two HD copies or separate HD and SD copies–ideal for quick sharing or turnaround.
As one AVCHD full HD camcorder user, you may meet some incompatibility issues of AVCHD .mts files when working with them in Sony Vegas Pro 13/12, a popular video editing program on Windows. In usual, the MTS footage from Sony, Panasonic, Canon AVCHD camcorders is encoded with H.264/AVC codec. The advanced compression method of H.264 results in much less storage and the same picture quality comparing with MPEG-4. However, the highly-compressed content is not so friendly for editing software. Then how to get Sony Vegas Pro 13/12 working perfectly with Canon C100 Mark II AVCHD files? A best way is to convert AVCHD MTS to MPEG-2, which is best supported by Sony Vegas.
Sony Vegas Pro 13 Supported file formats:
Opens: MOV, WMV, H.264, AA3, AAF, AIF, ASF, AU, AVC, AVI, BMP, BWF, CDA, DIG, DLX, DPX, DV, EXR, FLAC, GIF, HDP, IVC, JPEG, AVCHD, M2T, M2TS, MVC, Sony MXF (XDCAM and HDCAM SR), MP3, MP4, M4A, MPEG-1 and MPEG-2 video, OGG, MPO, OMA, Panasonic MXF (DVCPRO, AVC-Intra) PCA, PSD, QT, R3D, PNG, SFA, SND, TIFF, TGA, W64, WAV, VOX, WDP, WMA, XAVC Intra MXF, XAVC S
Saves: H.264, AA3, FLAC, AC3, AIF, ATRAC, AVC, AVCHD, AVI, DPX, EXR, HDP, MOV, MP4, WMV, MP3, MPEG-1 and MPEG-2 video, M2T, Sony MXF (XDCAM and HDCAM SR), MVC, OGG, Panasonic MXF (AVC-Intra), PCA, W64, WAV, WMA, XAVC S, XAVC Intra MXF
Sony Vegas Pro 12 Supported file formats:
Opens: AA3, AAF, AIF, ASF, AU, AVI, BMP, BWF, CDA, DIG, DLX, DPX, DV, EXR, FLAC, GIF, HDP, IVC, JPG, M2T, M2TS, MOV, Sony MXF (XDCAM and HDCAM SR), MP3, MP4, M4A, MPEG-1 and MPEG-2 video, OGG, OMA, Panasonic MXF (DVCPRO 25, 50, 100, AVC-Intra 50, 100), PCA, PNG, PSD, QT, R3D, SFA, SND, TIFF, TGA, VOX, W64, WAV, WDP, WMA, WMV
Saves: AA3, AC3, AIF, ATRAC, AVC, AVI, DPX, EXR, FLAC, HDP, MOV, MP3, MPEG-1 and MPEG-2 video, MP4, M2T, Sony MXF (XDCAM and HDCAM SR), OGG, PCA, W64, WAV, WMA, WMV
To get the work done easily, here Pavtube Video Converter, as the best video converter for Canon C100 Mark II is highly recommended. With it, you can convert AVCHD MTS to MPEG-2 for Sony Vegas Pro 13/12, which will save you both time and trouble. And all you need is to drag the result videos for playing and editing.

 Other Download:
- Pavtube old official address: http://www.pavtube.com/video_converter/
- Amazon Download: http://download.cnet.com/Pavtube-Video-Converter/3000-2194_4-75734821.html
- Cnet Download: http://download.cnet.com/Pavtube-Video-Converter/3000-2194_4-75734821.html
How to import Canon C100 Mark II AVCHD to Sony Vegas Pro 13/12?
Step 1: Download and install the program. Click “Add video” on the main interface to load AVCHD MTS videos to the program. You can also drag the files to the program’s window list directly. This program can also support the batch video clips.
Other Download:
- Pavtube old official address: http://www.pavtube.com/video_converter/
- Amazon Download: http://download.cnet.com/Pavtube-Video-Converter/3000-2194_4-75734821.html
- Cnet Download: http://download.cnet.com/Pavtube-Video-Converter/3000-2194_4-75734821.html
How to import Canon C100 Mark II AVCHD to Sony Vegas Pro 13/12?
Step 1: Download and install the program. Click “Add video” on the main interface to load AVCHD MTS videos to the program. You can also drag the files to the program’s window list directly. This program can also support the batch video clips.
 Step 2: Click “Format” pull down list to select “Adobe Premiere/Sony Vegas>>MPEG-2 (*.mpg)” as output format.

Step 3: Click “Settings” to fix the frame rate, bit rate, video size, and etc. to your needs. To have a smooth editing with Sony Vegas Pro 13/12, you need create the files with the appropriate resolution and frame rate that matches your source footage.
Step 4: After all the settings, you can preview the final result of movie. If you are happy with the effect, you can then press the big “Convert” button on the lower right to launch the conversion.
Conclusion: Wait a moment, and then the conversion will be done flawlessly. After conversion, click “Open Folder” button to locate the converted video files.
Source: http://digitalmediasolution.altervista.org/blog/edit-avchd-in-sony-vegas-pro/
Further Reading:
Summary: The following passage guides you how to convert Canon T4i/650D H.264 MOV footages to iMovie Apple Intermediate Codec encoded MOV file so that you can edit the Canon T4i videos in iMovie 8/9/10 without problems. The Canon EOS Rebel T4i Digital Camera is an ideal camera for any level photographer; combining both high quality imaging power and a wealth of functions that enable you to create beautiful imagery with ease. Full HD 1080p video is supported and features a full-time Movie Servo AF system for continuous auto focusing while using live view to record movies. When using one of Canon’s STM lenses, ultra-quiet and smooth performance is possible for fluid HD movie making.With every new camera, there are many new questions about workflow. The term “workflow” can be fairly broad, but today I am looking at importing Canon Rebel T4i (EOS 650D) footage into Final Cut Pro. The Canon T4i uses the same workflow as the Canon EOS series of cameras which includes the 550D (T2i), 600D (T3i), and 1000D (XS), because it records in the same H.264 MOV format. Although the tools for importing the footage have been updated by Canon, it seems not working well when ingesting T4i footage to iMovie. Below, I will throw a quick tutorial up on how to import videos from Canon T4i/650D into iMovie without the EOS Movie Plugin-E1.Software requirement: Pavtube HD Video Converter for Mac (review)This program is good at encoding camera shootings in different formats (H.264 MOV, MTS/M2TS, MXF, etc.) to video editing software compatible file types, i.e. AIC for iMoive, ProRes for FCP, and DNxHD for Avid Media Composer. In this guide, we will run it as a Canon MOV to iMovie Converter to convert Canon EOS 650D (Rebel T4i) to AIC for iMovie. More than dealing with Canon T4i recordings, you can also use it to handle H.264 MOV footage shot by Canon EOS 550D (Rebel T2i), Canon EOS 600D (Rebel T3i), and Canon EOS 1000D (Rebel XS).
 Other Download:- Pavtube old official address: http://www.pavtube.com/hd-video-converter-mac/- Amazon Store Download: http://www.amazon.com/Pavtube-Video-Converter-Mac-Download/dp/B00QI9GNZS- AppStore Download: https://itunes.apple.com/de/app/pavtube-hd-video-converter/id502792488?mt=12- Cnet Download: http://download.cnet.com/Pavtube-HD-Video-Converter/3000-2194_4-76177786.htmlHow to import Canon Rebel T4i (EOS 650D) MOV to iMovie for editing?Step 1: Download and have a quick installation. The trial version will have a watermark on your converted files. Except for that, there are no time limitation, no virus, and no unnecessary bundle apps while downloading. After that, click “Add Video” button to load your original files. You can load several files at once thanks to “Add from folder” button.
 Step 2: Click the “Format” bar to get the drop-down menu and you can get “iMovie and Final Cut Express”. Choose “Apple InterMediate Codec (AIC) (*.mov)” as output format.
 Step 3: Click “Settings” button to customize the output video and audio settings by yourself. But if you are not good at it, you’d better use the default parameters, they will ensure you a good balance between file size and image quality basically. You can change the resolution, bit rate, frame rate as you need.Step 4: Click “Convert” button on the bottom of the screen to start H.264 footage to AIC MOV conversion process. The amount of time it takes will vary based on your system’s hardware and the quality settings you selected.Conclusion: When the conversion is done, you can click “Open” to get your generated files. Now, you can edit H.264 footage in iMovie/FCE without any hassles.Further Reading:
Today here we are going to show you how to convert all 3D MTS Videos to 3D MOV/MP4/MKV/AVI format with SBS 3D Effect so that you can enjoy 3D .mts videos freely with best quality. Just with a professional 3D MTS converter, we can handle this job well. With the hotter and hotter well-developed 3D technology, more and more people are fond of watching the 3D movies with the vivid image, right? Have you got the experience of enjoying 3D movies? In the camcorder market, 3D camcorders may be the new hot devices; users buy 3D camcorders to record unusual videos. If you have got a 3D camcorder and recorded lots of 3D AVCHD MTS/M2TS files, you may want to watch the recorded 3D videos on HD TV, portable devices or just want to import these 3D AVCHD files in some NLEs for editing. However, it seems that 3D MTS has some problems.Hot Search: 3D MTS to YouTube | 3D MTS to FCP | Convert 3D MTS“My camera is a Sony DEV-5. The recorded format is AVCHD 3D/Progressive. It is a full HD camera, which means it captures 1920*1080 images. It would be my preference to enjoy my recorded 3D MTS videos on Windows or Mac at home. But as you know we need to convert the 3D MTS to others suitable for Mac/PC. I need some suggestions.”How to convert 3D MTS to SBS 3D MOV/MP4/MKV/AVI for playback smoothly?Not perfect enough, we here would like to introduce you the professional 3D MTS Converter—Pavtube MTS/M2TS Converter for Mac/Windows, which can meet the most people’s basic need. with it, user can convert 3D MTS to 3D AVI/WMV/MP4/DiVX/MKV HD video formats, and 3D mts to general 2D video formats for the convenience of view or playback it on your iPad, HDTV, Apple TV, Google TV and other traditional general 2D video Players (software player and hardware player). Other Download:- Pavtube old official address: http://www.pavtube.com/mts-converter-mac/- Amazon Download: http://www.amazon.com/Pavtube-MTS-M2TS-Converter-Download/dp/B00QIE3U0Y- Cnet Download: http://download.cnet.com/Pavtube-MTS-M2TS-Converter/3000-2194_4-76177029.htmlConvert 3D MTS to other 3D/2D video formats with several steps:Step 1: It supports importing the source .mts videos directly from SD, SDHC, MS and SXS card. support drag 3D mts from local files or click “Add Video” button to add 3D MTS videos.
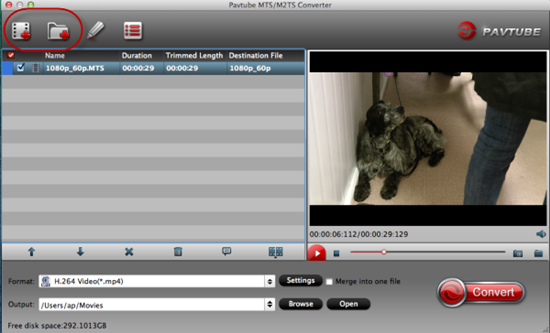 Step 2: Then we should come to the format output list and click the “Format bar” and choose a decent format as you need. For example, click “3D Video” for more items there such as the “MP4 Side-by-side 3D Video (*.mp4)”.
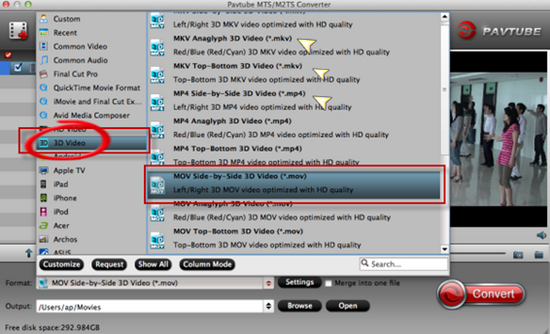 Step 3: If necessary, click option under “Edit” icon to start video editing with your 3D files. The supporting editing functions include the cropping frame size, trimming the length, adding watermark, and so on.Step 4: Finally, when you have done all the preparation work, it’s time to go back to the main interface to click the “Convert” item to end the work.Conclusion: You have no needs to wait for a long time cause this program has the faster conversion speed and easy operation to converting the 3D MTS files. Just enjoy yourselves with the high definition and vivid effects!Further Reading:
Canon C300 Mark II is a very hot camcorder on the market now. A lot of users choose to buy this excellent camcorder. It is a new camcorder with 4K internal video recording, which is aimed at beginners and semi-professionals who would want to upgrade to shooting 4K video without spending the big bucks for it. While as we often mentioned, as the incompatible one, MXF cannot be one of the best supported video formats for iMovie.
 Hot search: 4K MXF to YouTube/Vimeo/Facebook | 4K MXF to DaVinci Resolve | 4K MXF to Sony Vegas | 4K MXF to After Effects
Though Canon C300 Mark II camcorder can help you to record high quality 4K MXF footages, but usually it can make video editing a real nightmare. “I’ve got a ton of Canon C300 Mark II footage that I’m trying to import the C300 Mark II 4K MXF files to iMovie for further editing. Since the files come out natively as MXF, iMovie couldn’t recognize these files at all, let alone do the polishing work. What should I do?”
Some main formats that iMovie supported are allowed below:
Hot search: 4K MXF to YouTube/Vimeo/Facebook | 4K MXF to DaVinci Resolve | 4K MXF to Sony Vegas | 4K MXF to After Effects
Though Canon C300 Mark II camcorder can help you to record high quality 4K MXF footages, but usually it can make video editing a real nightmare. “I’ve got a ton of Canon C300 Mark II footage that I’m trying to import the C300 Mark II 4K MXF files to iMovie for further editing. Since the files come out natively as MXF, iMovie couldn’t recognize these files at all, let alone do the polishing work. What should I do?”
Some main formats that iMovie supported are allowed below:
 List of iMovie exported video formats:
 iMovie supports Apple InterMediate Codec (AIC) natively although, it is pretty picky with the codec of what it’ll accept. For those who need to edit Canon C300 Mark II 4K MXF in iMovie on Mac, we would recommend converting 4K MXF to AIC MOV before editing. As we mentioned above, AIC is iMovie’s favorite editing codec, which iMovie will read and handle well. In this way, you can expect a fast and fluid workflow between C300 Mark II 4K MXF and iMovie. How could we remove the troubles when editing C300 Mark II 4K MXF in iMovie? The process is surprisingly easy and can be done with the help of Pavtube iMixMXF. With this program, you can effortlessly encode/re-encode Canon C300 Mark II 4K MXF footage for smoothly importing and editing in various NLEs.
Other Download:
- Pavtube old official address: http://www.pavtube.com/imixmxf-mac/
- Amazon Download: http://www.amazon.com/Pavtube-Studio-iMixMXF-Download/dp/B00QI7MY4Y
- Cnet Download: http://download.cnet.com/Pavtube-iMixMXF/3000-2194_4-76171460.html
How to import Canon C300 Mark II 4K MXF to iMovie for further editing on Mac?
Step 1: Download and install the program from the website or click the free trial icon. Then, launch the best iMixMXF and load your original MXF files in with “Add video” or “Add from folder”. Directly drag files in is available.
iMovie supports Apple InterMediate Codec (AIC) natively although, it is pretty picky with the codec of what it’ll accept. For those who need to edit Canon C300 Mark II 4K MXF in iMovie on Mac, we would recommend converting 4K MXF to AIC MOV before editing. As we mentioned above, AIC is iMovie’s favorite editing codec, which iMovie will read and handle well. In this way, you can expect a fast and fluid workflow between C300 Mark II 4K MXF and iMovie. How could we remove the troubles when editing C300 Mark II 4K MXF in iMovie? The process is surprisingly easy and can be done with the help of Pavtube iMixMXF. With this program, you can effortlessly encode/re-encode Canon C300 Mark II 4K MXF footage for smoothly importing and editing in various NLEs.
Other Download:
- Pavtube old official address: http://www.pavtube.com/imixmxf-mac/
- Amazon Download: http://www.amazon.com/Pavtube-Studio-iMixMXF-Download/dp/B00QI7MY4Y
- Cnet Download: http://download.cnet.com/Pavtube-iMixMXF/3000-2194_4-76171460.html
How to import Canon C300 Mark II 4K MXF to iMovie for further editing on Mac?
Step 1: Download and install the program from the website or click the free trial icon. Then, launch the best iMixMXF and load your original MXF files in with “Add video” or “Add from folder”. Directly drag files in is available.
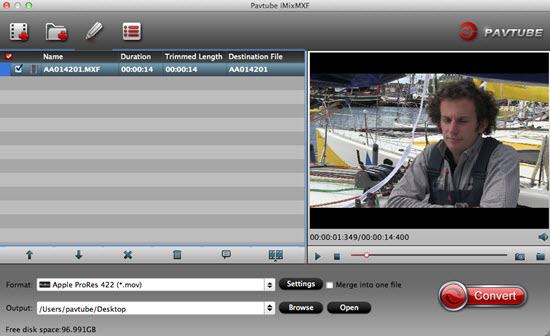 Step 2: Click the “Format” bar to get the drop-down menu and you can get “iMovie and Final Cut Express>>Apple InterMediate Codec (AIC) (*.mov)”.
 Step 3: Click “Settings” button to customize the output video and audio settings by yourself. But if you are not good at it, you’d better use the default parameters, they will ensure you a good balance between file size and image quality basically. You can change the resolution, bit rate, frame rate as you need.
Step 4: Click the “Convert” button on the main interface if you have done all the preparation work. This is the workflow that we need to convert 4K MXF to AIC MOV.
Conclusion: OK, everything is ready, you can get the generated files by clicking “Open” button and instantly edit Canon C300 Mark II 4K MXF files in iMovie.
Step 3: Click “Settings” button to customize the output video and audio settings by yourself. But if you are not good at it, you’d better use the default parameters, they will ensure you a good balance between file size and image quality basically. You can change the resolution, bit rate, frame rate as you need.
Step 4: Click the “Convert” button on the main interface if you have done all the preparation work. This is the workflow that we need to convert 4K MXF to AIC MOV.
Conclusion: OK, everything is ready, you can get the generated files by clicking “Open” button and instantly edit Canon C300 Mark II 4K MXF files in iMovie.
Source: http://digisns.com/2015/07/edit-4k-mxf-in-imovie/
Further Reading:
Summary: What’s the best way to work with Canon C100 Mark II AVCHD in FCP X? This article aims to give you an easy solution to edit C100 Mark II AVCHD in FCP X on Mac OS X (Yosemite included) without hassle.
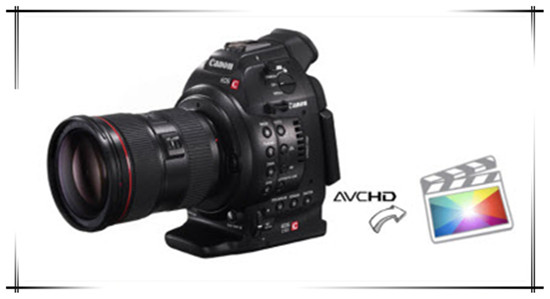 Canon C100 Mark II camcorder is unveiled not long ago, now many users have bought this camcorder. The C100 mark II uses super 35mm canon cmos sensor and a digic dv 4 processor, which are very excellent on the market. With this equipment, this camcorder can offer you better image quality. Besides, it also has many useful features.However, due to different reasons, people sometimes may encounter incompatibility issues one or another while importing and editing Canon C100 Mark II footage in FCP X. “Not long ago, I purchased the C100 Mark II camcorder. This device has helped me to record a lot of videos since I got it. Today I need to edit few of the videos in FCP X on Mac, so I tried to import the footages into FCP X, but it is disappointed to find that FCP X can’t recognize the AVCHD MTS files recorded by C100 Mark II. It is said the video format is not supported.”The Canon C100 Mark II is able to records 1080p videos with dual codec capability in AVCHD and MP4 container format. As we know AVCHD MTS format is great for recording footage from the camera, but it can be a challenge for editing. Although FCP X now has the ability to support MTS videos natively, it doesn’t mean you can edit MTS in FCP smoothly all the time. To solve those problems, the quick workaround is to convert Canon C100 Mark II AVCHD to FCP X best accepted format.Some main files formats recommended for Final Cut Pro:Video Formats: Apple Animation codec, Apple Intermediate codec, Apple ProRes(all versions), AVC-intra, AVCHD (including AVCCAM, AVCHD Lite, and NXCAM), DV (including DVCAM, DVCPRO, and DVCPRO50), DVCPRO HD, H.264, HDV, iFrame, Motion JPEG(OpenDML only), MPEG IMX(D-10), REDCODE RAW (R3D), Uncompressed 10-bit 4:2:2, Uncompressed 8-bit 4:2:2, XAVC, XDCAM HD/EX/HD422, QuickTime formats.Audio Formats: AAC, AIFF, BWF, CAF, MP3, MP4, WAVContainer Format: 3GP, AVI, MP4, MXF, QuickTimeStill-image Formats: BMP, GIF, JPEG, PNG, PSD, RAW, TGA, TIFFAccording to the information above, Apple ProRes codec, natively supported by FCP X, is highly recommended. Along with some help from third-party software to convert AVCHD MTS to ProRes, editing Canon C100 Mark II AVCHD in FCP X can be done effortlessly. The utility applied here is the professional Pavtube MTS/M2TS Converter for Mac which can be used as a top MTS/M2TS to ProRes Converter under OS X Yosemite. With it, you can effortlessly transcode AVCHD MTS/M2TS files to ProRes 422 encoded MOV for Final Cut Pro X, and it works well and converts flawlessly. Meanwhile, the Mac MTS conversion tool can create files compatible with various non-linear editing systems including Avid Media Composer, iMovie/FCE, and Adobe Premiere Pro, Premiere Elements, After Effects, etc. Other Download:- Pavtube old official address: http://www.pavtube.com/mts-converter-mac/- Amazon Download: http://www.amazon.com/Pavtube-MTS-M2TS-Converter-Download/dp/B00QIE3U0Y- Cnet Download: http://download.cnet.com/Pavtube-MTS-M2TS-Converter/3000-2194_4-76177029.htmlHere is a step-by-step tutorial for you to figure out your AVCHD MTS footage to FCP X problem:Step 1: Import Canon C100 Mark II files to Mac MTS Converter. Run it as the best Mac MTS Converter, and click the “Add video” button to load your original files. You may also directly drag and drop files to application UI for importing files.
 Step 2: Click the “Format” bar to get the drop-down menu and you can get “Final Cut Pro>>Apple ProRes codec”, including ProRes 422, ProRes 422 (HQ), ProRes 422 (LT), ProRes 422 (Proxy) and ProRes 4444. Choose the proper one you want. Here, we suggest you to choose “Apple ProRes 422 (*.mov)” as the best output format.
 Step 3: Click “Settings” button to customize the output video and audio settings by yourself. But if you are not good at it, you’d better use the default parameters, they will ensure you a good balance between file size and image quality basically. You can change the resolution, bit rate, frame rate as you need.Step 4: When everything is ready, click “Convert” to start converting C100 Mark II AVCHD MTS to ProRes MOV. This Mac MTS/M2TS Converter supports batch conversion so you may load multiple files and convert them at one time.Conclusion: After converting, you can get the generated files by clicking “Open” button. Now, you can edit Canon C100 Mark II AVCHD footage in FCP X freely.
For some people who usually record their game videos or other full Desktop screen record, this app totally works well. The install space is small but output quality is very sharp. The recorded videos came from Bandicam usually goes to AVI or WMV. Those formats are compatible with most devices. But since those formats are both “Container” formats, the codec in this “Container” may disorder in it. If you want to do some following edits or stream AVI files into your Table, phone just for watching, some unexpected errors may show up. Let’s take the Sony Movie Studio as an example. Many users who owned both Sony Movie Studio and Bamdicam will encounter this problem which the AVI files from Bandicam can’t be imported in the Sony Movie Studio. That was so frustrating, for Sony Movie Studio do support the AVI format.Tips: Related reading for AVI: Stream AVI files in Xbox OneAbout those AVI can’t import problem, how to solve it? Here are two ways for you to take.1.Use Bandicam MPEG-1 decoderBecause this AVI format is called “Container” formats, you should first figure out what the inner codec in it. That codec was used to encode your video and audio. How to identify the inner codec? Here is a simple app which can help you, it’s called Mediainfo. That small app is free and when you drag your source video into it, clearly inner info will show up.After figured out what the inner codec in this “Container” then download the Bandicam MPEG-1 decoder to fix your shortage or disorder problem about your codec. This way is simple and easy to tackle the problem if your inner codec is MPEG. But sometimes the codec which used to compress your videos is not MPEG, maybe it’s XviD or other codec. What should you do to solve it? If your inner codec is XviD, then you can go for this configure app named ffdshowwhich can help you decode/encode many video and audio formats, including DivX and XviD . After install and run it your problem will be solved.2. Powerful third-party all-in-one converter appAfter all those steps , if your problem still can’t be solved then I recommend you to go for some third-party converter apps. Most third-party converters have numerous codec in it. So you don’t have to look for the corresponding codec your video used. Here strongly recommend this Pavtube Video Converter, which is an all-in-one converter app with powerful inner decoder. It also has Mac version, Pavtube Video Converter for Mac, which can run on Yosemite system smoothly. Other Download:- Pavtube old official address: http://www.pavtube.com/video_converter/- Amazon Download: http://download.cnet.com/Pavtube-Video-Converter/3000-2194_4-75734821.html- Cnet Download: http://download.cnet.com/Pavtube-Video-Converter/3000-2194_4-75734821.htmlThe detailed workflow of using Video Converter to convert AVI files then import into Sony Movie studio.
Step 1: First, go to the Pavtube Official website to download this Video Converter then install it step by step. Second, load your AVI files. You can load them by click the “Folder” or “Video” icon on this program’s main UI. Or click “File” > “Add Video/Audio”. Directly drag your video into this software is also very convenient if they are on your desktop.Step 2: After loading your AVI files successfully, click the format bar to choose the output format you want. In this case, the Sony Movie Studio is our target format, which you can type “Sony Vegas” in the search box on the right-down corner of the format bar UI. Then choose “Adobe Premiere/Sony Vegas” > “MOV (AVC) (*.mov)” as your output format. Step 3: Then you can go to “Settings” UI to adjust your Bit rate or Frame rate if you want. Some previous simple edits can be done with the build-in editor. Click this “Pencil” icon in main UI, it will bring you to a interface, in this place, you can trim your clip by moving tow red arrows easily. Add your watermark, subtitles, background music; turn “Interlaced” into “Progressive” etc.If you want to stream your video clip to your Table or your phone so that you can enjoy them whenever and wherever you want, just choose the correct format your devices support. Or select brand name your device on the format list, such as Samsung, iPhone. Then you can enjoy the video without any quality drop or lagging.
Step 4: After all have been settled, choose the output folder with enough storage space then hit “Convert” button to start your conversion. Also in the drop-down menu of “Tool”, you can speed up your conversion by clicking “Acceleration”. Or choose to convert bunch or your videos at the same time.Conclusion: After the conversion, I don’t know if you have found it could be much easier for us to converting out Banddicam AVI files. So here you have my words that the question, Sony Vegas Studio 11 won’t open Bandicam AVI videos? Solved!Further Reading:
VLC media player (commonly known as VLC) is a portable, free and open-source, cross-platform media player andstreaming media server written by the VideoLAN project.
When you got some MKV videos, and want to play them in VLC media player. You would meet some issues, such as: MKV audio can not be identified by VLC Media Player, subtitles load error, play slowly and so on. The reason for these problems is that MKV is more complex encoding.
To solve the problem, there is an universal solution: Install appropriate codec pack. There are various free codec packs online which will allow us to decode and play MKV files. The disadvantage of this approach is that you have to download a lot of codecs but if you are only trying to play one type of video file. Another shortcoming is these codecs not always work well.
Here, I recommend this simple and easy way: Using Pavtube Video Converter which is a perfect converter for converting 720p, 1080p MKV and MKV with dts/ac3 5.1 channel audio into VLC without any problems.
Other tools: MKV Players
Related conversion: Blu-ray to M3U8 in VLC, H.265 to VLC, M4V to VLC,
With Pavtube Video Converter, you’ll have free access to watching SD videos (e.g. YouTube FLV/F4V, MP4, AVI, etc), digital camcorder recordings (e.g. MXF, MTS AVCHD, MOV, MP4, etc), Tivo, audio files (e.g. MP3, MP2, WMA, FLAC) on devices such as Apple/Android/Windows series, media players, game consoles, etc.In addition to various common audio/video files, Pavtube Video Converter is also able to output compatible video formats for editing programs (e.g. Final Cut Pro, Final Cut Express, iMovie, Avid, Adobe Premiere, etc).
Notes: If you are Mac user, you can use the Mac version.
Then, follow the steps to convert MKV for playing in VLC Media Player.
Other Download:
- Pavtube old official address: http://www.pavtube.com/video_converter/
- Amazon Download: http://download.cnet.com/Pavtube-Video-Converter/3000-2194_4-75734821.html
- Cnet Download: http://download.cnet.com/Pavtube-Video-Converter/3000-2194_4-75734821.html
Step 1: Once run the program, click "Add video" button to load the MKV files. The program supports batch conversion, so you are allowed to add multiple files to convert at a time. Meanwhile, if you wanna combine several files into a single file, you can tick off the checkbox "Merge into one file".
 Step 2: Just click the "Format">"HD Video", then click the “H.264 HD Video(*.mp4)”
 Step 3: After selecting the format easily, you can click "Settings" to adjust Bitrates (kbps) and Size (pix). Don't forget the balance between video quality and size.
Moreover, Pavtube Video Converter also allows you to customize profile settings to get a desired and better output. Movie creation with this program is no big deal. You can edit your video files by trimming, cropping, attaching external subtitles, adding watermarks, change video effect, etc
Step 4: Click the red "Convert" button, start the conversion. And find the destination file by clicking "Open". After you get the transferred MKV file, you can play the video in VLC player without any sound issues and problems subtitles. Have a try and have fun!
Further reading:
Step 3: After selecting the format easily, you can click "Settings" to adjust Bitrates (kbps) and Size (pix). Don't forget the balance between video quality and size.
Moreover, Pavtube Video Converter also allows you to customize profile settings to get a desired and better output. Movie creation with this program is no big deal. You can edit your video files by trimming, cropping, attaching external subtitles, adding watermarks, change video effect, etc
Step 4: Click the red "Convert" button, start the conversion. And find the destination file by clicking "Open". After you get the transferred MKV file, you can play the video in VLC player without any sound issues and problems subtitles. Have a try and have fun!
Further reading: