This blog helps you keep in tough with colorful digital life by providing newest technology including Canon/Panasonic/Sony/Nikon/JVC etc. camcorders & cameras and tips for editing media files like xavc, mxf, mov, etc.
Summary: No more worries about importing H.265 videos to Premiere Pro CC for editing from Samsung NX1 camcorders if you read this article below. This article teaches you how to convert H.265(HEVC) video to Premiere Pro edit-friendly format for smooth workflow. We are seeking the best H.265/HEVC decoder here.
Since H.265 footage like from Samsung NX1 can’t be recognized by Adobe Premiere Pro CC on Mac Yosemite due to its best supported video formats, some related questions are asked on some forums. For example:
“I feel well because the new Samsung NX1 camcorder can shoot the H.265 recordings so nicely. But it seems wrong when I wanna edit them in Premiere Pro. Such as the ‘errors’ and ‘unsupported message’ always appear on the screen. Any good measures?”
How to easily import Samsung NX1 H.265 videos to Premiere Pro CC on Yosemite? Method 1: Cinemartin Cinec Plin---third-party tool to work H.265 well with Premiere Pro CC. It’s the new plugin from cinemartin for Premiere Pro that allows users to export Adobe Premiere Sequence Timeline to several output videos including the Apple Prores codecs, and the new HEVC H.265. Just look the following video display as good reference.
Method 2:Professional H.265 decoder for Premiere Pro CC---Pavtube Video Converter for Mac. (Windows version) Here we can also introduce you a professional H.265/HEVC videos converter to help you a lot. With the latest version upgraded, it can decode and encode the H.265/HEVC videos well, also, other common video formats are included. For editing NX1 H.265 movies nicely in Premiere Pro CC, it’s not a big deal to convert the H.265 to MPEG-2 .mpg now. Let’s download this Samsung NX1 H.265 Video Converter and start transcoding.
Learning course of converting Samsung NX1 H.265 to MPEG-2 MPG for Premiere Pro CC:
Step 1: After you install the H.265/HEVC decoder correctly on your computer, drag you files in this program directly or with two adding buttons. “Add video” and “Add from folder”.
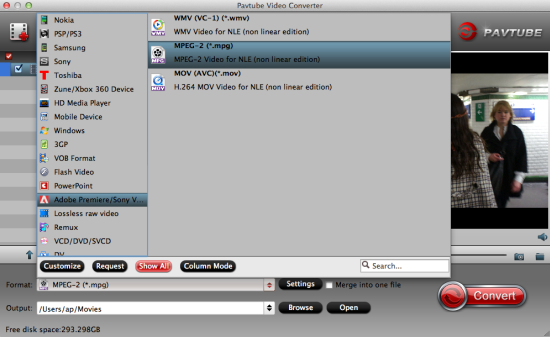
Step 2: Come to the output list and choose “Adobe Premiere/Sony Vegas>>MPEG-2 (*.mpg)” as the best video format for editing Samsung NX1 H.265 files in Adobe Premiere as well as good video quality.
Notes: For other NLEs as output? Such as H.265 to FCP or media devices like H.265 to iPhone 6,etc. All these output items we can easily find on the output list.
Step 3: Adjust the video and audio parameters, including the Bitrates of Video & Audio, Video Size, Sample Rate, Frame Rate, Audio Channels, etc., by clicking the “Settings” button on the main interface for getting the best quality.
Step 4: Finally, if you get back to the main interface, we are going to hit the big icon “Convert” to get the work started.
Summary: Facing problems when importing Panasonic HX-A1 MP4 to After Effects? Fortunately, there is an easy way to fix the issue. If you are in such issue, read on to get the quick solution.
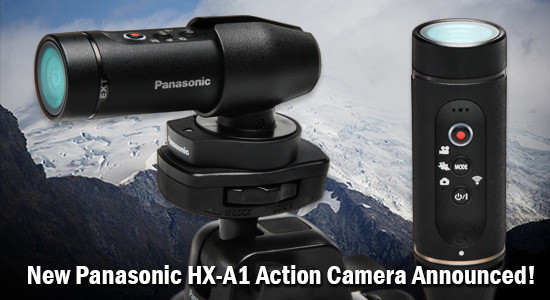
Panasonic expands its line of wearable POV action cameras with the new HX-A1. The camera is incredibly lightweight, at only 1.6 ounces, yet has a rugged design that can withstand harsh environments. It is waterproof to depth of 5' without an additional housing, shockproof from drops of up to 5', dust proof (IP6X), and freeze proof to 14°F. This “quad-proof” design makes the A1 an ideal choice for nearly any action sport or adventure. It sports a cylindrical design that can be mounted in a variety of positions for hands-free action footage.
When got some recordings generated from Panasonic HX-A1, some people would choose to edit these videos before sharing. For Windows user, After Effects is the best choice. Whereas, most of us having no luck with After Effects. It fails to accept Panasonic HX-A1 recorded MP4 files still. Related:HX-A1 MP4 to YouTube
Adobe After Effects is a digital motion graphics, visual effects and compositing app developed by Adobe Systems used in the post-production process of filmmaking and television production. Actually, After Effects like CS4, CS5, CS6, CC supports MP4 natively. However, MP4 codec is a final delivery codec, it is not one you want to use for editing. Thus, there are many video, audio codec problems while importing MP4 video into After Effects for editing. Plus, even the Adobe program can ingest your MP4 files directly, it takes a long time for rendering. The best method to avoid those problems and save time is to convert MP4 to a more editing-friendly format, such as AE's MPEG-2 (the most compatible video format for AE).
Along with the help of Pavtube Video Converter, you can complete the task effortlessly. It supports creating high quality MPEG-2 video for After Effects and all the Adobe products at super fast speed effectively.
How to import Panasonic HX-A1 MP4 to After Effects for editing?
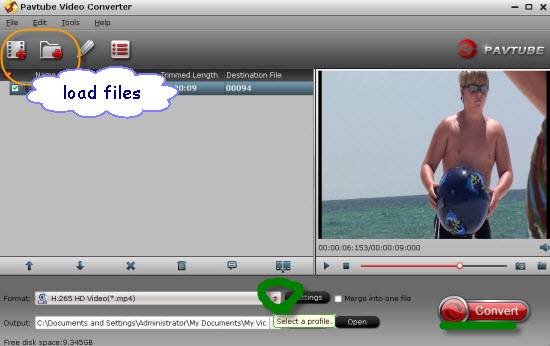
Step 1: As soon as you download and install the program, launch it and when the main interface pops up in front of us, just click the “Add Video” or “Add from Folder” to let in.
Step 2: Click the drop-down list in the format line to get the format box. Then choose “Adobe Premiere/Sony Vegas>>MPEG-2 (*.mpg)” as output format.
Step 3: Click “Settings” button to customize the output video and audio settings by yourself. But if you are not good at it, you’d better use the default parameters, they will ensure you a good balance between file size and image quality basically. You can change the resolution, bit rate, frame rate as you need.
Step 4: After that, click “Convert” to start the Panasonic HX-A1 MP4 to After Effects MPEG-2 conversion.
Conclusion: After conversion, you can get the generated files by clicking “Open” button. Now, you’ll get no troubles in editing HX-A1 MP4 in After Effects.
Summary: Having issues when import and edit Sony PXW-FS7 4K XAVC footage in Final Cut Pro 6/7/X? Looking for some tips regarding Sony PXW-FS7 4K XAVC workflow in FCP? You are in the right place. In this page, I will share an efficient way to edit Sony FS7 XAVC files in FCP.
The newly released Sony PXW-FS7 has won lots of attractions from videographers in that it delivers long-form recording capabilities with 4K resolution in a compact, hand-held design. Videographers must be excited once they get to know that Sony PXW-FS7 can record videos into 4K. And they are eager to edit 4K videos in FCP to get some superb masterpiece to spread the world. However, it is a pity that FCP hardly supports 4K raw Sony PXW-FS7 XAVC files. Tips:FCP supported video formats
I’m searching for a solid answer for the Sony FS7 to FCP issues. When I opened FCP on Mac, the footage from my Sony PXW-FS7 cannot be recognized. I had searched the method and tried the Log and Transfer, but still failed. An alternative way I found to get Sony FS7 XAVC to FCP flawlessly is to convert XAVC to ProRes. I’ve tried the workaround. Yes, it works.
Generally, we can use Log and Transfer or Log and Capture to import videos to FCP for editing. But the new XAVC codec is not supported well by Final Cut Pro. Since, Apple ProRes is the most compatible codec for FCP, so if we want to edit Sony FS7 XAVC in FCP, it is necessary to convert those already shot XAVC files to ProRes .mov using third-party software. Here, you can depend on Pavtube HD Video Converter for Mac. With this best 4K XAVC converter, besides FCP, it can also export DNxHD for Avid MC, MPEG-2 for Adobe Premiere Pro, AIC for iMovie and more NLEs for native editing.
Tutorial on converting Sony PXW-FS7 4K XAVC to FCP:
Step 1: Launch the 4K XAVC to ProRes Converter on your Mac, and then click the “Add video” button to import your 4K XAVC files from Sony PXW-FS7 directly. In order to import several files at one time, you can click “Add from folder” button.
Step 2: Click the “Format” bar to get the drop-down menu and you can get “Final Cut Pro>>Apple ProRes codec”, including ProRes 422, ProRes 422 (HQ), ProRes 422 (LT), ProRes 422 (Proxy) and ProRes 4444. Choose the proper one you want. Here, we suggest you to choose Apple ProRes 422 .mov as the best output format.
Step 3: Press the “Settings” icon and you’d better set the video frame rate as 30fps, video size as 1920*1080 for editing Sony FS7 XAVC in FCP easily.
Step 4: Now, click "Convert" and let it go. The XAVC to FCP Converter for Mac supports batch conversion. So if you have lots of XAVC videos to convert, check “Shut down computer after conversion” and you can go away without keeping an eye on it.
Conclusion: Once the conversion process shows in 100%, click “Open” to get the output videos. Create a project and start Sony PXW-FS7 editing 4K XAVC files in Final Cut Pro with light speed.
Keynote, developed by Apple Inc as a part of the iWork family, is a software application used in making presentations. The latest Keynote 6.0 has made a reimagined leap forward in which the developer added some new features, a new user interface, vastly improved file compatibility with iOS platforms and Microsoft PowerPoint, new themes, effects and animation, and great export options.
There are so many funny and interesting videos on YouTube, have you ever thought that use them to make your presentation more vivid and cogent? For Mac users Keynote is really a good tool to do presentation, so if you can insert YouTube Videos to Keynote, you will make it!
However, although Keynote has a lot of new changes, it is still a hard time for users to embed YouTube video to Keynote when they want readers to understand what the presentation is expressing without making further explanation because Keynote now does not accept embedded videos within a presentation. Related:Import AVCHD Files to Keynote
What movie and video file types will play in Keynote? Keynote uses QuickTime to display content, so if you can open it in QuickTime Player and play it with no problems, you should be able to use it in Keynote (except, of course, protected videos from the iTunes).
Media formats supported by QuickTime Player:
Thus for the purpose of figuring out the solution, we need to use a third-party software to convert the YouTube videos to the format that we need for the Keynote presentation. Here you can highly depend on Pavtube Video Converter for Mac (review). It has a good reputation online that can solve almost all the video format conversion troubles for our users. Even for the latest codec H.265/HEVC, it can hold well. Besides, it also supports encoding to M3U8.
How to embed YouTube video to Keynote on Mac OS X El Capitan?
Step 1: Download and have a quick installation. The trial version will have a watermark on your converted files. Except for that, there are no time limitation, no virus, and no unnecessary bundle apps while downloading. After that, click “Add Video” button to load your downloaded YouTube videos. You can load several files at once thanks to “Add from folder” button.
Step 2: Select the right formats for playing on Keynote. Here we suggest you to go to the “Common Video” list, you will get the “MOV- QuickTime (*.mov)” as the best output.
Step 3: Adjust video and audio parameters, including the bit rate of video and audio, the codec of video and audio, video size, sample rate, frame rate, audio channels, etc., in the Profile Settings by hitting “Settings” button.
Step 4: Click “Convert” button to start YouTube video to QuickTime MOV conversion for Keynote presentation. You can get the generated files by clicking “Open” button.
Conclusion: If you don’t want to wait for the entire conversion process, you can tick off “Showdown computer when conversion completed” and go away to do other things. Pavtube Video Converter for Mac is great, safe and easy to use. YouTube video can be workable with Keynote now. Continue proceeding with the following steps to finish the rest. -Open Keynote. -Click on “Insert” tab and select “Choose” and then choose the video file that you want to add. -Click “Insert” button and the video will then appear on Keynote.
Summary: We have known that FCP X won’t deal with 4K video instantly- having to wait for rendering. Why not get an easy workaround to convert AJA Cion 4K video to a more “edit” friendly codec- Apple ProRes for FCP X? Here is how.
4K is a new resolution standard designed for digital cinema and computer graphics. It has following advantages: higher image definition quality, more detailed picture, better fast-action and larger projection surface visibility. Although it has been possible to create 4K timelines in Final Cut Pro X, smooth editing AJA Cion 4K video in FCP X still requires instant playback of more than one stream of video footage at once.
Up until now, one strategy of dealing with 4K high quality video on systems that are too slow: wait for the computer the render the video to a single combined clip which can then be played back. If you want to avoid the long-time rendering, another solution is to convert 4K video to ProRes, which is natively supported by FCP X.
Some main files formats recommended for Final Cut Pro: Video Formats: Apple Animation codec, Apple Intermediate codec, Apple ProRes(all versions), AVC-intra, AVCHD (including AVCCAM, AVCHD Lite, and NXCAM), DV (including DVCAM, DVCPRO, and DVCPRO50), DVCPRO HD, H.264, HDV, iFrame, Motion JPEG(OpenDML only), MPEG IMX(D-10), REDCODE RAW (R3D), Uncompressed 10-bit 4:2:2, Uncompressed 8-bit 4:2:2, XAVC, XDCAM HD/EX/HD422, QuickTime formats.
All in all, to smoothly import AJA Cion 4K video to FCP X, you’d better to convert 4K video to FCP X totally compatible formats as we searched above. To get the job well done, we need to use an all-in-one program- Pavtube HD Video Converter for Mac (review), applying which you are capable of converting AJA Cion 4K video to ProRes format, the compatible video format with FCP X, with lossless quality at faster speed so that you can edit 4K videos in FCP X without any problem.
How to convert AJA Cion 4K video to FCP X for editing?
Step 1: Download and have a quick installation. The trial version will have a watermark on your converted files. Except for that, there are no time limitation, no virus, and no unnecessary bundle apps while downloading. After that, click “Add Video” button to load AJA Cion 4K video. You can load several files at once thanks to “Add from folder” button.
Step 2: Click the “Format” bar to get the drop-down menu and you can get “Final Cut Pro>>Apple ProRes 422 (*.mov)” as output format.
Step 3: Click “Settings” button to customize the output video and audio settings by yourself. But if you are not good at it, you’d better use the default parameters, they will ensure you a good balance between file size and image quality basically. You can change the resolution, bit rate, frame rate as you need.
Step 4: Click “Convert” button on the bottom of the screen to start AJA Cion 4K video to ProRes MOV conversion process. The amount of time it takes will vary based on your system’s hardware and the quality settings you selected.
Conclusion: When the conversion is done, you can click “Open” button to get the generated video files. Now, you can edit AJA Cion 4K video in FCP X freely.
Question: “Hi, I am using a FCP 7 Studio. I recently bought a Sony PMW-300 camcorder. The MXF files coming out of this camera are not recognized by FCP 7. Is there a way to handle this without converting the files? Is it possible to edit MXF files in FCP 7 directly?”
Answer: If you want to edit Sony PMW-300 MXF footage in FCP 7, you will need to use the Sony XDCAM Transfer Utility to rewrap the PMW-300 XDCAM MXF into QuickTime’s files. However, due to different computer environments, this would not always work as expected. In this case, you will need to convert Sony PMW-300 XDCAM MXF to Apple ProRes for FCP as we should know the best supported video formats for FCP.
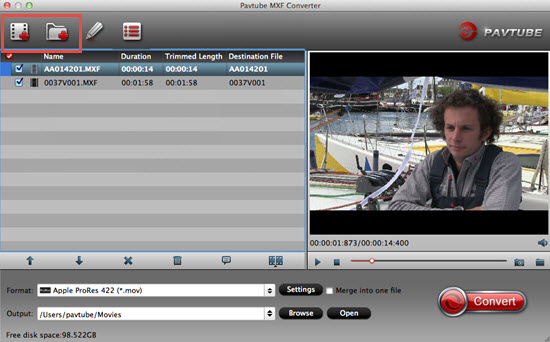
Due to the causes we mentioned above, is there any good solutions we can take as the good reference? Fortunately, we still have the professional MXF to FCP converter called Pavtube MXF Converter for Mac, which is a converter program designed for transcoding HD media, including camera and camcorder videos files to whatever format you need with best video and audio synchronization. With this little tool, you are able to convert some incompatible codec videos to FCP for editing, such as XAVC, MKV, etc.
How to transcode Sony PMW-300 XDCAM MXF files for editing with FCP 6/7?
Step 1: Launch the program and click the “Add Video” button to load PMW-300 MXF files for converting.
Step 2: Click on the “Format” and you will get a drop down menu and then select “Final Cut Pro >>Apple ProRes 422 (*.mov)”, which is the best format for Final Cut Pro.
Step 3: (Optional) Click “Settings” to set video resolution (1920*1080/1440*1080/1280*720/720*480), bitrate (from 1Mbps to 20Mbps), frame rate (24p/30p) as you like. To deinterlace, crop, trim XDCAM HD MXF video, click “Edit” menu.
Step 4: Finally after above settings, hit “Convert” button to start transcoding Sony PMW-300 MXF to ProRes for directly importing to FCP 6/7.
Conclusion: Additionally, here is also the guide on how to transfer files into FCP 6/7 for editing, you can read more. If you wanna convert your MXF files with multiple audios preserved, why not take this iMixMXF as a try?
In this article , detailed steps about how to set up the Gear VR for enjoying 3D videos on Note 4 and for some unknown problems like non-supported videos and turn 2D to 3D for Note 4 will also dig a little. Virtual 3D world is on its way, just grab it and follow this 3D wave.
Gear VR is a 3D virtual reality headset which allows you to experience a virtual reality like ever before. This gear was promoted by Samsung Company which is a big hit on the 3D market. You can enjoy the 3D videos on Note 4 via Gear VR no matter where you are, you don’t have to purchase a bulky 3D TV to follow the 3D wave and you can still enjoy the 3D videos even when you travel away.
First, we have to figure that this Gear VR don’t have much technical support for there need Note 4 plays as its brain and screen. And you must wonder how to watch 3D videos on Note 4 via Gear VR, since some 2D or non-supported videos can’t turn themselves into 3D videos by this Note 4. Here you may need the 3D videos to Gear VR Converter to help you.
How to watch 3D videos from Galaxy Note 4 via Gear VR? (h2)
Step 1: Launch this 3D videos to Gear VR Converter on your Mac. This app can support El Capitan without any hassle. And no other bundle apps hide in this install package. After installing this app, then you can load your videos by clicking “File>>Add Video”.
Tips: During the installation, if one error message pop up “unidentified developer”, please follow these steps to tackle this problem: 1. Launch System Preferences from the Apple menu 2. Choose “Security & Privacy” and then click the “General” tab, followed by clicking the lock icon in the corner to unlock the settings 3. Look for “Allow applications downloaded from” and choose “Mac App Store and identified developers” 4. Accept the security warning and allow 5. You can now launch any app from any location or developer And this step won’t make your Mac be a vulnerable one, if you not sure about it , after the installation, you can change your settings back for sure.
Step 2: Choose 3D Side-by-side to playback on Note 4 via Gear VR. If your videos are 2D or non-supported videos, then you can change them into the most suitable files for your Note 4 and your Gear VR. Just click “Format” to this “3D Video>>Mp4 Side-by-Side 3D Video (*.mp4)” for a compatible feature.
Step 3: Adjust the parameters if you need. If you want to make your 2D into 3D HD videos, here you can click “Settings” to improve the quality of your source videos for more vivid 3D viewing experience. You can go for 1920*1080p for your output videos.
Step 4: Start to transcode files to 3D for playing on Note 4 via Gear VR. After setting the file location, then you can click the “Convert” to start your conversion, which the conversion time depends on the file size and the parameters. If you forget about the file location, you can click this “Open output folder” to check your converted files.
To view your SBS 3D videos on your Gear VR, follow these steps: 1. On your Micro SD card file directory, navigate to Oculus>Movies> Your Movies 2. Create a new folder within “Your Movies” and label it “3D” 3. Import or move your SBS 3D videos into your newly created “3D” folder
Once you have created your 3D content folder and imported compatible video files, insert your MicroSD card into your Galaxy Note 4 (if it isn’t already), dock the phone in your Gear VR, and don the virtual reality headset. Then:
1. Navigate to Oculus Cinema from the main menu 2. Navigate to “My Videos” from the Oculus Cinema content library menu Select the 3D video you wish to view (if you followed the above steps it should have a “3D” label in the upper righthand corner) 3.Choose the cinema mode to begin playback
Now you can enjoy the 3D videos with Note 4 via Gear VR as you like. Just jump into this wonderful virtual viewing experience!
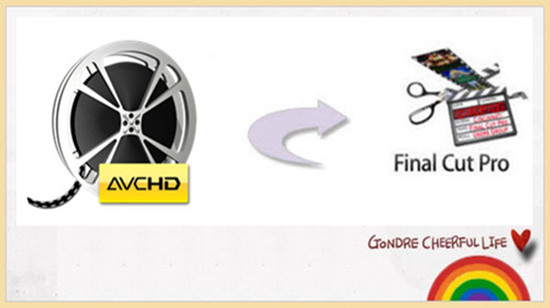
Have captured lots of video clips with your HD camcorder during a trip, a party or a family get-together? Don't you want to recall the best moments on your mobile device and take them on the go? However, camcorders like Sony, Canon and Panasonic record video in AVCHD MTS/M2TS format. It is a file-based format for the digital recording and playback of high-definition video. Although Apple’s new operating system- Mac OS X El Capitan brings new vigor to your Mac computer, you may have to face the roadblock when editing and playing AVCHD MTS/M2TS files in FCP on Mac.
AVCHD is a highly compressed format that produces video file with a .mts file extension. Anyone who has tried to edit these files in FCP has quickly found out that they almost never playback smoothly within the software. Instead, the playback is very choppy and the audio doesn’t match the video.
As a result, people think something is wrong with the video or the camera. Actually, both of them are fine. It’s just that your computer doesn’t have the horsepower to playback your AVCHD video file in real-time. AVCHD video requires heavy decoding (i.e. a lot of computer resources), more than most computers can handle while simultaneously providing real-time playback. So you get choppy images and mismatched sound. On the other hand, AVCHD files are not ideal format for FCP natively editing. Someone said that there is no playback issues between AVCHD and FCP because when importing AVCHD footage, FCP will automatically convert the video to ProRes 422 format. But it will take longer to import. Instead of buying a new computer and avoid rendering time, an affordable and quick solution is to convert AVCHD MTS/M2TS files to FCP best supported one, which is much easier for your computer and editing software to handle with third-party software.
Step 1: Run the program as the best Mac MTS Converter, and click the “Add video” button to load your original files. You may also directly drag and drop files to application UI for importing files.
Step 2: Click the “Format” bar to get the drop-down menu and you can get the suitable output format from the optimized presets. If you want to edit AVCHD MTS/M2TS files in FCP, you’d better choose “Final Cut Pro>>Apple ProRes 422 (*.mov)”.
Step 3: Click “Settings” button to customize the output video and audio settings by yourself. But if you are not good at it, you’d better use the default parameters, they will ensure you a good balance between file size and image quality basically. You can change the resolution, bit rate, frame rate as you need.
Step 4: When everything is ready, click “Convert” to start converting AVCHD MTS/M2TS to ProRes MOV. This Mac MTS/M2TS Converter supports batch conversion so you may load multiple files and convert them at one time.
Conclusion: After converting, you can get the generated files by clicking “Open” button. This program is highly efficient because it’s boosted with CPU and GPU (30X faster). And a neat process bar will show the percentage and remaining time. Now, you can edit AVCHD files in FCP without choppy issues.